328 | Optimising Cold Start - Maxx ECU
Summary
In this webinar we’ll be looking at the process of optimising the cold start parameters in a Maxx ECU. For this webinar we’ll be using our Honda City race car.
| 00:00 | - Hey team, Andre from High Performance Academy, welcome to another webinar and in this webinar we're going to be diving into MaxxECU, specifically we're going to be dealing with cold start tuning. |
| 00:12 | While I'm going to be focusing on cold start tuning, there's a little bit of crossover here because we can't really deal with the cold start tuning without also dealing to a degree with our idle speed control. |
| 00:23 | And as we'll find out as we get into this webinar, there's a couple of issues with our test car that make this a little bit trickier but again I'll explain as we go. |
| 00:33 | Now as usual we're going to be having a Q&A session at the end of this lesson so if you do have any questions on anything I'm talking about in the lesson, please ask those in the chat and we'll get into those closer to the end. |
| 00:45 | For a start, what is cold start tuning, why do we need to consider it, why do we need to care about it and what are we actually trying to achieve here? Well this is one of the elements that I found is so often overlooked and I think it's overlooked for two purposes, or two reasons. |
| 01:04 | One is that tuners do not understand what they're actually trying to achieve and how they should go about achieving it when it comes to the cold start tuning and the other element sadly is I think there's an element of laziness that creeps in here. |
| 01:18 | In order to do a good job of cold start tuning, it is time consuming. |
| 01:23 | As we'll learn, the problem we can't do the cold start tuning until the rest of the tune is complete and of course when the rest of the tune is complete, the engine is hot so we can't do our cold start tuning so this straight away means that we must as a professional tuner, have the car at least for two days. |
| 01:44 | And that's what I did when I was running my workshop, any time we had a car booked in for a tune, it would be an overnight exercise and essentially we would complete the dyno work and the road calibration on the first day and then we'd allow the engine to cool down properly, completely overnight and then we'd address the cold start and idle speed elements of the cold start tuning the next day when the engine was truly cold. |
| 02:08 | The problem with this is even then this really only gives you one good crack at getting the cold start tuning dialled in and if you strike some problems, obviously by the time you're halfway through, the engine's at 50 or 60°C operating temperature, you've lost the opportunity to look at what's happening at 10 to 20° and it's going to take several hours for the engine to truly cool down. |
| 02:32 | So it is difficult, so I do understand that. |
| 02:35 | The other element that is something we shouldn't overlook is that if you live in a part of the world where you get quite vast variations in summer to winter temperatures, if you are doing the cold start tuning in the middle of summer, even in the mornings the coolant temperature might only get down to 15 to 18°C and obviously then you get into winter like we do here in Queenstown and we end up with temperatures sub zero. |
| 03:03 | That's an area of the cold start mapping that we clearly just can't even get access to when we're in the middle of summer. |
| 03:11 | Yes we can extrapolate our results down and take a good guess at what it's going to be but we don't get the ability to do that so quite often I would also have customers bring cars back when it did get colder in winter and I would recalibrate that area and I'd do that free of charge so it's a bit of an understanding here of also educating your customer if you're doing this professionally so that the customer knows if something goes wrong when we get into winter, those colder temperatures, this is why it's happening and this is how we can deal with it. |
| 03:41 | So they don't end up bad mouthing you all over town and instead bring the car back, have an adult conversation about it, get it dialled in properly and get a good result that everyone's happy with. |
| 03:52 | So what are we actually trying to achieve here, well essentially what I'm always trying to achieve is to match as well as I can, factory like cold start performance. |
| 04:02 | What I mean by this is I want a car where in the middle of winter when it's sub zero and there's snow on the ground, I can reach in through the driver's window, turn the key and the engine's going to start and it's going to idle by itself, I don't have to nurse it for five minutes with my foot on the throttle and if I do jump in it when it's stone cold straight after it's started and try driving up the street, it's going to drive smoothly and basically act and respond just like a factory car. |
| 04:29 | That is what I am trying to achieve. |
| 04:31 | Now that isn't always entirely possible. |
| 04:34 | Some of this does come down to the mechanical state of the car. |
| 04:39 | So the performance of the car during startup and cold start is going to be a little bit more questionable if you've got some really big nasty aggressive cams with a lot of duration and overlap, that's a given most people can understand that. |
| 04:53 | The other element which we're going to dive into with this car is it is a racecar so it actually has no idle speed controlled motor so this obviously means there's going to be some limitations in what we can achieve with the cold start specifically around the idle speed control but there's still some ways we can deal with that. |
| 05:12 | Next element is why do we need cold start enrichment, what is the purpose of this and why can't we just run the ECU with the main fuel map and call it good? Well there's a variety of things going on here but particularly with a port injected engine, when we're injecting fuel when the engine is cold, there's no heat obviously in the intake ports, the intake valve, it's going to take time for that to all build up so when the fuel is injected out of the fuel injector, a lot of it is going to end up wetting out against the port wall. |
| 05:46 | Now when everything's at operating temperature it's going to evaporate off that or vapourise off the hot port wall pretty much as soon as it's injected onto the port wall so it's really not an issue but when everything's cold, it will condense out on that port wall. |
| 06:01 | The fuel still ends up going into the cylinder but a lot of it will sort of end up dripping in in a liquid form which doesn't combust very well so essentially what this means is when the engine is cold, we physically need to deliver a higher mass of fuel than when the engine is at operating temperature in order to achieve the same operating air/fuel ratio so that's number one. |
| 06:20 | The other element is particularly when the engine is very very cold, we will find that it will respond better, run smoother and generally just be nicer to drive if we target slightly richer air/fuel ratios so there's the two elements there, we want to actually target a richer air/fuel ratio but in order to target that we're going to need quite a considerable amount more fuel than when the engine is at operating temperature. |
| 06:44 | I always think it's important to understand the implications, why we need to do something rather than just blindly doing it. |
| 06:51 | Now the other element here is understanding the relationship between load and RPM and our cold start requirements. |
| 07:01 | Most of the time for initial cold start we are going to be at or very close to closed throttle so there's no real load, the airflow is low and we get that situation which I just explained where we've got a lot of the fuel is being injected, condensing out on the port wall. |
| 07:16 | Basically making its way into the cylinder in a liquid form. |
| 07:20 | That's fine but if you do want to jump in your car straight away and drive it and particularly if you are not that mechanically sympathetic and decide to go straight to wide open throttle and use quite high RPM, that tends to undo some of the problems because obviously at higher RPM wide open throttle or higher throttle openings, we end up with a lot more airflow and a lot more turbulence so that tends to mean that under those conditions, we need less fuel delivery or less additional fuel delivery relatively speaking, than we do at low load, so closed throttle, idle. |
| 07:57 | So there's some considerations there around how we want to do this, whether it's a 2D table, just relative to our coolant temperature or maybe we want to incorporate throttle position or manifold absolute pressure into that as well so we can kind of reduce our additional fuelling as we bring those load and RPM values up so every ECU is a little bit different here and we'll see how that works in the MaxxECU. |
| 08:21 | Another consideration here, not specifically directly related to our warm up enrichment but this is something I quite often did, particularly with engines that we had built in house to essentially protect the engine and therefore protect our reputation which is to incorporate some safety strategies when the engine was cold. |
| 08:42 | So let's say we've got an engine that revs to 9000 RPM. |
| 08:45 | Well I might restrict the RPM using a 2D coolant temperature based rev limiter to maybe 5000 RPM until the engine temperature's up over maybe 50° or something like that. |
| 08:58 | Obviously you can make up your own numbers. |
| 09:00 | Likewise I could do exactly the same with manifold absolute pressure so we could kind of have a boost limit relative to coolant temperature. |
| 09:08 | Kind of not relevant to our warm up enrichment, we can also use that to bring in safety strategies at higher coolant temperature, so basically if the engine's overheating, we might again want to pull the RPM limit and the boost limit down just to bring in some safeties and protect the engine as well as we can. |
| 09:26 | Great strategies, I will say that if you are doing this again for a customer or maybe you're tuning your friend's car, don't do this without explaining what you're doing and why because inevitably if you don't, you're going to have the customer come back or ring you up and say hey the engine won't rev nicely, it's misfiring at 5000 RPM when it's cold, so that'll be because they're running it into the coolant temperature based rev limiter, kind of also gives you a bit of a hint as to how the customer is treating that. |
| 09:57 | So enough talking, let's just jump in for a moment and have a quick look in our MaxxECU. |
| 10:03 | I'm not online at the moment but that doesn't really matter. |
| 10:05 | Let's just have a quick look at exactly what I was talking about here, so we'll come up to our limits and we've got two limits here, we've got rev limit and boost limit, boost cut. |
| 10:16 | This is a naturally aspirated engine, I haven't actually talked about this car that we're using so far but it's a Honda City, it's a dedicated racecar and it is powered by a B18C Type R engine, naturally aspirated out of a DC2 Integra. |
| 10:31 | So obviously we don't have boost to worry about, we'll pretend we do though in a moment. |
| 10:36 | So let's click on rev limit for a start and at the moment we're not incorporating anything fancy so you can see that our rev limit RPM source here is a single value and that single value is right here so 8800, doesn't really matter if the coolant temperature is 0° or 115°, it's going to do the same thing. |
| 10:57 | But if we want to make this a little bit nicer, let's bring this down here and from our drop down menu, we'll choose table and now we've got a 2D table here so we can see we've got coolant temperature on the X axis here and this probably isn't a bad place to have this. |
| 11:14 | We can see, well it's going to be too low but we'll see how we can address this so from zero to 25°C, that is 6000 RPM so maybe we want to be a little bit more conservative down at zero, let's try 4400 RPM's probably a touch optimistic, and then from 65°C to 95°C we can see that that's 7500 RPM, let's set that to what we did have which is 8800 RPM and then you can see again at the upper end of that scale, we've dropped that back down, if we get to 120°C, that's going to drop down to 5000 RPM. |
| 11:53 | Now this, the only thing I will point out with this is that these tables will interpolate, just essentially like any table in any ECU so you do need to be a little bit mindful of this because this point here, this break point in the table, 95°C, that's not that high realistically, we quite often will see with marginal cooling, an engine running at 100 or maybe even 105°C, I mean I don't like that but it's not necessarily the end of the world. |
| 12:24 | What's going to happen here is basically as soon as we get to 95°C, we're going to get our rev limiter kind of dropping down on an angle like this between 8800 and 5000 as we move from 95°C through to 120 so just understanding that that interpolation will happen and what's going to happen around that range is really important. |
| 12:46 | Of course what we can do here is just bring this up to 105, we can alter these break points just by double clicking on them so we can get this set up essentially however we want but for the moment let's just bring that back to a single value so that's how we can deal with our rev limiter. |
| 13:03 | Again a little aside from our topic but worth mentioning here. |
| 13:06 | Let's just come down to boost cut, I'll just go through this really quickly, at the moment of course we have this disabled, we'll enable this and again we can have boost limit as a fixed value which we've got here, it's just autofilled to 270 kPa. |
| 13:20 | Obviously no danger of getting to that with our naturally Honda City but again we can set this up as a table and what we can see here, interestingly it's actually set up the vertical load axis here based on our target map which makes sense because then we can have our map limit based around the actual target so rather than having one overall value, we can basically match it to our boost target. |
| 13:47 | At this point the load axis, the horizontal axis there is the engine RPM but if we right click on this, what we can do is come down and we can change axis source and if we type in coolant, temp we can see we've got that there, we'll click OK and then we can set our lower axis and upper axis value. |
| 14:10 | Probably a little bit optimistic as they are so let's set those from zero to 120 and number of cells we'll leave at the moment, obviously we can play around with that to suit our own requirements. |
| 14:23 | Likewise if you don't want the target map axis, what we can do there is right click on that axis and click on remove axis and now we've got a simple 2D table. |
| 14:31 | So a lot of flexibility on that, again obviously we don't need this so I'll disable it. |
| 14:35 | So that's the first element that we're going to cover off or we have covered off. |
| 14:41 | Let's have a look now at what is important to us when it comes to our cold start tuning and the first part has nothing to do with our cold start tuning because we need to begin by getting our VE table sorted out properly so let's come across to our fuel table, you can access that by pressing F5, so this is just our main fuel or volumetric efficiency table. |
| 15:08 | We are using manifold pressure vs RPM so nothing particularly out of the ordinary here just like we're going to have just about any aftermarket ECU set up. |
| 15:17 | The reason this is important and this is another area that a lot of tuners overlook is that all of our cold start adjustments work as multipliers on this base VE table. |
| 15:31 | So what that means is that our base volumetric efficiency numbers need to be set accurately under normal operating conditions, normal coolant temperature and then we use the warm up cold start enrichment parameters in order to adjust or add multipliers to this in order to get everything running nicely when the engine is cold so if we don't do that, then we're going to end up trying to, if we don't tune the VE table properly to start with, we're going to end up in the situation where we're essentially trying to add a bandaid to getting our fuelling right with our cold start enrichment values and that's just not going to end up with a really nice result. |
| 16:13 | The other element with this as well is let's say we're operating at 80°C, the engine is properly warmed up and it's likely we might be somewhere around about this area here, maybe 25 to 30 kPa at idle and let's say we've got 1000 RPM idle speed. |
| 16:32 | So that's fine but when we first start the car when it's cold, if we haven't got our idle speed dialled in correctly, we may find that instead we're down close to 750 RPM which we won't have necessarily tuned when the engine's at normal operating temperature, brings us back to the situation where we're basically fudging or adding a bandaid with our cold start numbers because we haven't properly tuned this column of our VE table when the engine is hot. |
| 17:01 | So it's always a good idea when we are doing our proper tuning on the dyno to artificially bring our RPM down to 750 or basically below our target idle speed, get that right and then for exactly the same reason we might end up or most likely going to find that if our hot idle speed target is 1000, we're probably going to be maybe 1250 or even 1300 when the engine is cold so we sort of end up interpolating here, so again if we haven't tuned the 1000 RPM column and the 1500 RPM column at normal operating temperature, we're again in the situation where we're trying to sort of add a bandaid to the situation so properly tune the volumetric efficiency table, giving really really good attention to those areas down in the idle area and that's your first step, basically making sure that is all right. |
| 17:53 | Another element with this as well, is our lambda target table, making sure that our lambda targets are where we want them to be. |
| 18:02 | In this case we've got a normal 3D table, we could add a 4D table if we want for coolant temperature to manipulate these targets but generally you see I've got down here, 0.95 lambda under our idle conditions, that's probably going to be absolutely just fine with our cold start targets as well but particularly if you are running closed loop fuelling, we want to make sure that the lambda targets actually match what you are trying to achieve, otherwise you're sort of basically shooting yourself in the foot. |
| 18:36 | Right so what we'll do is we'll come to our fuelling and we've got all of our fuelling parameters in here, we'll come down to our start and warm up settings. |
| 18:49 | So we've got three tables here that we will be adjusting. |
| 18:54 | First of all we've got our cranking fuel, pretty easy to understand here, this is additional fuelling that is active purely during cranking and it tells you what's going on here, we've got a 2D table relative to our coolant temperature and it tells you this is the percent of normal fuelling that is going to be added so basically you want to make sure that you're adding additional fuel particularly in that cold start area. |
| 19:20 | The default values will generally be a pretty good place to start so you're not going to need to populate these tables from scratch which is a huge benefit. |
| 19:30 | So this occurs when the engine is cranking only, as soon as the engine is deemed to have started, we move into these next two tables. |
| 19:39 | So there's an interaction here which is important to understand. |
| 19:44 | This particular table here, our warm up fuelling, this is active basically once the engine has started and it is 2D at the moment, we've got our coolant temperature as our axis but again we could add a second axis, a Y axis, load axis here with our manifold pressure or throttle position if we want, we can do that by right clicking and add axis and let's add manifold pressure. |
| 20:12 | MAP should do it. |
| 20:18 | OK and let's go zero to 100 kPa, could also do this relative to throttle position if you prefer but basically then what I was talking about with the requirements for fuelling relative to load, basically what we would do is need maximum fuel down here at low manifold pressure or low throttle position and as we move up this table, we can remove some of that fuelling so by the time we get up to 100 kPa here, this particular row, we might only need maybe 25 to 50% of the additional fuelling that we need down here when the engine is at idle and we're completely off the throttle. |
| 21:02 | So depending on how you want to set that up, I'm just going to remove that axis for simplicity but generally that is probably how I would set up the cold start or warm up enrichment in most instances because it does give you more control. |
| 21:15 | If you just use a 2D table like this, everything's going to work fine but if you do drive the car hard under large throttle openings when it is cold, you're going to find that the air/fuel ratio is just going to move too rich or richer than your target. |
| 21:31 | Not necessarily dangerous but not quite what we want either. |
| 21:35 | Right so that's our main table, that's probably the most important one is our warm up enrichment but then we've also got our afterstart enrichment here and this sort of interacts essentially based on time or run time so we can see the horizontal axis here, X axis is engine run time. |
| 21:53 | And we've got our coolant temperature on the Y axis so basically it adds additional fuelling, we can see that the majority of this is down at low coolant temperature and low engine run time and basically by the time the engine has been running for 20 seconds, we've got no additional enrichment and we can see that if we're starting the engine up here at 80°C which is our normal operating temperature, we've got very little after start enrichment there compared to when it's cold. |
| 22:25 | So it's kind of filling in a hole between the cranking fuel table here which only operates when the engine is at cranking speed and our warm up enrichment table which operates as soon as the engine is started. |
| 22:38 | And this is because we quite often find that there will be a need for a momentary additional enrichment that sort of fills in between the cranking and when everything settles down and we move into our warm up enrichment table. |
| 22:52 | Now another little tip here, and I've been caught out by this in the past, it's a dumb mistake to make but it is a mistake that is easy to make, is not checking the warm up enrichment table when you're first going through and configuring everything. |
| 23:10 | What we want to do is make sure that out in the normal operating temperature range, which would probably be sort of let's say 65, 70° through to maybe 105°C, we want to make sure that there is no additional enrichment there so quite often you might find that you've inherited a map from another tuner and they've done some weird stuff in this. |
| 23:33 | I've seen this even in base maps from ECU manufacturers so never make any assumptions and there'll be maybe additional enrichment at 85°C or 75°C so if you're transitioning back and forwards through this and particularly you'll see it on the dyno as you run the car, it warms up, it moves to a different zone in the warm up enrichment table and then you come back to idle, let it cool down while you're making some changes, so you're sort of moving backwards and forwards and the fuelling just seems inconsistent so that will often be the result of warm up enrichment values in an area of the table that you absolutely don't want them. |
| 24:10 | Alright so one of the other elements that comes up with the cold start enrichment is that we obviously want to be able to monitor the air/fuel ratio essentially from the moment we start cranking the engine and it starts up and that's not necessarily how the ECU, the MaxxECU will be from default so let's have a quick look at that. |
| 24:32 | If we go down to our inputs, then we click on that and we come down to lambda sensor, so this has a built in wideband controller, we're running an LSU 4.9 sensor, yeah it is a 4.9, you can see that there and what we've sort of found with the aftermarket ECU industry is initially when the ECUs started incorporating wideband controllers, they were basically running the wideband heater from the moment the ECU was powered up. |
| 25:06 | Which kind of makes sense, well would make sense but the problem with this is that the sensor is nice and hot when we first start the car and then we've got a lot of condensation going through the exhaust which then tends to quickly destroy the sensor so it's actually going to extend your sensor life if we have the sensor warm up setting here set to either engine start up or alternatively you can have delayed startup. |
| 25:37 | So as it would suggest, this means that the sensor won't actually come online until the engine's been running so yeah it helps with sensor life, it's how I would normally set the ECU up but for our purposes when we are setting this up, doing our cold start, we really want to have this set on ECU startup so that basically the sensor will be online the moment we start cranking the engine and I'm not online at the moment, we'll do that in a second but we'll be able to see our lambda being displayed down here in the bottom bar. |
| 26:09 | Without that, we're really kind of a little bit blind to what's going on. |
| 26:14 | Remember if you do change that, personal preference here, but if you want your sensor life to be extended, once you have done the cold start, I would recommend changing that back to engine startup or delayed start up so that you don't have that problem with condensation destroying the sensor. |
| 26:31 | Alright we also need to talk a little bit about ignition, sorry idle control. |
| 26:37 | So as I mentioned, this is a bit difficult for our demonstration here because the Honda City doesn't actually have an idle air control valve. |
| 26:45 | Not uncommon on a race car to not have this, it's not strictly essential on a race car and also in this instance, one of the main reasons it's been removed was because we've got an engine in an engine bay that's really too small to fit it and the location of the factory idle speed control valve would have interfered with something in the engine bay, I think it was the firewall from memory so not a problem, I can still explain how this works so let's come down to our idle control here and let's start with our idle control settings. |
| 27:22 | Always a good idea when you're going through this to start with our control set to open loop. |
| 27:27 | The reason for this is if you have the setting closed loop, obviously the difference between open loop and closed loop, with open loop, all the ECU is doing is blindly applying the settings from our idle duty table, irrespective of what the actual idle speed is so it could be higher or lower than we want, the ECU's going to do nothing to try and adjust that. |
| 27:50 | On the other hand, if we start in closed loop mode, it could seem like the idle speed is doing what we want but the ECU may be making changes to the idle duty from this base duty table here in order to get us to our target. |
| 28:05 | The problem with this is that particularly if these changes that it's making are quite large, this could mean that when we come to a stop we could get the idle speed dropping, maybe causing stalling so what we really want to do is start in open loop mode the we want to adjust these values here, our duty cycle vs coolant temperature to get our idle speed as close to our target as we can and then once we've done that, we can then reenable closed loop mode. |
| 28:33 | Just like any closed loop mode, or closed loop control, let's say boost control for example, the closer we can get to our desired target in open loop mode, the less work the closed loop control strategy is going to need to do and the better it will work so that's really important. |
| 28:51 | At the same time, if we come to our idle control target RPM, we do want to make sure that this is properly set to our realistic targets too. |
| 29:01 | So this is probably not too out of the ballpark with what I'd expect. |
| 29:06 | 0°C we're targeting 1250 RPM. |
| 29:10 | At normal operating temperature, we're down to 900 RPM. |
| 29:14 | So also important when we're dealing with idle speed control to understand what's realistic. |
| 29:20 | What should we be targeting? And this is a bit difficult because it really does depend on the engine. |
| 29:26 | It's going to depend on the number of cylinders for example so a stock 4 cylinder B18C, probably going to idle quite nicely at 800, 850 RPM, maybe 900 RPM. |
| 29:39 | If we're talking about a stock six litre LS2 for example, probably idle quite happily at 600 RRM. |
| 29:47 | If we try and make our B18C idle at 600 RPM, it's not going to be too happy about it, it's going to be a bit grumpy, probably going to be prone to stalling, not going to sound nice, so again just getting a realistic target. |
| 29:59 | How do we know this, well using the base stock idle speed targets for the factory engine is probably a pretty good place to start. |
| 30:06 | But then there's also mechanical conditions to think about so what I mean here is if we take the stock cams out and put in a big nasty cam with heaps of overlap and duration, well we're almost certainly going to need to bump up the idle targets to make the engine idle nicely. |
| 30:22 | And how far you're going to have to go there was going to depend on the cam profile you're using, my old drag car for an example wouldn't idle nicely below about 1800 RPM, that was a 4G63 four cylinder turbo engine running on methanol, stock 4G63 will idle quite happily at 800 RPM so again there's a vast range here, we just need to be realistic and understand what we're trying to achieve so we can target realistic numbers. |
| 30:50 | So again I'm not going to be able to show you the actual process of setting this because we don't have an idle speed control circuit on the engine but the process is really just a case of coming through as we're warming up and let's say hopefully we're starting down at around maybe 0-15°C so we're going to be in these zones here. |
| 31:12 | And basically adjusting these numbers up or down until our idle speed actually matches our target. |
| 31:20 | Alright so again we're deviating a wee bit purely from cold start but I do consider the idle speed and cold start enrichment, there's sort of a lot of back and forth or cross pollination between these two so you can't kind of treat one in isolation without the other. |
| 31:35 | Other element with this is that the idle speed target is going to obviously dictate where we are operating in our volumetric efficiency table and as I've already explained, that's going to affect how accurately we've tuned the VE table in that zone and then the multiplication factors for our warm up enrichment act over on top of that so little bit to consider there. |
| 31:59 | I will just cover off one of the elements that we can use to our benefit, irrespective of whether or not we're using idle speed control, an idle speed control motor or solenoid or whatever, which is idle ignition control and that kind of gets us a reasonable result here with this particular engine even with no idle speed control circuit. |
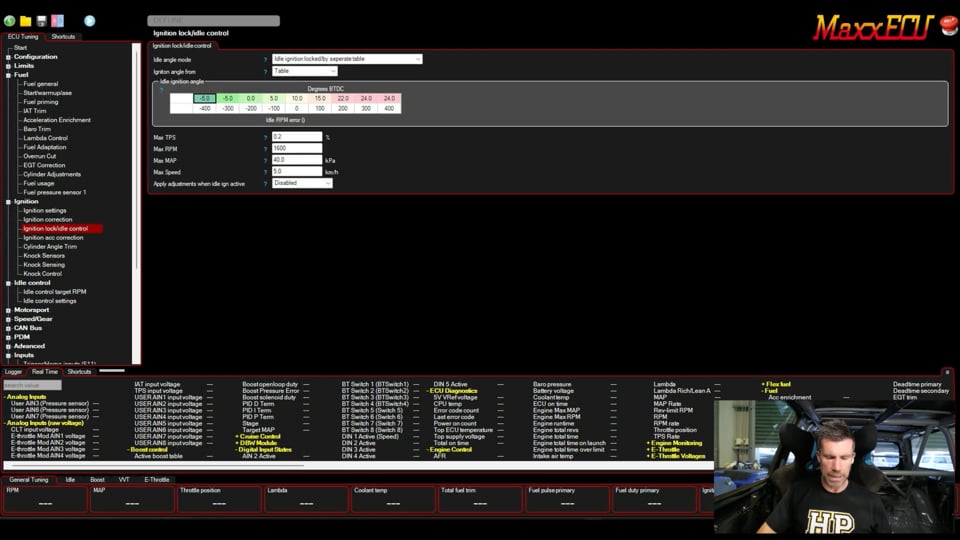
| 32:20 | So that is idle ignition control so to get to that, we'll come up to our ignition menu, open that up and we'll come down to ignition correction, sorry no we won't, we'll come down to ignition lock and idle control. |
| 32:35 | So the principle of this is that we're going to be using the ignition timing to help with our idle speed. |
| 32:46 | How does this work? Well it's really no different than optimising the ignition timing anyway. |
| 32:53 | Remember when we're optimising the ignition timing under steady state conditions, what we're trying to do is tune the ignition timing to achieve MBT and what we're doing when we're in steady state on the dyno is we're going to be advancing the timing from a retarded starting point and as we move towards MBT, every time we add timing and move towards MBT, the engine makes more torque. |
| 33:13 | So we see that on the dyno. |
| 33:16 | Obviously we're not monitoring torque when the engine's sitting there idling, the wheels physically aren't turning but the same thing happens, if we start from a very retarded ignition timing at idle and we advance towards MBT, because the engine makes more torque, the idle speed increases. |
| 33:31 | Conversely, if we retard the timing from MBT, we make less torque and the idle speed drops. |
| 33:35 | So this gives us the ability to manipulate the idle speed and also do it really quickly by advancing or retarding the timing, the ECU does this for us so let's have a look at how this works. |
| 33:47 | So what we want to do here is have our idle angle mode set to idle ignition locked by a separate table. |
| 33:55 | And that is this particular table here and the axis of this table as we can see here is our idle RPM error. |
| 34:04 | This is important because this essentially looks at the current idle speed, compares it to our idle target and then depending on the error, that obviously dictates where abouts we are in this table. |
| 34:16 | So what we can see here is when the error is zero, so essentially when we are right on our target, we're going to be giving the engine 10° of advance. |
| 34:26 | If the idle speed is above our target by 100 RPM, what we can see is that that the ignition timing drops to 5° and then as we move to the left, we drop it further until we're actually in negatives, we go to -5°. |
| 34:39 | Conversely if our idle speed drops a little bit, we're moving this way in the table and you can see we step to 15° and then 22° and then 24°. |
| 34:48 | So works really really well and it does a great job but we do need to actually make sure that we are working within safe or sensible bounds here. |
| 34:59 | What I mean by this is we don't want to be consistently running the engine at operating temperature at idle with timing of let's say -10°. |
| 35:10 | That's going to create a huge amount of heat in the exhaust system, the exhaust manifold, it's not going to be really that great for anything in the engine bay or the engine in general so typically I like to try and target around about a 10° ignition timing and I'll allow the timing to go momentarily negative but I really want to be seeing the timing jumping between maybe about 0-5° and then up to maybe 20° so we just need to monitor that and then adjust our idle settings in order to get us in that ballpark. |
| 35:42 | So with this system again, no idle speed control circuit, what we have to do is set our idle throttle stop or sorry our throttle stop screw so that when the engine is at normal operating temperature, let's say we want to have the engine idling at 900 to 1000 RPM, what I'd probably do is set the throttle stop so that we're idling with 15° timing at let's say about 1200 RPM. |
| 36:08 | Then if we enable the idle ignition control, that'll allow the timing to be pulled down and it'll get us to where we want to be, 1000 RPM for example. |
| 36:17 | And the reason we want to set the throttle stop so our idle speed is naturally a little high is that's going to give us the best chance of the engine idling by itself when it's cold, when it would traditionally need more air bypass to keep the engine idling. |
| 36:31 | Now it's not going to idle perfectly, it's probably going to idle quite low, maybe it'll idle at 600 or 700 RPM, maybe a little bit more than that but it should be able to idle pretty quickly by itself and for a racecar, that's fine, I mean we're probably going to be getting it off the trailer and most people are going to be quite happy nursing the throttle manually for maybe a minute or two before the engine actually idles by itself. |
| 36:55 | There are also some lock outs here that we do need to consider. |
| 36:59 | Basically this is just to make sure that the idle ignition control only functions when we want it to so it won't work if we've got more than 0.2% throttle or we're above 1600 RPM, above 40 kPa manifold pressure, 5 km/h speed so just making sure that those are realistic targets so that we actually only end up with the engine idling, using idle ignition control when it truly is trying to idle. |
| 37:26 | Alright we're going to do into a quick demonstration of this and I'll try and go through the warm up procedure. |
| 37:34 | Give you some tips on that and then we're going to move into questions and answers so this is a good time to mention that if you do have questions please ask those now. |
| 37:43 | So what I'll do, we'll just get online, as I said I haven't been online while I've been doing this and doesn't really want to go online, that's helpful. |
| 37:54 | Let's just quit that and we will just restart our MaxxECU. |
| 38:03 | And we are online now, alright so we'll go to our fuelling and generally what I want to do here is make sure that I am on our start warm up screen like this, we can see a little cross hairs showing exactly where we are and we can see while I've been talking here, our lambda is online now so that means that we can monitor this while the engine is warming up. |
| 38:25 | Coolant temperature, can see we're not super cold today, 15°C but again we can only do what we can do here. |
| 38:33 | So again with this particular application, I'm almost certainly going to need to apply a little bit of throttle just for the first few minutes while we do start warming up. |
| 38:42 | Now how do we go about tuning the different tables? Let's start by talking about our cranking fuel because generally the numbers in this table, we're not going to be able to tune by using the lambda that is being displayed. |
| 38:59 | Because the engine isn't really physically running at this point so I go through a slightly more rudimentary approach with this, which is, does the engine start crisply and quickly? If it doesn't, I'm going to start by making some changes to our cranking fuel and we're not necessarily going to know which way we need to go. |
| 39:18 | We can look at what the air/fuel ratio does immediately after the engine's started, whether it's going too rich or too lean, that'll give us a bit of a hint. |
| 39:26 | What I'll generally do though is just make a change to this table and make a broad change so a good place to start is by either doubling or halving the number. |
| 39:35 | Now why we want to do a broad change like that is that if we only make a change of a few percent, it's going to be hard for us to know if we've made the thing better or not. |
| 39:43 | Initially we want to make a big block change and that's going to give us a really good indication of did we go the right way, did we go the wrong way? Obviously it's unlikely that we're going to want to stay at that multiply by two or multiply by 0.5 but it'll give us a direction to go and then we can start making more granular changes. |
| 40:01 | Of course with the cranking fuelling as well, this is relative to our coolant temperature so we really, to be thorough here, would need to check this multiple times at multiple temperatures, that's not overly realistic but generally I would use the default values from the ECU manufacturer and then multiply or divide that whole table and particularly once we get up to normal operating temperature, we generally need little to no cranking enrichment anyway so that's how I deal with that particular table. |
| 40:32 | Then we move into, as I mentioned, our after start enrichment and our warm up enrichment. |
| 40:37 | What we want to do here is understand that particularly where we are now, we can see our cross hairs showing that we're at 15°, we know that the after start enrichment is going to be active for the first 20 seconds and we will see this cross hairs move across once the engine's up and running so we can monitor what the lambda's doing at that point and what I want to do is essentially wait until we're out of this after start enrichment, we could also begin by zeroing this table but generally not necessary. |
| 41:07 | Wait until we're out of this after start enrichment table, while monitoring what the air/fuel ratio has been doing and as soon as we're out of the after start, we know that then we are purely in our 2D warm up enrichment table here so now if we're too rich or too lean, the warm up enrichment table is the one that we want to change. |
| 41:28 | Now again we're trying to essentially do this, particularly if we're doing it commercially, we want to try and really do this in one go so we are trying to do a lot of work very quickly. |
| 41:37 | If you've got more time with the car, if it's your own car for example, you can be a little bit slower with this and have multiple cracks at getting your warm up enrichment dialled in. |
| 41:48 | So if you're trying to do it all in one go, what I'd be doing is monitoring that lambda while we're in the after start enrichment, once we're out of after start enrichment, I would then be looking at are we too rich or too lean, in that case we want to make changes to our warm up enrichment table only but then having that knowledge of what was happening while we were in that after start enrichment, that's then going to help guide you on what do we need to do to these numbers here? So what am I talking about? Well let's say straight after start, we find that the air/fuel ratio is too rich. |
| 42:21 | And it's too rich for 15 or 20 seconds but then once we drop out of the after start enrichment, once that drops down to zero, the air/fuel ratio's actually pretty damn close to our target. |
| 42:31 | Well that would suggest to me that we need to reduce the fuelling in our after start enrichment table but our warm up enrichment table's actually pretty good. |
| 42:40 | So pretty self explanatory there, yes we are trying to do a lot of work but it's not actually too strenuous. |
| 42:46 | Alright I'm going to try getting this thing to start now, hopefully it plays the game for us and what we want to do again is just monitor our lambda. |
| 42:55 | We want to take note of how crisply it starts up, because again that's going to be based on our cranking fuel but the first change I'm going to be making if any will be to our warm up enrichment table here at 15°C so let's just try starting the engine and see what happens. |
| 43:20 | OK so a little bit too much throttle there which isn't super helpful. |
| 43:25 | We can see that we're just about to drop out of our after start enrichment and we can see that our fuelling's actually pretty good. |
| 43:35 | Little bit lean, maybe 0.97 so let's come up here, let's change that number to 20%. |
| 43:40 | And we are starting to move across here so this does all happen pretty quickly as we can see so we're now at 30° where we're starting to interpolate so I'm just trying to get my fuelling to 0.95 lambda. |
| 43:55 | You can see that I am using a little bit of throttle, we're at 3.5% or so, 1500, I'm just going to drop that down. |
| 44:05 | And everything's looking actually pretty good so I changed that number at 30° maybe a little bit too far, let's take that down to 12%. |
| 44:14 | And now I'm just going to essentially allow the engine to continue to warm up so it is a reasonably slow process. |
| 44:21 | So what we did see was that initially we were quite rich but actually the fuelling at 15° wasn't too far out of the ballpark, in fact I ended up adding fuel to that so what I would probably want to do here is come into our after start enrichment table and I might start by reducing that fuelling by maybe 20%, maybe 15% and then of course unfortunately we would then have to allow the engine to cool down and have another look at that. |
| 44:49 | But we see that we also move through it quite quickly so it's not the end of the world if we aren't exactly on our target there. |
| 44:57 | We've just moved into the centre of our 40°C zone here and we can see that we're right on our target, 0.95, want to be really fussy we're at three decimal places, maybe 0.96 so let's try taking that from 8% to 10%. |
| 45:13 | Yeah pretty close there, again we're not trying to split hairs on it but this is the process, just allowing everything to warm up. |
| 45:20 | I do just like tuning any part of the fuelling table, or the ignition table, we want to only make changes here when we are in the centre of a cell, so at the moment we're interpolating obviously between the 40 and the 50°C cells so we would wait until we're in the middle of that 50° cell before we make any changes. |
| 45:43 | It's all looking pretty good at the moment so I actually just closed that throttle down and see what happens when we get down to our actual idle speed so you can see at the moment, we're not warm enough so the idle speed is a little bit low here and you can see that at the same time we have gone a little bit richer than what we were when I was using throttle to hold everything open. |
| 46:06 | So this is what I was talking about with making sure that we have our VE table dialled in accurately, it's actually come back to pretty much where we wanted it to be there but if you haven't dialled in that VE table accurately, the fuelling's going to be different at 1500 RPM than what it'll be at 1000 RPM and that's going to affect what we can do with our warm up enrichment so right now, we can see yeah our idle speed's just coming up to closer to 900 RPM, again we're kind of limited by what we can achieve there because of the lack of the idle speed control so we are using our idle ignition control, we can see our ignition timing over here on the right hand side, we can see that sort of moving around a little bit and trying to add a little bit of timing to get us closer to MBT. |
| 46:51 | So we'll leave it there and shut everything down and move into questions in a moment. |
| 46:56 | I'll just reiterate that process there, so remembering what we want to try and do here is replicate as closely as we can, the cold start performance of a factory car. |
| 47:05 | Remembering that we have to start by properly tuning the volumetric efficiency table under normal operating conditions because these cold start parameters work as adders or multipliers over and above our main VE table. |
| 47:19 | So then we've got, for our cold start parameters, we've got our cranking enrichment. |
| 47:23 | Remembering we aren't necessarily going to be using the lambda feedback to guide us with this, this is more looking at does the engine start crisply and quickly and if it doesn't, we're going to make bold, large changes to get a sense of direction for that. |
| 47:39 | Once we've done that we're then basically looking at our after start enrichment and our warm up enrichment. |
| 47:45 | Remebering the after start enrichment is a time based thing so we do not want to make adjustments to our warm up enrichment until we've dropped out of that after start enrichment and that's adding no extra fuel and then we can look at our warm up enrichment. |
| 47:59 | Now the other thing we do want to be mindful of is making sure that our air/fuel ratio isn't excessively rich during cold start, this is a real common problem. |
| 48:11 | The engine will generally start quite nicely when it's excessively rich for a few times. |
| 48:16 | After that, if you keep cold starting it, and this is a real problem with a poorly tuned car, if you are starting the car, moving it maybe in or out of a garage and then shutting it down again, rather than allowing it to properly warm up and taking it for a drive, what you'll find is that over the course of several starts, you're going to end up fouling the spark plugs and after maybe five or six attempts, you're going to find that the car just won't start anymore so that's the danger of an excessively rich mixture so I don't like to see the mixture sitting much richer than maybe 0.90, maybe 0.88 for too long during that cold start period, otherwise you are going to run into problems with fouling your spark plugs. |
| 49:01 | Alright we'll move into our questions now, remember if you've got any more, please keep them coming and we'll get into them. |
| 49:09 | Wedge has asked, I've got an issue when my engine fires up from a cold start it fires straight up to around 3000rpm or higher before dropping back down to the post-start target RPM. |
| 49:20 | It hits the post-start and idle targets properly the rest of the time. |
| 49:24 | What things should I look at to correct this post-start issue? OK so I'm not sure what ECU you're running here and that's obviously going to have a big impact with it. |
| 49:36 | It sounds to me like your issue is most likely in some of your idle speed control settings. |
| 49:41 | Possibly you've got a scenario that's similar to what I explained where your base or cranking idle targets are way too high, by idle targets what I actually mean is your base duty cycle for your idle speed control circuit, maybe it's drive by wire, again your base target for your idle control with your drive by wire is too high. |
| 50:03 | And basically what it's doing is initially flaring the RPM and then the ECU will be taking over in closed loop and dropping that back down so this is kind of that problem you see if the open loop stuff hasn't been set up properly and you're kind of reliant on the closed loop fixing everything and picking up the pieces so that's what I'd be looking at, it will not be an element, almost certainly won't be an element of your actual cold start fuelling, it's going to be air bypass, that's the only way you're going to get the engine running that high in the RPM initially. |
| 50:34 | Daniel's asked, how do you guys rate the MaxxECU vs something like Link? I'm just hearing about them but they seem pretty alright. |
| 50:41 | Honestly I've been really really impressed with them, value for money is exceptional. |
| 50:46 | Features wise, probably very much similar to the Link, I'll admit I've still got more experience on the Link ECU than the Maxx but everything I've seen so far, I've really liked. |
| 50:58 | The other thing that's really nice with the MaxxECU is just as I've gone through the process of creating a worked example in our Practical Standalone Tuning course using this car and the MaxxECU, I found a few things that I thought could be improved, just through the exposure I get to a variety of different platforms, I kind of see how everyone does things and obviously every ECU manufacturer does things slightly differently, so I've made a few suggestions to Maxx and they've actually been very very responsive and done a couple of firmware updates based on some of my suggestions to incorporate those so I really respect that, that's super helpful. |
| 51:41 | Gonzalo's asked, on a high compression engine with really cold spark plugs should we use the compression ratio of the engine to build in heat and use a low ignition timing? Or there is any recommendation? No I wouldn't say using low ignition timing is going to be necessarily beneficial there. |
| 52:01 | Yes you're going to create more combustion temperature or heat but I mean that's only something that's going to be relevant at idle and the actual combustion temperature at idle's always going to be reasonably low anyway relative to what you're going to see under wide open throttle so it's more a case of choosing an appropriate heat range for your spark plug. |
| 52:22 | I would very seldom see this as an issue unless you're in the situation where you end up with your cold start enrichment too rich. |
| 52:33 | And that kind of comes back to what I was saying before about fouling the spark plugs, this becomes more of an issue with a cold spark plug heat range because the spark plug physically isn't getting hot enough to burn off the carbon deposits that you're going to get. |
| 52:46 | So really as long as you are mindful and quite fussy with your cold start tuning and keep your air/fuel ratio targets reasonable during that period, it's not going to be an issue. |
| 52:59 | I mean I know some people will use a warm up set of plugs which are a hotter heat range and then swap to a cold plug for actual competition use, I've never really seen the need for doing that, particularly with modern ECUs, they just have good enough control that it should absolutely not be an issue for you. |
| 53:17 | Next question, do you recommend running closed loop lambda control in positive MAP areas of operation? Hmm it's a good question, yes is the answer. |
| 53:27 | A long time ago i would have said no but these days there's enough diagnostics with most modern ECUs with built in closed loop lambda control that they will disable the closed loop control if the sensor goes bad for example so you're not going to be using closed loop control because of a faulty sensor, falsely reporting air/fuel ratio and end up running the engine too lean so yeah our race cars are all run in continuous closed loop control as is most late model factory cars these days and it works really really well. |
| 54:02 | Where possible, I do tend to give a little bit less range of the closed loop control under wide open throttle or higher boost running so maybe under idle conditions or cruise I might allow plus or minus 15 or 20%, maybe under wide open throttle I might pull that down to plus or minus 5% just to really narrow down that range so it can't ever end up excessively rich or lean if the worst does happen. |
| 54:31 | Where I would be less keen to run that system would be if you're relying on an older style analog voltage input wideband controller where the ECU's got no diagnostic data about the wideband sensor itself and it's just looking at a 0-5V or something like that so yeah again a lot of this comes down to personal preference and you've got to be happy with the decision that you are personally making. |
| 54:56 | Alright that brings us to the end of our questions and as usual, if you are watching this in our archive at a later point and you've got any questions on it, please ask those questions in the forum and I'll be happy to answer them there. |
| 55:08 | Thanks and we'll see you next time. |
Timestamps
0:00 - Introduction
0:45 - Often overlooked/ignored by tuners
3:52 - What are we trying to achieve?
5:12 - Why do we need to optimise it?
6:51 - Considerations of fuelling vs load/RPM
8:21 - Safety strategies
10:05 - Rev limit
13:07 - Boost cut
14:41 - Dial in VE table first
18:36 - Start/warmup fuel tables
24:10 - AFR monitoring
26:32 - Idle control
31:59 - Idle ignition control
37:27 - Demo
49:09 - Questions


