334 | Link G4X Introduction
Summary
In this webinar we’ll take a tour of the link G4X ECU and cover off the key changes you’ll need to be aware of compared to the older G4+ range.
| 00:00 | - Hey team, Andre from High Performance Academy, welcome to another one of our webinars and this time we're going to be diving into the world of the Link G4X. |
| 00:09 | Now this is definitely not a new ECU from Link and in fact they're actually just in the process of superceding this with their new G5. |
| 00:18 | We haven't covered this G4X software to any degree up to this point because it is so similar to the G4+ which we've got a lot of content on. |
| 00:29 | However there are some subtle differences and I know there's also some tuners and enthusiasts that are coming in who have never looked at the G4+ so we're going to cover off the G4X inside of this webinar. |
| 00:43 | The car that we are using today is our Mitsubishi Lancer Evo 9 and it is fitted with the plug and play variant of the G4X however, it doesn't matter what G4X you're currently tuning, whether it's a plug and play or a wire in, everything that we will be dealing with is going to be 100% applicable. |
| 01:03 | Now before we actually dive into the software, because this is freely available like most ECU manufacturers, I would also urge you, if you haven't already, to download the software. |
| 01:15 | So we'll jump across to my laptop screen. |
| 01:16 | This is where you can come to in order to download this, you can find it from the Link website and we go to PC Link downloads. |
| 01:25 | So at the top we've got the G5 which as I mentioned is their newest platform. |
| 01:30 | We obviously want in this case the G4X. |
| 01:33 | In a really interesting change up for ECU manufacturers, Link are probably the first as far as I know who also offer their tuning platform in multiple languages. |
| 01:46 | So we've got English or Japanese, Spanish, French etc so there's a lot of options there for those who don't have English as a native language. |
| 01:57 | So obviously we've downloaded the English version because that is the only language that I speak and this is what it's going to look like when we jump in and first get it up and running. |
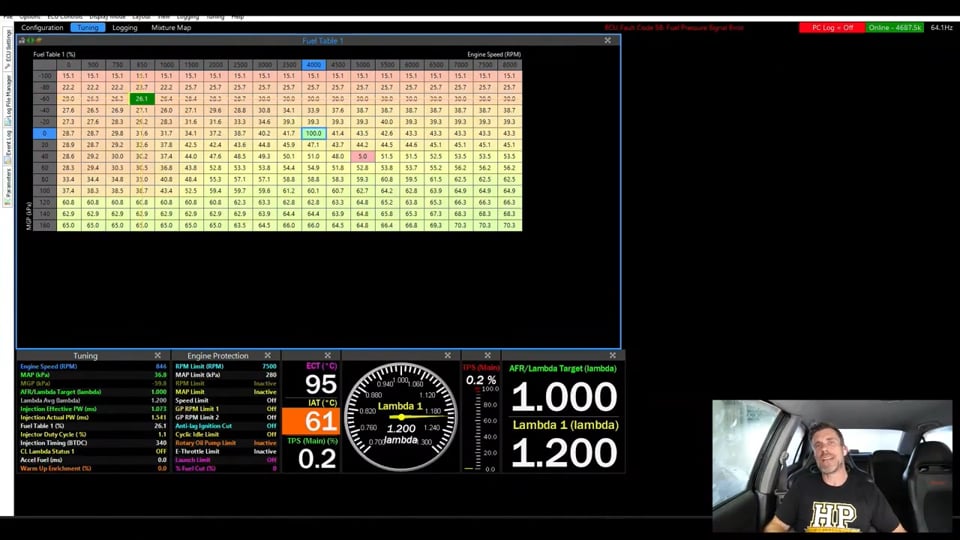
| 02:08 | So at the moment I've got our Evo up and running and it's just sitting there idling and we can see that we're looking at our fuel table here and we've got a little yellow crosshairs showing exactly where we are accessing. |
| 02:21 | So let's go through this is something of an order. |
| 02:26 | We've got a variety of ways of manipulating the software and basically achieving what we want. |
| 02:32 | A lot of this really is also going to come down to your own personal perference. |
| 02:37 | For a start, up the top we've got some tabs here, you can see that we're currently on the tuning tab and we can come across to our logging tab which we're going to use in a little bit more detail. |
| 02:48 | Let's just get that up and running, give the engine a bit of a rev so we can see we've got some data scrolling across there. |
| 02:54 | Press F8 and that's going to stop that, again we'll come back and look at this in a bit more detail because the built in logger in my opinion is one of the most powerful functions of the G4X, G4+ platform. |
| 03:07 | We've got the mixture map functionality over here which I'm not going to dive into and we've got another tab set up for configuration. |
| 03:13 | So basically you can manipulate these tabs to suit your own requirements of what you want to see and you could set up additional tabs if you wish so that you can focus on specific tuning functions but what we've got here as a layout, this is the default layout so this is much what it's going to look like once you actually install the software for the first time and get yourself up and running but again, you can manipulate this to suit your own preferences. |
| 03:40 | The first thing we'll probably look at here is the ECU settings menu so we can find that out here on the left hand side of the screen. |
| 03:50 | Couple of ways we can manipulate this, we can click on it with the left mouse button and click on it, outside of that will close it down. |
| 03:58 | I don't personally like using the mouse when I am tuning, typically it's pretty difficult to be accurate with it, you're sort of bouncing around or there's vibration in the car so I try and stick to keyboard shortcuts and the way of doing that is pressing the escape key, that will open it up, press the escape key again and it's going to close it down so this is really the heart of navigating through everything in the G4X platform. |
| 04:23 | So let's have a quick look at it. |
| 04:25 | And what we've got is, you can see here is a number of options in the menu here and these all expand out as required so let's say we want to do something related to fuel, we obviously have our fuel option right here and then if we click to the left of that, that's going to expand out our menu structure. |
| 04:47 | So we have fuel setup, cold start etc and the list essentially goes on, in order to get us where we want to go. |
| 04:54 | That is one way of navigating this menu. |
| 04:58 | What I quite often find that I will end up doing though is actually just using the search function. |
| 05:04 | So this little box up here. |
| 05:06 | Let's say we want to look for injector settings and we don't really know exactly where we're going to find that. |
| 05:12 | Chances are it's going to be under fuel but let's just assume that we don't really know where we're looking. |
| 05:16 | What we can do is start typing in inje in this case and basically that's going to autofill with all of the options that include injector and lo and behold, there is our injector setup. |
| 05:29 | So I just find that's a really quick and easy way of navigating. |
| 05:32 | Let's press the escape key again and we don't actually have to click into that box as well because as I mentioned, I don't really like using the mouse, so we can just start typing. |
| 05:41 | In this case I've typed in iat, again everything that starts with iat, or inlet air temperature comes up, let's say maybe we were looking for our IAT fuel trim table, double click on that, there we go and again if you don't like using the mouse, you can also use the up and down arrow keys and enter, that's going to get you exactly the same result. |
| 06:03 | So that is really a menu structure that you are going to have to become familiar with and learn how to work your way around it. |
| 06:11 | There are also some keyboard shortcuts for some of the more common aspects that you're going to be needing access to in order to make tuning changes. |
| 06:20 | So the two that are obviously the key tables we're going to be dealing with, fuel, we can press the F key on the keyboard, that will jump us to our fuel table and I of course will take us to our ignition table. |
| 06:33 | Now if you're going backwards and forwards between a couple of tables frequently as well, You will see that up in the top left corner we've got this little green back arrow. |
| 06:43 | So if I click on that, and you'll remember that just before I hit the i key, we were on the fuel table, hit that little back arrow, we go back to the fuel table. |
| 06:51 | Now I've gone backwards, now the forward arrow's also visible so basically we can go backwards and forwards between those two tables using the arrows. |
| 06:59 | Obviously breaking my rule there, that does require the mouse but personal preference in just how you want to navigate those tables. |
| 07:07 | It's very very flexible. |
| 07:09 | Let's press the F key and come back to our fuel table and we'll have a quick look at the way this is set up. |
| 07:15 | And how we can manipulate the numbers. |
| 07:18 | So what we can see at the moment is that we do have this little pink box here and that wasn't there before, that is simply because when we looked at our logger, I pressed the F8 key to start logging and then I stopped it, if we go to our logging screen again, we can see that, let's go to this point here where I actually gave it a rev. |
| 07:41 | We can click anywhere in this and now when we come back to our tuning menu, what we're going to see is this, I call it a ghost cursor. |
| 07:48 | Basically it shows exactly where we were accessing in any of the tables, not just fuel and ignition, any of the tables at all, at that particular point in the log file. |
| 08:00 | This is really powerful because it's difficult on a ramp run on the dyno or even a full power acceleration run on the road, to really be watching where we are going through the fuel and ignition tables, what we're really probably focusing on is either controlling the car and keeping it on the road or maybe looking at our wideband air/fuel ratio meter. |
| 08:18 | Doesn't leave a lot of potential for us to actually focus on the tuning software, nor should we. |
| 08:23 | But what we can do, once we've finished our ramp run, full power acceleration run on the road, press F8 to stop our logger, pull the car over to the side of the road and then we can simply go back through our logger, find any areas that we weren't happy with, let's say this particular point here, 2800 RPM and I know this was just a free rev but obviously it's all going to look the same on a ramp run. |
| 08:44 | Let's say we were maybe a little bit lean there, then we can go back to our tuning and again see exactly where abouts we were in this table and make the appropriate changes. |
| 08:55 | Let's just go back to our, whoops not that one, that's not going to work because I ended up closing down the software. |
| 09:03 | It's alright, we'll do a ramp run shortly and see how that actually works out. |
| 09:06 | So that's our little ghost cursor there, I'm just going to start the logger so that it gets rid of that and what we can see, we've got this little red status flag up here which says PC Log = off, I press the F8 key, that starts our logger, press F8 again and that is going to stop it. |
| 09:27 | While we're up here as well in terms of status flags as well we can see this green online so it shows us that we are online with the ECU at the moment. |
| 09:35 | Alright let's talk about ways we can manipulate numbers in our table. |
| 09:40 | So there are a few here, let's go to this particular site here where we kind of are a little bit out of the way. |
| 09:47 | We can use the Q key, that will add 0.1, the A key will remove 0.1 so useful for fine tuning but particular when we're a little way from the mark, we're going to want to make bigger changes. |
| 10:01 | Shift and Q, that'll make a 1% change and then if we use control and Q, that will do the entire row. |
| 10:09 | Control and A will go the other way as well so we can add and subtract like this. |
| 10:15 | The other way we can do this, just get rid of our little highlight there, the other way we can do this is directly enter a number of course, so let's say we want to enter a value of 50, enter that value and press enter, that's going to do exactly what we'd expect. |
| 10:29 | One of the more powerful functions I use when I am tuning is the math functions. |
| 10:34 | So particularly if we're doing, making a change to a block, so let's have a look at that. |
| 10:38 | We'll highlight in the entire block of numbers here, let's say we want to add to that. |
| 10:44 | So let's say we want to add two. |
| 10:46 | So we could either go shift and Q and do that two times. |
| 10:54 | Or we can use the plus key, so we'll press plus and that then opens up our little box here for our new value, you can see it's already got the symbol plus beside it and what we'll do is enter two and the key to using this, or just monitoring what's happening is it's going to show exactly what's going to happen here, it's going to add two. |
| 11:13 | So what we can do is press enter, that's going to add two and obviously we can also use the minus key, minus two, back to where we started. |
| 11:21 | The other way as well that's really powerful is the multiplication symbol, so we can use the multiplication symbol which is on the eight key. |
| 11:30 | So let's say we want to add 10% fuel. |
| 11:34 | Well we do that by entering a value of 1.1 and again that's exactly what it does. |
| 11:39 | So why would we want to use that multiplication factor? Well the simple reason here is that if you've gone through our engine tuning fundamentals course, we teach in that how you can calculate a correction factor that you can apply based on your desired air/fuel ratio or lambda and your measured air/fuel ratio and lambda. |
| 12:00 | So very very simple, one of the reasons I prefer to work in lambda is that if you are working in lambda it's really easy to do that in your head. |
| 12:08 | Let's say that you are targeting lambda 1.0 and your measured lambda is 0.95. |
| 12:16 | Numbers less than one are richer so that means that we are richer than our desired and if we actually look at the difference there, 0.05 that's actually 5%. |
| 12:25 | So basically knowing that and not needing a calculator to do it, I know that 0.95 is 5% too rich, what I can do is come back into my fuel table and we enter that multiplication symbol and enter a value of 0.95, what that's going to do is multiply our numbers by 0.95, which is the same as removing 5%, press enter and there we go. |
| 12:48 | We've made that change now, we've corrected our fuelling and we should be good to go. |
| 12:53 | Now it's not to say it's going to be absolutely perfect, it depends a little bit on the fuel model you're using, making sure that all your corrections are OK, particularly around your injector latency but you should find that that's going to get you into the ballpark very very quickly. |
| 13:07 | Really great way to go through and make individual cell changes based on log data after a ramp run as well. |
| 13:16 | Alright other ways of manipulating the numbers in this table here. |
| 13:21 | So let's say we want to interpolate. |
| 13:24 | So what we can do here is use our shift key, I've just clicked on this cell here, 4000 RPM -20 kPa, hold down the shift key and we can manipulate around, highlight the numbers that we're interested in using the up and down arrow keys, left and right arrow keys. |
| 13:41 | So what we can do here is right click, this will also give you a full list of all of the adjustments that you've got. |
| 13:50 | What we want to do here is come down to interpolate and what we want to do here is interpolate vertical, shift V, and that's going to just make sure that the numbers now, from the top to the bottom are going to be nice and smooth. |
| 14:04 | Obviously as you saw there, you could also do this in two directions. |
| 14:08 | So if we did want to basically interpolate this entire block of numbers here, do exactly that, come down and interpolate and interpolate bi-directional and that's going to do what we want. |
| 14:22 | Obviously powerful functions so they do need to be used with a little bit of care. |
| 14:27 | On top of this as well, how we actually look at these tables, at the moment it's pretty difficult to really take note of the numbers in the table, it's black and white, there's no gradient colour coding on this but we absolutely can have that if we want. |
| 14:43 | Press the H key and that will give us a gradient colour coding which makes it nice and easy to sort of spot the trends in this table, in other words where numbers are high and where numbers are low. |
| 14:53 | Why that's important is let's say over here, we're filling up some numbers and we have a bit of a slip on the keyboard and we enter a value of four, sorry five. |
| 15:02 | Now while at the moment, any changes that have not been stored are going to highlight as the sort of light greeny, bluey colour so that they do stick out, the reality is if I store these changes, which I don't want to do right now, if I store these changes, everything's going to go back to that black and white and it can be really easy to overlook a single value in this table if we're looking at it like that. |
| 15:26 | However, if we press the H key to bring up the colour gradient, straight away I've got this outlier here, this red cell in a sea of sort of yellows and greens so a really really good way to spot that something is not right. |
| 15:40 | The other way that we can view the table as well is 3D, and we can do that by using this little icon here in the toolbar, so we'll click on that and we can see that that shows us our table, we can manipulate it around using our arrow keys and again straight away we can see something is not right because we've got this massive hole here in our table so definitely wouldn't want to save that. |
| 16:06 | I do always recommend at least validating your work using the 3D view like this, just to get a sense of the shape of the table. |
| 16:19 | And it's really easy to fall into the trap of expecting your engine to want a perfectly smooth fuel table and a perfectly smooth ignition table and I see a lot of people using smoothing functions to make their work look nicer. |
| 16:33 | The reality is that if everything's working properly, generally yes we will see a reasonably smooth shape to the fuel and ignition table but that's not always the case and it's much more important to give the engine what it actually wants rather than to have a nice pretty table that you can post up on Instagram or Facebook and be proud of because that doesn't necessarily mean that the engine is going to run perfectly so particularly if we're dealing with a naturally aspirated engine that's got a really aggressive cam, really aggressive set of cams, particularly with ITBs or something like that, where there's some sort of tuning harmonics going on or resonance I should say, what we can find is that low down we're going to see quite large peaks and troughs in our VE table and then generally at higher RPM that'll all smooth out so don't necessarily expect that your table is going to be perfectly smooth. |
| 17:27 | Alright let's switch back to our text view and the other element is how do we go about adjusting our break points for our table? So a number of ways we can do this. |
| 17:39 | The X key will bring up our axis setup, again if you're not familiar with this, while you're just getting set up with the software, what we can do is go to axis setup here, it's going to give us exactly the same thing. |
| 17:53 | So what we can do is choose our parameters, this is by default, we've got our engine speed on the horizontal axis. |
| 18:01 | We've got break points already set up. |
| 18:03 | Alternatively what we can do is click initialise axis and that will give us pre defined set break points, we can still add or subtract from that as we see fit. |
| 18:13 | On the load axis we've got our MGP as our input which is I think a little unusual to Link. |
| 18:21 | I don't think I see this with too many other ECUs but manifold gauge pressure is slightly different to manifold absolute pressure. |
| 18:28 | In so much as it's the difference between the current manifold absolute pressure and the current barometric air pressure. |
| 18:35 | So the ECU has an onboard baro sensor so it's always looking at atmospheric pressure and it's giving us the difference between those. |
| 18:42 | But up to you, if you don't like manifold gauge pressure, click on the little tool icon there and we can enter map or search for it manually and it'll auto fill, there's map, we can choose that. |
| 18:54 | So obviously, suit yourself with that, TPS will be another obvious option if you're tuning on alpha N. |
| 19:01 | Then we've got the axis break points. |
| 19:04 | There's a bit of flexibility in how we can adjust these, so what we can do is click the plus icon, let's say we want one at, I don't know, let's say 160 kPa so we'll just enter that and press OK and what that's going to do is it's going to automatically reorder it, so you can see that popped in there. |
| 19:24 | Or alternatively we can scroll down and just manually enter the values that we want. |
| 19:29 | If we don't want one, we can of course hover over that, press the little X icon and that'll disappear. |
| 19:36 | Nice feature with this is that it gives you the option to automatically interpolate any changes you make to the break points and we'll see this in a second. |
| 19:45 | We've got an idea visually of what this is going to look like and you've just got a grid of lines but you can see we've got some tighter spacing here and we've got some tighter spacing here and again these are just the default values. |
| 19:58 | We can see that, those are all RPM so you can see that by default, 500, 750, 850 and 1000 RPM. |
| 20:05 | Yeah I mean gives us a little bit more resolution around our idle point, no big deal, maybe essential, maybe not and then for some reason the base map's also got another break point here at 4750 RPM. |
| 20:20 | I typically will start without too much excessive break points. |
| 20:26 | I like to have 500 kPa and maybe 20, sorry 500 RPM, let's try that again, 500 RPM and about 20 kPa. |
| 20:34 | And then when I see fit, I'll add additional break points but that's where this really comes into its own because we don't have to have all our break points set up. |
| 20:44 | We'll click OK and what it's going to do is it's going to ask if we want to interpolate the table values. |
| 20:50 | So what this means, we'll click yes, what it means is basically when we add or subtract break points, it's going to rejig the fuel table or the table values, whatever the table might be, to essentially have to tuning effect. |
| 21:03 | So if we add a break point at 4750, the one that we just removed here, what it's going to do is it's going to simply take the middle value between 4500 and 5000 RPM and fill in that column and essentially that way it's going to have no tuning effect. |
| 21:20 | So that's how you want to start and then obviously if you're going to add those break points, you're doing that because you need to manipulate the fuelling at that particular RPM, then you can go in and change them to suit so really really powerful and flexible in terms of how you make those adjustments. |
| 21:36 | So if we click the I key to go to ignition, essentially exactly the same adjustability in here, this time the axis is actually by default, set to manifold absolute pressure there, but again up to your personal preference as to how you set that up. |
| 21:55 | In terms of other things that are worthwhile understanding, we've got the, all these channel lists down the bottom here and again you can manipulate these to suit your own requirements so that you've got the information that you want to see. |
| 22:11 | There's a variety of different ways we can display them, I like the numerical displays like we're seeing here, so obviously engine coolant temperature, intake air temperature and throttle position. |
| 22:23 | What we can do here is right click on these and we can click on properties and property box will show up so here's the properties that we are going to be viewing. |
| 22:34 | So we can add or remove those as we see fit. |
| 22:37 | No big deal there, pretty self explanatory. |
| 22:39 | We'll click cancel for this. |
| 22:42 | Let's see how we can manipulate our AFR lambda target. |
| 22:46 | So we've got this here and this will display our lambda target that comes from our AFR target table. |
| 22:53 | But usually I'd also have wideband built into the ECU. |
| 22:57 | We haven't had the opportunity to install that yet so I don't but for the sake of demonstrating this, if we right click and we come down to properties, and what we can do here is then add another gauge. |
| 23:14 | So let's type in lambda and it'll just autofill and what we're looking for here is lambda one. |
| 23:20 | We can double click that or click the arrow to move that across and that will then show us those two parameters, one above the other which is generally how I prefer to view them but again really comes down to personal preference. |
| 23:35 | Let's say we want to add a new view, so right clicking somewhere where we don't have an existing view, existing gauge and this gives us the full list of options that we've got available, so basically really up to your own personal preference. |
| 23:50 | The run time value list is basically the channels list that we've already got out here on the left hand side so we can add another one of those, digital gauges again as I mentioned, my sort of usual personal preference and then we can go through and find out whatever gauge we actually want to display so we'll get rid of that for the moment. |
| 24:08 | Alright so let's move through our ECU settings in a bit of order, I'm definitely not going to have time here to go through every single element. |
| 24:17 | So I'm going to gloss over some of this but really a lot of it is relatively self explanatory, if you come from the G4+ most of this currently is really no different in the G4X and I'll focus on the main difference in terms of the workflow for setup first and then we'll sort of come back to some of the basics. |
| 24:39 | So the main thing that they've changed or at least as I see it in the user interface here in the G4X is how you go about setting up an input. |
| 24:49 | So let's come down to our analog inputs and in the G4+ world, or in fact all of the preceeding Link G4, G3 even I think, products, basically what you would do is choose an analog input for a sensor for example and then once you've chosen that, you would choose what the parameter was that was going to be attached to that and then basically set it up. |
| 25:14 | In the G4X they've gone about this in a different way, so now what we've got here is a number of parameters that are pre defined. |
| 25:24 | So see we've got accelerometer, barometric air pressure, engine coolant temperature, exhaust pressure, fuel pressure and fuel temperature. |
| 25:31 | Some more down here, IAT, lambda, MAP, oil pressure etc so let's say we want to add a fuel pressure sensor. |
| 25:39 | Well the first thing we would do is go to our analog inputs and we would double click on fuel pressure. |
| 25:45 | So at the moment, we can see our source is set to none. |
| 25:48 | So by double clicking on this, we can now choose an analog voltage input to apply that to so I'm not actually too sure, obviously I don't have a fuel pressure sensor here on this car but I'm not too sure what's free, let's just go with analog voltage eight. |
| 26:05 | Now we can define a high and low value. |
| 26:09 | Generally these pressure sensors are 0.5 to 4.5V and pays to set a error, maybe 0.05 for low and maybe 4.95 for high and straight away we can see that that's actually showing that we've got a fault code here. |
| 26:29 | The ECU, as a plug and play, also operates the check engine light on my dash and obviously you can wire up an output for a check engine light if you're using a wire in, so I've now got a fault code up on the dash to let me know something is wrong. |
| 26:43 | We can also set an error value for our fuel pressure. |
| 26:46 | This is pretty important because as part of the main fuel model in the G4 platform, we can actually incorporate fuel pressure into it. |
| 26:55 | Why that's important is that typically we were always expecting our fuel pressure to remain fixed. |
| 27:01 | That's not always going to be the case and particularly if you're using a volumetric efficiency based fuel model, that fuel pressure actually feeds into the equation. |
| 27:09 | And if we're monitoring it rather than just assuming that it is staying fixed, let's say our fuel pressure drops off a little bit, the ECU can actually calculate what additional fuel injector pulse width to deliver in order to get us back to the mass of fuel that we wanted to be delivered. |
| 27:24 | So why this is important though is if we go into error, we don't want this to drop to zero, that's not going to work really well. |
| 27:31 | So we probably at least want something somewhat sensible, let's say 300 kPa would be the norm for a normal return style fuel system for port injectors. |
| 27:44 | Then we've got the calibration and we can choose what we've got in here. |
| 27:49 | Let's say we've got 100 psi sensor which might be pretty typical and there our calibration, our input is set up so slightly different workflow there, again heading back to our menu, we want to start by choosing the sensor that we are setting up and then we can go ahead and actually calibrate that by choosing the source where that sensor is. |
| 28:14 | So let's have a look at one that we do have set up, throttle position. |
| 28:16 | So again this is by default, we can see that that is coming through on analog voltage three and we've got our high and low, our closed and our open voltages. |
| 28:28 | Now on top of that, I'll show you one more thing and then we'll have a look, I'll shut the engine down and we'll have a look at a couple of setup functions that we'll need to go through. |
| 28:38 | So the other one is our manifold absolute pressure, so we could find that here. |
| 28:44 | We can see that that is set up on analog voltage one, again just by default, we've got our minimum and maximum values, our error value at 100 kPa and then the calibration. |
| 28:56 | So double click on this, we've got a really wide range of calibrations, of course you can use a user defined calibration as well, this one's factory, EVO 9, job done, nice and easy. |
| 29:07 | Right I'll just shut this down and we'll power it back up and one of the things you will need to do when you are first setting up your ECU, before you actually get up and running, is you're going to need to calibrate the throttle position sensor and the manifold pressure sensor. |
| 29:25 | So you can do this from ECU controls, we've actually got the MAP sensor calibration little icon here so we can do that there by typically you're probably going to be doing this from the ECU controls menu. |
| 29:36 | We'll start with our TPS setup, so we can come down to the bottom, click on that and just do exactly what it tells us to do. |
| 29:44 | So we want to depress the throttle the whole way. |
| 29:46 | Really important when we are doing this that we make sure that we apply reasonable pressure to the throttle pedal, it's tempting just to touch the throttle, stop and leave it at that and maybe in the heat of competition, probably actually be trying to bend that throttle pedal through the firewall so we want a realistic amount of pressure, we'll click OK, back off to the closed position, click OK and our job is done and what we can see here is our TPS main. |
| 30:11 | Want to make sure that that is moving nice and smoothly as we move our foot through the pedal travel so if it's erratic or it's sort of jumping up and staying stationary, obviously that indicates that we've got a problem, we'd need to look deeper into that. |
| 30:27 | Also, probably notice while I was doing this, we've got the TPS shown both in a digital number as well as in a bar graph so again just absolutely down to personal preference there as to what you'd like. |
| 30:41 | The other element as I mentioned is our TPS, sorry our MAP calibration, so MAP sensor calibration, we're going to find that in exactly the same spot. |
| 30:49 | Click on that and it's going to ask if we'd like to perform a MAP sensor calibration. |
| 30:53 | Click yes, job done. |
| 30:55 | So the only reason that's going to fail is if there's a big enough discrepancy between the manifold pressure sensor input and our barometric pressure sensor. |
| 31:05 | So obviously here while we are turned off, the engine's not running, they should match pretty closely so that's the case, that's done and we would also want to press F4 in order to store those changes into the ECU. |
| 31:20 | Now we do have this error that's showing up here, so it's showing us a fault code on our fuel pressure signal and we can get a little bit more insight in there by double clicking. |
| 31:32 | So it's showing obviously the analog voltage eight that I set up is below the low value and our fuel pressure signal is an error so this is how we can see this. |
| 31:41 | We can also clear our fault codes, this is obviously going to come straight back because we don't have a fuel pressure sensor but if you've gone through and you've fixed whatever error it's coming up with, you can then go ahead and clear those errors and make sure that everything sort of should come back to normal, it's not going to because we've still got exactly the same problem of course. |
| 32:04 | Let's also go here and have a look at ECU controls and we have our ECU unlock and I haven't really covered this but the ECU unlock is something, let me just change this so that we're not going to end up having the stereo taking over in a second, there we go. |
| 32:25 | When you get your ECU delivered, it will be delivered in a locked state, so this is to avoid theft and the like. |
| 32:35 | So before you can actually get in and tune it, you will have to actually unlock that ECU so you can go to ECU unlock, it'll give you the serial number here, if you're a dealer you can log on through your portal onto the Link ECU website and get the unlock code, otherwise you would deal with whoever you purchase the ECU from, enter your unlock code here, click unlock, job done and we are good to go. |
| 32:58 | Another parameter that I'll just go over in the ECU controls menu here, we've got, or a couple actually, we've got update firmware, pretty self explanatory and again if you are buying a new ECU, it also is worth having a quick check and making sure that you are on the most up to date firmware because often you won't be. |
| 33:19 | New firmware fixes bugs and problems that have been found and also introduces new functions and features so you always want to make sure that you are on the latest firmware so that's a relatively straightforward process, you can download the newest firmware from Link's website. |
| 33:36 | There is the ability to clear our fault codes which we've already seen, straight from here. |
| 33:41 | We can set up our ECU log files, download them, CAN setup which we're going to have a look at in a different way. |
| 33:47 | Other interesting element here is our ECU statistics, control D will obviously also get you this. |
| 33:54 | What does this show you? Basically everything that, as a snapshot of maximum values. |
| 34:00 | So this is quite handy just to get a sense of how the vehicle is being treated. |
| 34:05 | So for example, this is a reasonably fresh install, we can see that we've hit our rev limiter five times. |
| 34:11 | Not really a big deal, launch limit, MAP limit, speed limits, we can see basically everything that's going on. |
| 34:18 | We've got our maximum engine RPM, always a bit of an insight into what's going on, as well as our maximum manifold pressure and our maximum injector duty cycle. |
| 34:28 | Air temperature etc. |
| 34:30 | So this is a really good way of just keeping an eye on things. |
| 34:33 | I used this a few times where I had a customer that I knew was probably really beating up on the car a little bit more than he should be, or she should be, and not showing a lot of mechanical sympathy and you sort of can bring up these statistics and say hey look well you know, you've had the car back for three days and I can see that you've hit the rev limiter 385,000 times which is probably a touch much, maybe back it off a little bit. |
| 35:00 | Particularly if you're offering an engine package with an ECU then that's a good way of protecting your intellectual property and reputation with the engine as well. |
| 35:09 | We can also see how long the engine's been running for, how many times it's been started, how many times it's been stored and interestingly as well because this ECU does have onboard knock control, we've also got a knock counter as well. |
| 35:23 | Let's go back to, nope we don't want to go back to that, we'll go back to our ECU controls menu, so we can clear those statistics as well so what I'd always do is after I'd tuned the vehicle, I would just clear those statistics so that they were fresh and then I knew that I was only seeing what was happening once the car left my workshop. |
| 35:44 | Coming back to our ECU controls, we can store. |
| 35:49 | So this is one element that's important to understand with the Link ECU is that any changes we make are not automatically stored. |
| 35:59 | So we physically have to store those changes, we can either come into this menu, press control plus S or interestingly, F4 will do the same. |
| 36:07 | I still have made all of those changes to this fuel table so I don't want to actually make that store change now. |
| 36:15 | What else do we need, password protection if you want to password protect it, relatively straightforward and easy to do. |
| 36:24 | And then at the bottom the other element that I just wanted to show here was our trigger scope. |
| 36:28 | So not a new feature by any stretch of the imagination but probably one of the most useful features, particularly when you are fault finding triggering issues. |
| 36:40 | Shouldn't be such an issue with a plug and play ECU because again you're dealing with factory wiring and it should come pre configured for the factory sensors but if you're dealing with something that's a little bit special, little unique, with custom triggering then this basically can be used, let's click capture and it will show us our trigger scope for trigger one and trigger two so we can actually see exactly what the ECU is seeing, it will give us just basically what is, for all intents and purposes, an oscilloscope trace. |
| 37:13 | The other function here with this which is useful is we can click save and if you are having problems that are a little bit beyond you, this is something that you can then send to Link's tech support so that they can physically see exactly what's going on. |
| 37:27 | Alright let's close that down, we'll come back to our ECU settings. |
| 37:32 | We've kind of gone through our inputs, let's have a quick look at the same with our auxiliary outputs and again this is changed in exactly the same way as the input setup. |
| 37:43 | Previously out workflow would be to choose an auxiliary output, be that a auxiliary output, a spare ignition or a spare injector output and then define what that particular output was going to be, now we do it the other way around so for example we can see here we've got, let's try that again, we've got our engine fan, so when we're setting up our engine fan we would come to that, click on our, really hard at the moment, we'd come to our engine fan and here are all our settings for our engine fans, we can define then where our engine fan is going to be so we can see fan one is going to be on auxiliary one, we can set our turn on temperature and our hysteresis and we also have, looking down here, I haven't actually played with this yet, fan three. |
| 38:37 | For some reason fan two is missed by fan three is on ignition four and we can see that that is going to turn on slightly higher, that turns on at 96° and again with a 2° hysteresis so I'm not going to go through all of these, I mean for all intents and purposes, it's identical, just that slight tweak in the workflow of how we would go about that. |
| 38:57 | Alright let's go through some of the higher level stuff now. |
| 39:01 | We'll come up to our configuration here and click on configuration. |
| 39:04 | This is the stuff we're going to be doing before we try and get our engine up and running. |
| 39:09 | So I'm basically working through that menu structure in order, is a pretty sensible way of kind of making sure that we tick everything off and we don't overlook anything. |
| 39:17 | Number of cylinders and the engine type, four cylinder, four stroke. |
| 39:21 | Our connection speed, I haven't personally had too much trouble with it but there have been some reports of some connection instability with the G4X so in that case, we can come here and we can slow the connection rate down and that I believe is going to generally help. |
| 39:39 | Few other functions which I won't deal with and then down the bottom here we've got our firing order for our 4G63, one, three, four, two. |
| 39:47 | Alright let's close down our configuration. |
| 39:51 | The next one we'll come down to is our fuel and we'll start with our fuel setup and fuel main. |
| 39:56 | So couple of ways we can set up the G4X, again this is all really very similar to the G4+ but we've got the engine running so these are actually grayed out at the moment. |
| 40:08 | We've got our injection mode, obviously wherever possible we want to run that at sequential. |
| 40:12 | And then we've got our fuel equation mode. |
| 40:15 | So at the moment this is set up on traditional which basically turns the G4X into an injection time based ECU. |
| 40:24 | This is how the older Link products were done, very similar to the likes of MoTeC's older 100 series and M48, M4 etc. |
| 40:34 | These days volumetric efficiency based fuel models are all the rage. |
| 40:39 | There's no real must have to go one way or the other. |
| 40:43 | You can absolutely tune the engine on injection time or traditional in Link lingo, or volumetric efficiency which again in Link lingo is modelled. |
| 40:52 | I can't double click on this because the engine is running as I mentioned. |
| 40:55 | We'll leave it running but basically you've got the option there of traditional, modelled or I think modelled multi fuel from memory. |
| 41:02 | But basically whether you want to go volumetric efficiency or injection time. |
| 41:06 | I'll digress a little bit here and just talk very briefly about the differences. |
| 41:10 | As I mentioned, absolutely you can tune the engine on either. |
| 41:14 | If you are on injection time, if we come back to our fuel table here, these numbers in here are a percentage of a master injector pulse width. |
| 41:25 | So that's before any corrections are applied. |
| 41:28 | Let's just find that, fuel main, I think we find it in here. |
| 41:32 | This is our master injector pulse width here, 12ms. |
| 41:36 | So what that means is that if we have a number, let's get back to it, if we have a number in here, at 100 kPa with no corrections being applied for intake air temperature, coolant temperature etc, and we put a number of 100% in that value, in that point in the table, that means that the ECU will deliver 12ms pulse width to the injectors. |
| 42:00 | So the downside with this is that if we swap injectors, let's say we've tuned the engine, and this is actually a classic example, we've spent a bit of time on the tune and we find out right at the end once we get up to higher boost and higher RPM that we're actually out of fuel injector. |
| 42:18 | Well in an injection time based fuel model, what we're going to have to do is basically replace the injectors with something larger and we'll have to, we can kind of skew the entire table to suit the change in size of injectors. |
| 42:33 | Let's say we go up 25% of injector size, we can make a change, a similar change to the fuel table, should get us in the ballpark but with the idiosyncrasies between injectors, you're still inevitably going to have to make some touch ups to the fuel table. |
| 42:48 | So with volumetric efficiency based fuel models or modelled in the Link lingo, what this means is that the fuel table is ow no longer a fuel table, it is actually a volumetric efficiency table. |
| 43:01 | It is defining how completely the cylinders are being filled with air. |
| 43:05 | We've also got some requirements around the engine capacity and around the fuel characteristics. |
| 43:11 | And we also need accurate information on the injector size. |
| 43:14 | If we do all of that properly, or injector characteristics I should say, if we do all of that properly, what that means is that if we run out of fuel and we swap to a different set of injectors, if we swap the injector characterisation data in accurately and properly, the engine should actually run almost perfectly as it was. |
| 43:33 | In my opinion, again you can tune just as well on either model. |
| 43:38 | Real advantage with modelled fuel equations is that it makes our life a lot easier when we are running flex fuel because almost irrespective of our ethanol content, we don't actually tend to see the volumetric efficiency of the engine change much so that means we've got basically the ability to run on almost one fixed table. |
| 44:01 | Now few idiosyncrasies to that as well which I won't get into but that's essentially how that works. |
| 44:06 | Let's go back into our ECU settings and back to our fuel main. |
| 44:09 | We've got the ability to have an open loop lambda correction as well. |
| 44:15 | So this kind of is a way of really making the traditional or injection time based fuel model work a little bit more like a VE based fuel model. |
| 44:24 | We do have, let's just go to it here, we'll enter AFR and when my computer works itself out, we've got our AFR lambda target table. |
| 44:34 | So this is important to fill in properly. |
| 44:36 | Absolutely critical if you're using the modelled fuel equation. |
| 44:40 | These are going to want to be our actual desired air/fuel ratio or lambda targets, what we want the engine to run and while I'm talking about that, I just pressed the U key and we can switch between units of imperial or metric to suit your own personal preference. |
| 44:57 | You can get a little bit more involved with how you set that up and what parameters you want in metric and what you want in imperial as well. |
| 45:05 | So you want to set that up properly. |
| 45:07 | If we're using the open loop, where is it, open loop lambda correction, basically what that will do is a background correction based on our lambda targets. |
| 45:18 | Nice thing with this is that it improves the resolution of our fuel table because we're not needing to add so much to our fuel table in order to get a richer mixture as we go into positive boost for example. |
| 45:29 | Our lambda correction will do that for us. |
| 45:33 | Sorry that's actually our lambda target overlay. |
| 45:36 | Right, the one below that. |
| 45:39 | Next one that I want to talk about here just really briefly is our charge temperature correction. |
| 45:44 | Traditionally the fuel equation has been corrected for changes in intake air temperature with an intake air temperature correction table. |
| 45:53 | Now it does a reasonably good job but it is technically not the correct way of doing it. |
| 45:59 | I am just going to shut our engine down here for a second and give us a little bit of airflow so we don't end up completely overheating. |
| 46:06 | It's not technically the correct way of doing this because our air temperature sensor might be in our intercooler plumbing, it might be in our inlet manifold, it's going to be affected by heat soak depending where on the intake system it's fitted and really as far as the engine is concerned, we want to be correcting based on charge temperature which is the air temperature as the inlet charge goes past the inlet valves into the combustion chamber. |
| 46:35 | Now understandably, that's pretty difficult to measure so this option here, charge temperature correction, if we turn that on, allows us to basically have a 3D table that we can focus the charge temperature estimate based on either the inlet air temperature sensor or the engine coolant temperature sensor based on load or air speed, RPM for example. |
| 47:01 | And the theory behind this is that if we're at idle where the air speed is really low, there's a lot of time as the air goes through the inlet manifold, through the inlet ports, and then finally past the valves into the cylinder where it can pick up heat from the casting. |
| 47:17 | So basically if we're just looking at the air temperature sensor value, it's not probably going to be too realistic. |
| 47:23 | So we can skew or bias the charge temperature towards coolant temperature and then likewise at wide open throttle, high airflow, there's a lot less time for that to happen so we would bias the charge temperature estimate more towards the intake air temperature sensor. |
| 47:38 | That is a topic in and of itself and if you want to learn more about charge temperature estimates, search that out in our webinar archive because we actually did do that on the G4+ on our Nissan 350z. |
| 47:51 | More details in here, probably going to just skim over the rest of this, stoichiometric air/fuel ratio. |
| 47:58 | If we're going with a modelled fuel equation, we need a little bit more information around fuel density, fuel density, temperature coefficient as well. |
| 48:07 | Sounds a little bit scary but there's information in the help file to fill that in for most popular fuels. |
| 48:13 | So that gets our basics set up. |
| 48:16 | If we press escape now, we'll come back up to our fuel setup. |
| 48:21 | We've got our injector setup as well. |
| 48:24 | We'll click on that, this isn't such a case of just picking an injector from a drop down menu. |
| 48:29 | But what we, well this is traditional fuel model as well so it's not going to be overly helpful. |
| 48:36 | Generally what we're going to need to do is provide the reference flow from the injector, so basically how much fuel it can flow at a given pressure, we'll give that reference pressure and then we've got our injector deadtime table. |
| 48:50 | Pretty traditional here, nothing too unusual. |
| 48:53 | The nice feature here though is that Link go one step further and they also give us the ability to incorporate data on the injector short pulse width adder which I know is a hell of a mouthful. |
| 49:05 | So again without trying to get too far off track here, if we look at the flow through an injector, at very small pulse widths, it varies from the theoretical linear flow that the injector should provide. |
| 49:22 | So if we want to, if we've got the data we can enter that data in here and it will correct it. |
| 49:26 | What this does is it just gives us a more accurate shape to our fuel table, particularly if we're using the VE fuel model, that means that our VE table is an accurate representation of volumetric efficiency and it also means that our control of our air/fuel ratio is going to be much more accurate. |
| 49:45 | Might be wondering well how on earth do we get this information? It's absolutely not something that we as tuners are expected to provide. |
| 49:54 | But if you are buying injectors from one of the more high end suppliers, Injector Dynamics is one that pops to mind, they actually provide this data in an Excel spreadsheet so it's literally copy and paste, very very easy to do. |
| 50:09 | Not essential and people would get hung up on, well what do I do, I don't have this data? Do nothing, it is set to zero on this table and that is how it always used to be essentially before we had access to this parameter so it's basically, if you've got the information, use it, if not, not a problem at all. |
| 50:28 | Let's press escape and we'll come back. |
| 50:29 | We also have the ability to run an injector test here. |
| 50:33 | So you can test your injectors. |
| 50:35 | I always like to do this and make sure that basically the injector that I think is operating is in fact operating. |
| 50:43 | And that the injector is still actually working. |
| 50:45 | And this just helps, if we go through as a pre startup test and make sure that all of our injectors are wired correctly and operating, all of our ignition coils are wired correctly and operating because we have an ignition test just the same as this. |
| 50:59 | This gives us one more thing that we can sort of tick off and we know that we've got a really good chance that the engine's going to start and run as expected. |
| 51:07 | Right we'll close down our fuel setup. |
| 51:11 | We've got cold start which I'm not going to deal with and some fuel corrections here again which I'm not going to go into too much detail with. |
| 51:18 | I will talk here about our inlet air temperature correction, I talked about charge temperature estimate and in this case this is just a simple 3D table. |
| 51:27 | We've got throttle position vs our intake air temperature and then how much fuel we're going to trim out. |
| 51:33 | Generally as a rule of thumb we're going to need a zero point which I always have as 20°. |
| 51:38 | As the air temperature gets colder, I'm going to add around 2-2.5% per 10°, as the air temperature gets hotter because our air is less dense, we need less fuel to maintain a stable air/fuel ratio, so we remove fuel. |
| 51:51 | Now interestingly, what you can see is that, this is not actually as dramatic as I'd normally have it, but at closed throttle we can see that we aren't quite trimming out as much fuel as we would be at wide open throttle. |
| 52:03 | And this just is a kind of a manual way of trying to get the best results out of the intake air temperature sensor only if we're not using charge temperature estimate instead. |
| 52:16 | We also, if we come down to the bottom here, we've got the ability to have our injector timing and how that's going to be set up. |
| 52:25 | By default it's a single zone and it is end of injection and the injection point is 340° before top dead centre but you can set up a complete table for this if you prefer and then that's another parameter that you can actually play around with while you're tuning. |
| 52:41 | Alright I think we've probably covered the high level stuff for our fuel. |
| 52:45 | If we come into our ignition, basically we've got all of the same parameters here and again I'm just going to speed this up a little bit. |
| 52:53 | Nothing too different here to the G4+. |
| 52:56 | We do have a G4X and many G4+ worked examples in our library of worked examples so we recently added a G4X worked example on a Subaru STi rally car so if you want a little bit more detail than what I'm going through here, you can check that in our Practical Standalone Tuning course. |
| 53:16 | Here is just supposed to be more of a high level overview of the software and the differences between the G4X and the G4+. |
| 53:24 | Engine protection. |
| 53:27 | So this is basically where we're going to find all of our limiters and it's always a good idea to go through these and make sure that they are set up to suit your requirements before you get started. |
| 53:37 | So for example if we've got an RPM limit we can come here and set up how that RPM limit is going to function. |
| 53:44 | As you can see here we've got it set to fuel cut. |
| 53:46 | We can have ignition cut or fuel cut. |
| 53:49 | I prefer fuel cut where possible, it is just softer on the valve train and that can be problematic on some vehicles as well, SR20 would be a classic example, ignition cut and an SR20 do not go together well. |
| 54:04 | You can also turn on advnaced mode, I would absolutely not recommend doing so unless you need to but this gives you a little bit more control over how the cut is going to work. |
| 54:17 | Key parameter here that is worth mentioning though is this one here, the limit control range. |
| 54:23 | This exists for both the RPM limit as well as our manifold pressure limit and it's caught out a lot of tuners. |
| 54:30 | The way this works is that the hard cut will be at the point that we put into our RPM limit table so let's say that's 7000 RPM. |
| 54:42 | So that's where the hard cut occurs but we've got this limit control range which you can see there is 200 RPM so we're actually going to start soft cutting 200 RPM prior to the point in our RPM limit table, 7800 in other words. |
| 54:55 | So the number of times Link tuners who are fresh to this product will find that their engine's starting to misfire just before the rev limit, well it's not misfiring, it's actually starting to run into that soft limit function so just understand that. |
| 55:08 | How you set this up is up to you and it really does come down to the RPM sensitivity of the engine as well. |
| 55:14 | Obviously if you've got an engine that's not a known limitation in terms of maximum RPM, this is nice because the number we put in the RPM limit table is the upper limit so the same thing happens for the manifold pressure. |
| 55:29 | I think, off the top of my head, that's 20 kPa but let's just quickly have a look, we'll turn our advanced mode off there. |
| 55:36 | We'll come back over here to our MAP limit. |
| 55:39 | So again by default we are using our fuel cut which I'm absolutely happy with, we'll turn that on, and 10 kPa, I take it back. |
| 55:48 | So again just understanding you're going to end up, if you set a 240kPa limit, you're actually going to have that come in 10 kPa before that, so we'll just turn that back off. |
| 55:57 | Now how do you actually set the actual limit? So each of these, once we've turned them on, we're going to end up with a table that pops up down the bottom, so for our RPM limit, we've got a 2D table vs our coolant temperature. |
| 56:10 | Reasonably happy with that, you can manipulate it to suit yourself and of course MAP limit table again which is interestingly quite optimistic actually, for a default table, probably wouldn't really be wanting to run a standard engine up to 280 kPa but there we go, we can just change that down to something a little bit more suitable, let's say 250 kPa. |
| 56:30 | Again knowing that we are actually going to end up limiting 10 kPa earlier, 240 kPa. |
| 56:36 | Auxilliary outputs we've already dealt with, we've talked about our inputs which essentially mirror the digital inputs as well. |
| 56:44 | Triggers, trigger setup here, so we've got our trigger mode, obviously Evo 7-9 but there's a whole bunch here of predefined options as well as the ability to use conventional multi tooth missing trigger modes as well. |
| 57:02 | RPM filtering, again nothing's changed here, always with our filtering we want to use the minimum possible and then only add filtering as and when needed. |
| 57:11 | Then once we've got our main trigger setup we can come into trigger one, which is our RPM input in Link lingo and trigger two which is our synchronisation input or home trigger. |
| 57:24 | Trigger one, we can define what type of sensor it is and whether or not it's a pull up, whether or not the pull up is enabled and which edge we are going to be triggering on. |
| 57:33 | We've got the same information for trigger two and then finally and really importantly, the calibrate function. |
| 57:41 | So this is one of the things we will need to do before we get the engine running is set our base timing. |
| 57:47 | So in order to do that, we'd click on the little spanner icon here and what we can do is lock our ignition timing to a value that we can see. |
| 57:55 | So going to depend on the engine but something where we know we've got a timing mark we can reference, 10° is a nice safe one and the engine's going to generally idle quite happily at 10°. |
| 58:05 | Then what we want to do is adjust our offset here until the actual timing that we're seeing with the timing light matches the timing that we've got in our laptop, in this case 10°. |
| 58:18 | And then we also have the ability here to adjust our ignition delay. |
| 58:24 | So the idea behind this is that at higher RPM, we would maybe hold the engine at 6000 RPM and then adjust this delay in microseconds until we've got the same base timing, the same fixed timing at idle as we have at 6000 RPM and this means that we've got no timing drift. |
| 58:41 | So really important to make sure that that's accurate. |
| 58:45 | And trick here as well if you are setting up a trigger with a variable reluctance or magnetic sensor, to make sure that the polarity of the wiring is correct. |
| 58:56 | It's always a good idea to check the timing at idle and then once you've got that set, and you've still got the base timing mode set, so the timing won't vary, what you can do is bring the RPM up and just watch and make sure that the timing doesn't drift. |
| 59:10 | You might see it move around a degree or two but if you see a significant fluctuation in your timing, that's related to RPM that would be a good indicator that your polarity is wrong. |
| 59:21 | Another place that you can check that of course is with your trigger scope. |
| 59:25 | So all of these really just go to help make sure that we've got the best chance of success when it comes to starting the engine for the very first time. |
| 59:32 | Math is a function that was brought in with the G4X and I'll admit I have not actually had the opportunity or need to use this. |
| 59:43 | So I won't cover that off in this. |
| 59:45 | If there's enough requirement or request, we might look at doing a separate webinar on it. |
| 59:50 | Then we can come down to motorsport functionality, I'm not going to go through each of these but basically all of our conventional motorsport functions, anti lag, gearshift control, launch control etc. |
| 01:00:02 | Idle speed control, boost control, knock control, none of these I'm going to go into any detail because we are running a little bit short on time. |
| 01:00:11 | On that note, I'm going to do a quick demonstration of the logger function in a second so great point to suggest that if you've got any questions, please ask those now. |
| 01:00:23 | One thing I will mention is the VVT control or variable valve timing control. |
| 01:00:28 | This is a little bit different in the G4X and actually is a little bit simpler. |
| 01:00:34 | So if we go into that, we've got to set our cam control mode. |
| 01:00:39 | Obviously for the EVO 9, tells the ECU what it's expecting and then we've got this cam angle test, if we double click on this, we can test the cam angles which will show us the cam angles in real time while the engine is running and our run time values. |
| 01:00:52 | So in this case we've only obviously got inlet cam control so that becomes inlet bank one. |
| 01:00:56 | Then we can also go calibrate and what this will do, while the engine is running is automatically set up the calibration for our cam control so that's actually a lot easier than it was in the earlier G4+. |
| 01:01:12 | CAN is the other element that I'll just mention. |
| 01:01:15 | While it's not dramatically different here, the CAN setup on the G4+, G4X is in my opinion probably one of the best of the aftermarket standalones. |
| 01:01:27 | Particularly for the price point of these ECUs, there's not a lot that give the flexibility for you to write your own completely custom template and this allows you the flexibility to let the G4X send and receive messages from other CAN enabled devices even if they're not from the Link brand. |
| 01:01:44 | So you've got two CAN buses here, so CAN module one and CAN module two. |
| 01:01:48 | Let's quickly just have a look at this. |
| 01:01:51 | We can set this up, there are a bunch of pre defined CAN templates, so if you've got one of these vehicles that is already supported and basically reverse engineered, simply select that and you're good to go, you'll be able to get all of that data or user defined here. |
| 01:02:07 | And then we've got our channels over here so let's say we want to communicate with a dash. |
| 01:02:12 | So what we'll do is go to mode, we can transmit custom data on our user stream but most people probably aren't going to be doing that so if we scroll down here, transmit generic dash. |
| 01:02:24 | If we choose that and from memory, we'll want a faster rate than that, let's say 50 Hz. |
| 01:02:30 | From memory, this should transmit on CAN ID 1000 in decimal but you can basically just make sure that that matches what your dash is expecting to receive on and in the Link G4X manual, it gives you the CAN template that that will send but the idea with this is that you should be able to hook up your Haltech IC7 or your MoTeC C125, choose Link G4 or whatever it is as the receive template and your job should be done so it's trying to make it really really easy for those who aren't that savvy with their CAN but if you are and you want to program it yourself you absolutely can do that. |
| 01:03:09 | You've got your streams here that you can basically communicate or send as much data as you want in the correct template to communicate with whatever device you are talking to. |
| 01:03:22 | So very very powerful and very very flexible. |
| 01:03:27 | Right what we'll do now is we'll just get our engine up and running and we'll do a quick demonstration. |
| 01:03:33 | And then we will probably call our webinar finished, so let me just get ourselves going here. |
| 01:03:41 | And I'll just get the window back up so that I can hear and let's get our fan going as well. |
| 01:03:50 | So disconnecting back there, I purposefully disconnected and reconnected and the reason that I did that was simply so that we got rid of those changes that I made previously that I didn't want to make. |
| 01:04:05 | So we're going to click here no. |
| 01:04:07 | If on the other hand, you made some changes, maybe dropped out of communication but you've got the changes on the PC, you can send those through to the ECU. |
| 01:04:17 | Right we'll get our fan running. |
| 01:04:19 | So what I'll do is a quick ramp run here and while we're doing this, I don't know if we've actually got the dyno hooked up here but I'll go to our display here for our logger so I've just pressed F8 and I've got that running so probably a little bit heat soaked but in the interest of just getting a run on the board here quickly, we'll just do a ramp run. |
| 01:04:57 | We'll let that come down to a stop and that was a little bit lower, obviously heat soaked, 290 horsepower or 217 kW but we've still got our logger running so again, we'll press F8 here and that will stop our logger. |
| 01:05:10 | So you can set this up as you'd expect with any parameters you want, we've got RPM at the top. |
| 01:05:16 | Generally I'll have our measured lambda and our lambda target in this next group here. |
| 01:05:22 | Just because obviously that gives us a spot check of whether we're richer or leaner than our target. |
| 01:05:28 | We've got our manifold pressure in the next group here. |
| 01:05:32 | Engine coolant temperature and then we've got our VVT control which by the looks of it, probably actually needs a little bit of work, we've got about a 2° error there but close enough for our purposes. |
| 01:05:43 | Our VVT solenoid, duty cycle and then our injector duty cycle which as you can see, getting a little bit up there, I think right at the top there we're yeah just under 90% so again what we can do, just clicking on any point in that, we can then go back to our tuning table, fuel and this is why I kind of don't usually use the colour gradient 'cause it's alittle bit hard to see but if I press H, we can see yep OK this is exactly where we were at that particular point, allowing us to be really pinpoint accurate in making our tuning changes. |
| 01:06:18 | Alright we'll leave it there and we'll jump into our questions so if you do have any more, please ask those now. |
| 01:06:26 | And I'll see how many of those we can get through. |
| 01:06:30 | Well if we've got any at all for that matter. |
| 01:06:32 | Nismo Freak, any tips on calibrating the charge temperature correction table? Yeah it's not easy which is why it's almost a coin toss between using the traditional IAT correction table and charge temperature estimate. |
| 01:06:48 | Problem is when using a charge temperature estimate table, where do you actually go ahead and make the changes? I would highly suggest you have a look at our webinar on charge temperature estimate tuning. |
| 01:06:59 | I've gone to a lot of detail, that's probably a 45 minute to an hour long webinar where I sort of show my approach to setting that up. |
| 01:07:09 | And I mean I wouldn't say it's going to be absolutely rock solid because it is such a tricky thing to teach. |
| 01:07:20 | There's so many variables, where abouts is the intake air temperature sensor, is it in the intake pipe pre throttle body where it's going to be less exposed to heat soak? Is it in the inlet manifold where it will be exposed to heat soak? All of those things really play into that but that webinar's probably my best tip for you. |
| 01:07:39 | How do we run the injector test, Cory Z32's asked. |
| 01:07:43 | Yeah correct absolutely engine off, we don't want to have the fuel pump running so you can actually disable your fuel pump in order to do that. |
| 01:07:51 | You've got an output assigned to the fuel pump, you can just turn that off. |
| 01:07:55 | So you want to make sure that you don't have any fuel pressure buildup and the reason we want to make sure we don't have fuel pressure is obviously if we're going to be pulsing the injector, then it's going to be spraying fuel into the cylinder, obviously not what we want So generally I'd even try and do this before I've assigned an output for the fuel pump. |
| 01:08:13 | So how do we do this? Yeah we listen for it clicking. |
| 01:08:17 | This can be a little bit tricky to do. |
| 01:08:20 | Couple of ways that we can figure out exactly which injector is clicking. |
| 01:08:24 | One is if we've got easy access to the injector plugs, we can simply unplug the injector to see if the clicking stops and therefore really easy to highlight yep that's the injector that was being operated, make sure you've got the right cylinder. |
| 01:08:37 | Another one that sounds a bit rudimentary but actually works incredibly well, if you get a long flat blade screwdriver and you put the end of the screwdriver down on the injector body and then you put your ear on the end of the screwdriver, that'll transmit that clicking right through the screwdriver and it becomes super apparent very very clear and very easy which injector is clicking. |
| 01:08:59 | Rob has asked, what do you do if your trigger mode is unconventional In modern common patterns that you can just load? So the answer to that is it depends. |
| 01:09:09 | Not overly helpful but let me go on. |
| 01:09:11 | If you've got something that is super unconventional, and it's not supported, you may be stuck. |
| 01:09:18 | So this is one of those things where you would need to talk to Link's tech support and I would suggest doing this. |
| 01:09:26 | If you've got any oddball engine with a very specific trigger mode, I would absolutely be doing this before you purchase an ECU and just make sure that Link at least maybe could be convinced to add that trigger mode. |
| 01:09:39 | Where I'm doing with this is some of the OE based trigger modes that are super specific to the engine, you're not going to be able to use the traditional, general trigger modes and then manipulate them to suit so some of them have got some quite weird patterns. |
| 01:09:55 | Normally it's to do with their variable valve timing control but not always so yeah absolutely check with Link first. |
| 01:10:04 | Generally if the engine is not brand new, maybe it's a few years old and it's a popular engine for modification, most aftermarket standalone ECUs will have support. |
| 01:10:15 | Mossad has asked, can you please tell me your experience with the G4X short pulse width and without? I don't know if this is, this is not specific to the G4X because that short pulse width modifier or adder which I assume is what you're talking about, that is something that is incorporated in the G4+. |
| 01:10:39 | It's not one of those things that's really going to be a massive standout result, you're not going to set up that short pulse width adder table and go hey you know what, this is absolutely transformed the drivability of my engine. |
| 01:10:51 | What it's going to do is just give slightly, and I'm talking the last few percent, more accurate control over the fuel mass that's delivered, which can help in turn give slightly more accurate control over the air/fuel ratio. |
| 01:11:05 | But yeah we're talking the last few percent and it's absolutely possible to tune the engine just as well without that data so if you don't have it, I absolutely wouldn't beat yourself up. |
| 01:11:16 | Mossad has also asked, any experience with the new G4X knock normalise? No I have not at this stage set up knock control on the G4X so that is something that we're going to be delving into. |
| 01:11:29 | Understanding that the ECU went into this car about three hours before this webinar so it is at the moment a very rudimentary setup but we're going to be adding a bunch of sensors, wideband control and validating the knock control on it as well so you can look forward to some more advanced G4X webinar topics in the near future. |
| 01:11:50 | Alright team that brings us to the end there of our webinar so as usual if you are watching this after it's aired live in our archive, please ask any questions you've got in the forum and I'll be happy to answer them there. |
| 01:12:03 | Thanks and we'll look forward to seeing you online next time. |
Timestamps
0:00 - Introduction
1:03 - How to download
2:08 - Software layout
3:40 - ECU settings menu
6:11 - Shortcuts
9:35 - Manipulating fuel table values
16:06 - Table doesn't have to be perfectly smooth
17:27 - Adjusting breakpoints
21:55 - Channel lists
22:42 - Changing AFR target
24:39 - Input setup
29:07 - TPS + MAP sensor calibration
32:04 - ECU unlock
32:58 - Firmware version
33:47 - ECU statistics
35:44 - Storing changes
36:24 - Trigger scope
37:32 - Auxiliary outputs
38:58 - Configuration settings
39:50 - Fuel setup
51:18 - Inlet air temperature correction
52:16 - Injector timing
52:49 - Ignition setup
53:25 - Engine protection
56:44 - Trigger setup
1:00:23 - VVT control
1:01:13 - CAN setup
1:03:27 - Logger demo
1:06:32 - Questions


