336 | Design for Manufacture - Laser, Waterjet & Plasma Cut Sheet Metal Parts
Summary
Sheet metal parts are commonplace on racecars as they allow us to create relatively lightweight and stiff parts from cheap materials. If we design these parts in CAD software it's easy to get the flat pattern cut on a 2D CNC cutting machine like a laser, waterjet, or plasma cutter. As with every manufacturing method there's some considerations we need to keep it mind during the design process to make sure we end up with a quality product.
| 00:00 | - Hey team, Connor here from HPA, welcome to this week's webinar. |
| 00:04 | So this week we're going to be talking about design for manufacturing or DFM for short, considerations around laser cut, plasma cut and water jet cut parts. |
| 00:15 | So when we have a CAD model and we want to get these parts made via one of those manufacturing processes, what are the things that we need to consider? So we're going to talk about how they're helpful to us, the key differences between each of those methods and how they compare to each other, why you might choose one over the other and then we're going to talk about some considerations around designing parts to be made with those processes. |
| 00:43 | So we'll get into it straight away with how this is going to be useful to us in motorsport and it's very useful to us in motorsport in short because we can make, if we use sheet metal parts in our racecars or street cars or anything like that, sheet metal allows us to create really lightweight really strong or stiff parts, relatively cheaply compared to the alternative being a machined part or even 3D printed or something like that. |
| 01:11 | So when we have the sheet metal parts designed in our CAD software, it's very simple from there to just export a DXF file and send that to the manufacturer. |
| 01:24 | In this case we're talking about the use of CNC machines being computer numerically controlled using a tool path like G code from our CAD file to automatically make our parts for us into really high quality and really high accuracy parts rather than the alternative of maybe making a cardboard template and sketching that out on a piece of, or tracing that out onto a piece of sheet metal and then cutting that out and going through that whole process. |
| 01:59 | So don't get me wrong, that process is great in some instances but for really high quality parts, this is really the best way to go, it can save us a lot of time making the parts in CAD, being able to analyse them first, make sure they work and then of course with the manufacturing process being automated, that saves us a lot of time and effort as well. |
| 02:24 | And we can use this to cut all sorts of different materials. |
| 02:30 | So it's not just cutting steel or aluminium for brackets, we can also use it to cut things like gasket material, wood in any case as well, in some of the cases like water jet cutting, so there's actually a lot of uses to it besides just the obvious ones. |
| 02:49 | But the kind of key thing to consider here is that you really need to have a sound understanding of the manufacturing process when you are designing parts in CAD to ensure that you design a part that can be manufactured, otherwise you've probably just wasted a lot of time designing something that can only exist virtually. |
| 03:10 | So that is kind of what this is all about now, just having a solid understanding, albeit basic understanding of the manufacturing processes we're going to talk about so when we're designing parts in CAD, we can make the right calls to get a part that can be manufactured efficiently and effectively. |
| 03:32 | So a little disclaimer first, my background is in mechanical engineering as a mechanical design engineer and although I have designed a lot of parts that have been made with these processes, I've never owned or operated one of these machines. |
| 03:48 | So to be able to provide you this information today I have leant heavily on the experience of Elliot at Wai Innovations, I have something just here. |
| 03:59 | And he's helped me with some of these, clarifying some of these considerations around these processes. |
| 04:06 | So Wai Innovations is here in New Zealand, not far from us in Queenstown, they are in Wanaka and they've been doing some of the laser cutting and water jet cutting work for us recently with some really great results. |
| 04:21 | So Elliot's been helpful enough to help me with some of these DFM considerations and just clarify those to help out with this. |
| 04:31 | So the following descriptions, on that note the following descriptions of these processes are not going to be overly technical due to my understanding of it but that is not the focus of this anyway, it's just having a good basic knowledge of them and then the considerations around designing for them. |
| 04:56 | So we will start talking about laser cutting. |
| 05:01 | As this is probably the most common one that gets brought up so I have a little image there of a laser cutting process. |
| 05:12 | So laser cutting, as the name suggests, it uses a laser to cut through the material. |
| 05:18 | So it's a very hot and focused laser beam that cuts through the material, essentially melts the material or vapourises it actually to create a nice clean cut through it. |
| 05:31 | So this is really good for high precision, creates a very high precision cut with a relatively thin curve width. |
| 05:41 | So the curve width is basically the width of the cut that you can kind of see here, if I zoom in a bit, that is the curve width there, basically as a result of the cutting beam. |
| 05:54 | But this is great for cutting thin and medium thickness sheet metal material. |
| 06:02 | So in terms of those materials and the thicknesses it can cut, just to put some numbers around that, so steel, up to about 10mm, and this is all dependent on the machine, we'll come back to that in a moment, so steel up to around 10mm thick, stainless up to about 8mm thick and alloy up to about 6mm thick. |
| 06:27 | Sorry I didn't convert that to inches for those more familiar with imperial units before this but that gives you a rough idea anyway. |
| 06:37 | And these thicknesses were given to me by Elliot based on their 3kW laser so bigger lasers can of course do thicker material and smaller lasers would be able to do less obviously. |
| 06:49 | The thicker materials end up getting exponentially more expensive with the assist gas and things like that so those are kind of a good general values of what the laser cutter can cut and what would be typical for most laser cutters. |
| 07:08 | So one of the really good benefits of laser cutting is it can produce weld ready edges. |
| 07:16 | So as we cut around a part like this, the edge of it is ready to weld, it shouldn't be contaminated or anything, that doesn't mean the top surface would be of course, that would take extra preparation potentially but the cut edge itself is ready to weld straight after being cut. |
| 07:38 | The other advantage here that we can see on some of this, like this part here, is the engraving or etching. |
| 07:49 | So you can see it there, and also for our CAD course worked example of the battery box which this is a flat version of that, that hasn't been bent up yet, you can see I've got the HPA logo there engraved into the top here. |
| 08:06 | So that's really good for obviously aesthetic things like this but it's also a good option if you need to label parts, you can use things like just labelling for identification but you can also ad notes to parts in some cases that can act as assembly instructions as well. |
| 08:29 | So it might seem like just a little aesthetic trick that you can do to it but it can be quite useful having that ability to engrave the parts. |
| 08:38 | Laser cutting, on that topic also is 4-6 times faster than water jet, so it's quite fast and it is ideal for detailed parts, things like small brackets, things like this I guess with lots of little details in it, it's really great for that because it's got that really thin curve width. |
| 09:01 | So moving onto the next process being waterjet cutting. |
| 09:07 | And I have another one here, another image which isn't very big. |
| 09:12 | See if I can expand that a bit, not really. |
| 09:15 | So as the name suggests, again waterjet cutting, a high pressure jet of water used to cut through the material and waterjet cutting is kind of a jack of al trades when it comes to the cutting processes. |
| 09:27 | So you can cut metals, plastic, wood, glass, rubber, foam, stone, you can actually cut basically whatever you want to put on the cutting table and you can cut very thick material as well. |
| 09:43 | So steel up to 100mm thick, I guess that would be around four inches. |
| 09:50 | And alloy up to 150mm thick and again that is going to be dependent on the machine so more powerful machines might be able to do a bit more, less powerful maybe a bit less. |
| 10:01 | You can't cut things like lead and other nasty materials like that, simply 'cause of hazmat concerns and one of the huge benefits of waterjet cutting is you're not putting heat into the material and then all the stressors that this would cause are also not there because you're not putting that heat into the material and also after the part is cut, you can generally just pick it up off the bench. |
| 10:29 | And it's not chemically changing the material as well and the same thing we just talked about before with the laser cutting, it produces a weld ready edge so you don't need to prepare that edge after it's been cut or change any dimensions to that edge, that can just be welded straight away. |
| 10:49 | It has a little bit thicker curve width compared to laser cutting and it's obviously great for thicker parts or things like plates, maybe 10mm aluminium plates or even thicker, something that we would, it's just a 2D part, well it's constant through its depth and then something with a bit of thickness that we might want to cut a hole into it and then we can drill that out, that would act as a pilot hole, we could drill that out to the size that we want and then tap into that, parts like that. |
| 11:24 | But it can also do very fine detailed stuff. |
| 11:28 | I had another version of this battery box here cut, waterjet cut as well and it would be a very similar finish, you just couldn't have the engraved logo on the top. |
| 11:41 | So it is still very useful for that. |
| 11:46 | It just, when it comes down to that, it really depends on what you have access to locally, you might know someone with one of these machines so you can get away with both for either application. |
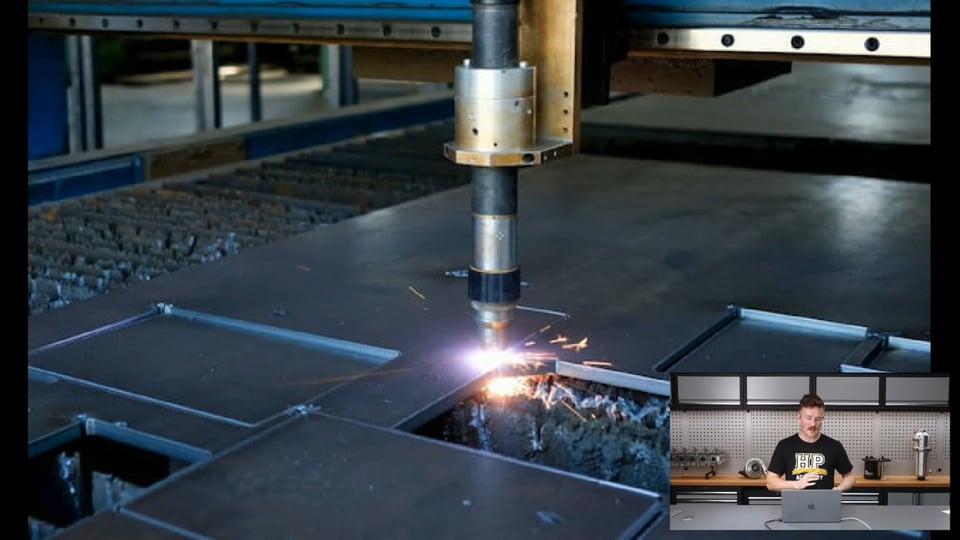
| 11:59 | And that brings us onto the final one I'm going to talk about here being plasma cutting, another small photo it seems. |
| 12:10 | Plasma cutting is kind of similar to welding in the way that it uses an electrode to create an arc that cuts through the material and it would typically use a cutting gas which will typically be, well it will use a cutting gas which will typically be compressed air and in some cases it can use a shielding gas as well. |
| 12:36 | It can cut thicker material than laser cutting, up to around 30-40mm so between one and two inches, depending on the machine again. |
| 12:49 | And you can cut aluminium, we have cut aluminium with a plasma cutter and used it on vehicle parts before but it is really more ideal for steel parts. |
| 13:02 | It's typically a lot cheaper to get done than the other processes but it is not as precise so I have another image here that shows the curve width compared to get a bit more of an understanding here. |
| 13:17 | So you can see that the plasma cutting curve width is significantly wider than that of waterjet or laser, also shown here so that's something that needs to be considered, doesn't really make it ideal for thinner more detailed parts. |
| 13:39 | The other thing to consider is you get a lot of slag. |
| 13:42 | So I don't have a photo of this but that would essentially be on the cut edge of the part around here you might get a build up of slag and that can usually easily be just chipped off with a scraper or something like that, it's not too much of a problem but it is another process. |
| 14:01 | The edge would typically be not as clean as something that is laser cut or waterjet cut. |
| 14:08 | It's a little bit more of an industrial process. |
| 14:11 | It can still be used for motorsport applications or automotive applications. |
| 14:19 | Where I see it being the most use, it's commonly used for things, like that's how the end plates with tow bars and things like that are made but if we're creating chassis like a 4WD chassis for example, then a bit plasma cut plate is a great use of plasma cutting compared to the other two, probably more expensive options. |
| 14:44 | So at this point I'll just make the call for questions, if you have any questions you want to ask relative to the topic we're talking about today or CAD, modelling sheet metal parts, go ahead and I'll try to answer those at the end of the webinar. |
| 15:02 | So moving on, let's talk about our design for manufacturing considerations around these manufacturing processes. |
| 15:10 | So one of the main ones that comes up is the actual hole diameter in the parts so we'll start with plasma cutting here and this is a general rule and it will change depending on different machines, different operators, different manufacturers as well but these are some general kind of rules of thumb. |
| 15:31 | So with plasma cutting, a hole diameter should be at least the thickness of the material. |
| 15:37 | So that means if we're using 10mm thick material, we want to use minimum hole diameter of about 10mm and if we go below that, significantly to something like 5mm then the quality of the cut and the hole diminishes quite a lot to the point where it's, depends on the application you're using it for but it's probably not very useful at that point. |
| 16:02 | Laser cutting is still supposed to be similar to this, a good rule of thumb being to use the thickness of the material as the minimum hole diameter but in saying that, it is common to be able to reduce this to about half the thickness at the most, depending on the machine that's being used, the quality of the machine and the operator as well, basically just setting the machine up. |
| 16:33 | So laser cutting, still best to work with that minimum hole diameter of the thickness of the material but if you really need to go smaller it is possible. |
| 16:45 | Water jet cutting on the other hand can go much smaller and it can easily do half the material thickness as the minimum diameter size of the holes and probably a bit further but something to consider here is that waterjet cutting can introduce some issues with lower quality alloys. |
| 17:06 | Basically with the, around delamination as the waterjet pierces through the material, the force in a smaller hole size can cause the material to delaminate around the edge of the hole so in some cases, might need to predrill the hole and things like that to basically give a lead in for the waterjet as it comes around to cut that hole. |
| 17:34 | But yeah those are the key considerations around hole sizes. |
| 17:39 | Some other considerations to consider are the cost of the material, the cost of the process. |
| 17:47 | So like I said before, plasma cutting is typically cheaper than waterjet or laser cutting but the cutting, the cost of the parts generally comes down to what material we use, which is kind of irrelevant of the process, some materials can obviously only be cut with certain processes. |
| 18:10 | But the cutting time as well is the major one here so if you had something, for example, even though this part here might be a lot smaller, the material cost will be less but there's quite a lot of details on this part if it was a flat pattern, a lot of times where the machine has to start and stop and that takes up a lot of time. |
| 18:36 | Compared to this part here, also made out of aluminium of similar, if not the same thickness. |
| 18:42 | Probably less details on this part, the machine time might be less and so the machining cost well the cost to cut this part might be less even though the material cost is more. |
| 18:57 | Obviously between those two parts, that's going to be relatively insignificant but if we start talking about much much bigger parts, it can stack up pretty quick. |
| 19:06 | So in order to keep the cost down in some cases, just think about the detail of the part that you're designing, maybe taking out a few of those details or just changing it so the machine doesn't have to start and stop, reduce that machine time, can make it, save you a lot of money basically. |
| 19:26 | So some other considerations that I wanted to mention were around basically the uses of this. |
| 19:36 | So obviously very useful for making brackets and sheet metal parts for our cars but also if we get something like a flange that's going to be welded onto a part, laser cut or waterjet cut then it's also very useful if we're using a waterjet cutter to cut the exact same profile and we can cut the gasket out in that case as well. |
| 20:00 | And that's where Wai Innovations has seen their customers get the most value out of it, it's with flanges and matching gaskets being cut off the same profile. |
| 20:11 | The other thing to consider is tab and slot which, I thought I had an example of but I don't. |
| 20:19 | There's a little bit of an example here. |
| 20:21 | So this is basically around self fixturing or self jigging of parts. |
| 20:29 | So basically designing the parts like this one is here to be able to jig together like that. |
| 20:37 | And when we have a part designed with the tab and slot method, basically we can make it as a bit of a jigsaw puzzle so as we go to assemble the part before we weld it together, the tabs and the slots can locate the parts in the right orientation and make sure that the parts are in the correct position as well and held in place and then we can go and weld them together. |
| 21:08 | So that's one that is commonly overlooked by people but tab and slot design is a very very useful DFM feature to use in our designs that can help make the process a lot quicker. |
| 21:23 | So that wraps up the main part of the webinar and I'll just jump into some questions now if there are any. |
| 21:39 | Just a moment. |
| 21:46 | Just lost my document, won't be a minute. |
| 21:56 | Alright. |
| 22:05 | So Andrew says, what do you recommend to get into CAD? So naturally here I'm going to recommend the HPA 3D modelling and CAD for motorsport course. |
| 22:15 | But in terms of software, the best, we like to use Fusion 360, it's very popular at a hobbyist level but any CAD software you have access to is the best CAD software to use. |
| 22:30 | So we've done some webinars in the past on choosing CAD software to get started and introduction to a few different CAD software like Solidworks for Makers, well Solidworks using the Solidworks for Makers offering. |
| 22:47 | We've used OnShape and we have used Fusion 360 obviously as well. |
| 22:52 | And there is a lot more out there, it just depends on what is accessible to you but all of, well most of the CAD software are all fairly similar and the skills between each one is definitely transferrable. |
| 23:07 | I've used a handful of different CAD software in professional environments and once you know how to use one, you can use any of them. |
| 23:15 | So what I would recommend would be getting a CAD software and just getting started designing, trying to design some parts with it and getting familiar. |
| 23:24 | Obviously with our CAD course, we take the approach of teaching the fundamental skills and understanding, so you'll be able to go through and design any part rather than some of the alternative methods just teach you, here's how you model X part and that doesn't actually teach you the underlying skills behind it and it actually takes a lot longer to build up those skills so that is the kind of process that we favour. |
| 23:52 | But the best way to get started is just to get a CAD software and start designing. |
| 23:56 | Again, we recommend Fusion 360, the free offering is quite powerful and will be able to do 99% of what you'd need to do, especially at the beginner level and it is still very useful at a higher level as well. |
| 24:14 | So that looks like the last of the questions and I'll leave it at that so thanks for joining the webinar today and we'll see you next time. |


