344 | How to Tune Haltech Idle Speed Control
Summary
Achieving stable and consistent idle speed control is something many tuners struggle with. In this webinar we’ll take a look at the control options provided by the Haltech Elite on a Mitsubishi EVO 9.
| 00:00 | - Hey team, Andre from High Peformance Academy here, welcome to another one of our webinars and today we're going to be looking at the Haltech Elite, specifically the idle speed control functionality and with the Elite, just to be really clear, we're going to be using the newer NSP software. |
| 00:16 | Everything we're really going to be talking about will still work on the ESP software as well, so depending which platform you're on but we're using the latest and greatest from Haltech. |
| 00:26 | The car that we're actually dealing with here is a Mitsubishi Lancer Evo 9. |
| 00:31 | Older car now, given that it is still cable throttle and it uses a 4 wire, actually 6 wire I think it is, stepper motor for the idle speed control. |
| 00:42 | Interestingly in the Mitsubishi world, those stepper motors for idle speed control are problematic so if you've got a Mitsubishi and you're really struggling with getting the idle speed control to work, or it's not really doing what it's told, wiring aside, and this is a plug and play so obviously shouldn't be an issue but wiring aside, once you've tested that, if it's still not working it is a very good chance that you may have a dud idle speed stepper motor, very very simple to change that out of the throttle body though. |
| 01:11 | But I digress, we'll get into our idle speed control tuning and let's start by what are we actually trying to achieve and why do we need idle speed control in the first place? Well the answer is, with idle speed control, we maybe don't necessarily need it and in a lot of racecars, people will actually purposefully choose to disable idle speed control for simplicity in the mechanical setup and simplicity in the wiring. |
| 01:35 | The downside with this is you put up with a car that's probably not going to idle by itself when it's stone cold so you're going to probably need to sit in the car and nurse the throttle to keep the car idling for the first two or three minutes when you cold start it, particularly in colder conditions in winter. |
| 01:53 | So generally the consensus opinion here is that when the engine's cold, we're going to need to bypass additional air around the throttle plate in order to make the engine idle. |
| 02:03 | Generally as a matter of course, when the engine is cold, we'll also actually target a slightly higher idle speed, engine's just going to basically be happier and run nicer with that higher idle speed target. |
| 02:15 | As the engine warms up, we can pull that idle speed target back down. |
| 02:19 | Using an idle speed control system, obviously then means that we should be able to reach in through the door, turn the key and have the car start up and idle by itself, irrespective whether it's absolutely stone cold and it's -20°C outside with snow on the ground or it's, you're in the middle of the desert and maybe it's 45°C, doesn't matter whether the engine's been running or it's never run for the last 24 hours, again it should just start up and idle by itself. |
| 02:48 | Essentially what I'm trying to do when I'm tuning idle speed control is replicate what we could expect from an OE factory car straight off the showroom floor, that's the kind of idle speed quality that I want to strive for and this is one of those things that might not sound that important but particularly for a street driven car, it really does make the whole ownership and driveability just that much nicer when you don't have to worry about the car stalling when you come up to a light or maybe having to nurse the car like I mentioned before for the first couple of minutes when it's cold. |
| 03:26 | Alright so with a bit of an understanding of what we're trying to achieve, what we'll do is dive straight into the Haltech NSP software. |
| 03:34 | I will mention that as usual we'll have questions and answers at the end of the lesson. |
| 03:40 | This will probably be a relatively short lesson, it is a relatively straightforward process so if you do have any questions, please get them loaded up, I'll put out a call when we want you to ask those questions. |
| 03:53 | So let's start by having a look here where we actually find our idle speed functionality and that is down in the engine functions menu here. |
| 04:04 | So we can expand out that menu just as it was before and we'll find idle control, again by default that will be closed up. |
| 04:11 | Nice feature with the NSP software is if we really just don't know what we're looking for, we can come up to this search bar and just start typing idle and we're going to get everything that basically comes up that relates to idle control so nice little trick if you don't know where you're looking for a certain element. |
| 04:31 | Other thing that's worth mentioning here is we do have a page here labelled idle control. |
| 04:36 | So this is predefined by Haltech, you can absolutely make your own. |
| 04:41 | By default this should be one of the pages that is available but it just lays out everything we need to know for idle speed control, everything we need to see in a nice really easy manner. |
| 04:53 | If that's not there for some reason, you can always add a new page, clicking on the add new page, or you can obviously use control shift N and then you can select page to add, there's a whole bunch here but obviously idle speed control is one of those. |
| 05:09 | I won't do that because obviously we've already got it so let's head back across to that. |
| 05:14 | So what we'll do is we'll start at the top and sort of work through some of these options here so for a start, when we have got our idle control highlighted over in this left hand menu here, we can see that first of all, our engine function for idle speed control is enabled, if we haven't got that enabled we will need to enable it and then we've got some controls on our output here so our control method, we can click on this and see what our options are. |
| 05:42 | 4 wire stepper motor, absolute, we've obviously got a range of different options there, drive by wire is really becoming the more common approach to this. |
| 05:54 | It's only older cars now that are really using a separate idle speed control strategy but irrespective of whether you're using drive by wire, a simple 2 wire stepper or in our case a 4 wire stepper or idle speed solenoid, the process is exactly the same. |
| 06:10 | So we've got our maximum output here. |
| 06:13 | You may want to clamp this if it's giving excessive range or excessive control because that will essentially affect the resolution of your control meaning that each step you make is quite a large change in our idle speed control. |
| 06:28 | If we do go to drive by wire, that is one aspect of that where we will set what is going to be the maximum range of the drive by wire throttle opening that will be used for the idle control between 0 and 100%. |
| 06:43 | So what I mean by that is let's say that in the coldest conditions, to get a good idle speed, we only need 10% drive by wire opening. |
| 06:53 | Well we might give ourselves a little bit of headroom and maybe say that the maximum opening will be 15%. |
| 07:01 | What that now means is that when we use a duty cycle or a value between 0 and 100% for our idle speed control, we're actually only going between 0 and 15% throttle opening so it gives us that nice tight resolution. |
| 07:15 | Let's carry on here, we've got our stepper motor calibration so with a stepper motor, as opposed to an idle speed solenoid which is fed a pulse width modulated signal, the stepper motor needs to basically be zeroed or calibrated when we key on so normal calibration, what that will do is it'll drive the stepper motor hard closed and then it will open it to our base position which we'll talk about soon. |
| 07:40 | The other calibration which if we click on this, reverse calibration will by some miracle go the opposite way, go fully open and then close it to our steps. |
| 07:49 | We've also got some default values here for our stepper max speed, so how many steps per second, in this case 80 and our stepper range. |
| 07:58 | So this is just base values from the base map for the Evo 9. |
| 08:03 | We don't need to invert our stepper because we know we're going in the right direction. |
| 08:08 | What else have we got here, mode, so in this case closed loop. |
| 08:12 | Typically what I normally do when I'm setting up idle speed control on most ECUs is I'll actually start in open loop mode. |
| 08:21 | The reason for this is basically it gets rid of the control from the ECU and that allows us to then accurately tune the base duty cycle or base step table, whatever it may be and what we're trying to do here is in open loop mode, get our idle speed control under all conditions to be as close to target as possible. |
| 08:41 | This isn't unique to idle speed control, it's really no different to boost control, we're trying to just make sure that we're already as close to our target as possible and what this means is that when the closed loop control comes in, it's got as little work to do as we can give it and that's going to give us better results. |
| 08:58 | For those who are new to those terms, open loop control just means that the system is going to output the value from a table irrespective of our actual idle speed. |
| 09:09 | So let's say we're targeting 800 RPM and the value that we're outputting results in an idle speed of 1000 RPM, the ECU's not going to try and do anything to correct that 200 RPM error. |
| 09:21 | Closed loop control on the other hand, is constantly monitoring our target and our actual RPM and if we're at 1000 RPM what it's going to do is reduce that stepper motor position until we get to our target and that is done using a PID control algorithm. |
| 09:36 | Don't worry about that, we'll talk about that in a moment so normally I start in open loop mode. |
| 09:41 | The only element here that sort of changes that for me a little bit is that the Haltech Elite, when we go into open loop mode, we lose our target idle speed table so it's nice to have that so we're referencing what's our step count, what's our actual RPM and what's our target and we can sort of go through as the engine's warming up and dial all of those in. |
| 10:02 | So basically, in this case I'm going to recommend that we actually start in closed loop mode and I'll talk through how we're going to go about this. |
| 10:11 | Some other aspects here that I'm not going to dive into in any more detail but again I've got the default values here from the Evo 9 base map. |
| 10:22 | OK so that's our first setup there, actually enabling the idle speed control function, making sure that we've selected the right idle speed control method. |
| 10:31 | Next we come down to our idle ups so we can set up idle ups for a range of functions, in this case the only one I'm actually using here is for our air con. |
| 10:42 | When we enable our air conditioning, what that does is it applies a reasonable amount of additional load on the engine and what that does in turn is to drag down the idle speed so what we've got here is our air con idle base offset. |
| 10:57 | What that's going to do is add 3% to our idle speed base value, in other words 3 steps in this case 'cause it is a stepper motor. |
| 11:06 | And it's also actually going to target a 50 RPM increase in our idle speed. |
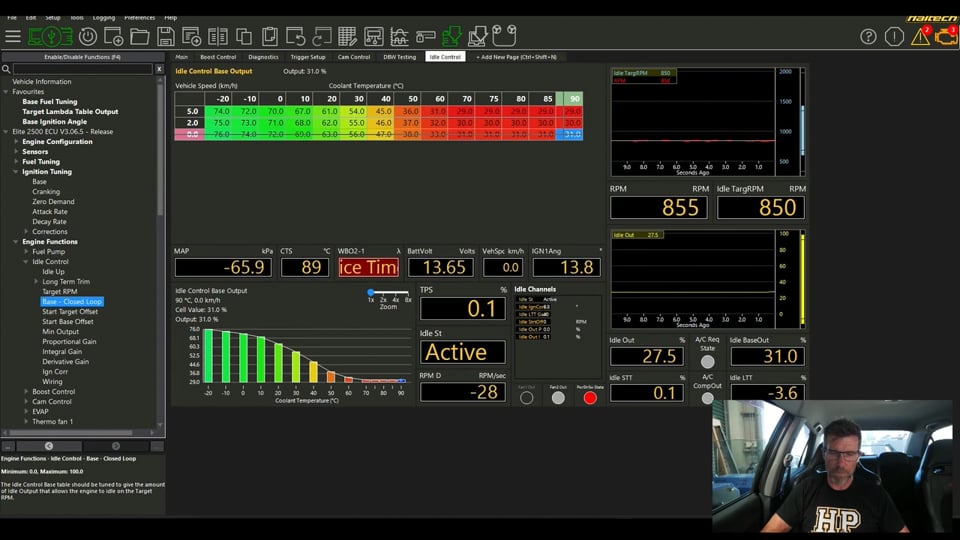
| 11:11 | I don't know how well this is going to work, haven't actually looked at this aspect yet but you can see over here our target idle speed is 850 and we're bang on that. |
| 11:20 | I'll just turn our air con on. |
| 11:24 | We can see that our idle speed dips momentarily, comes up, dips monentarily as the idle speed, the air con clicks in and then comes back right on our target. |
| 11:33 | So we can manipulate those values until we're getting basically as close to a seamless step as our aircon clicks in and out as we possibly can. |
| 11:42 | Another aspect with this particular page, we can see here is we're able to monitor our actual idle speed vs our target so this is a really good way of visually getting a cue as to how well we're tracking our target. |
| 11:57 | This obviously goes without saying, it needs a digital input to tell it when the aircon is active and when it's not so obviously without that, there's no real way of it knowing. |
| 12:09 | Likewise we can have idle ups for power steering or even electrical offset and then you can have some generic idle ups to basically suit whatever conditions that you feel you need in order to maintain as close to an accurate or stable idle speed as you can. |
| 12:26 | Next we come down to our long term trim, I'm just going to go out of order for a moment before we talk about that because this is sort of a more advanced aspect of the Haltech idle speed control. |
| 12:38 | What we'll do instead is we'll come to really what is the crux of this whole thing is our target RPM table. |
| 12:44 | 2D table there vs coolant temperature and this really comes down to what I was saying earlier, generally for the engine to run nice and stably, particularly when it's very cold, we generally need a slightly higher target idle speed so we can see down at sort of 0 or -10 through to 20°C, we're targeting 1200 RPM and then in the actual normal operating conditions, we're down to sort of 850 RPM and we've got a nice interpolation between those, we can see that represented graphically down here. |
| 13:17 | One of the things that I do see people make mistakes with is trying to target unrealistic idle speeds and then kind of building themselves into a bit of a hole where they go around in circles trying to make the engine achieve something that it's just physically not possible to do. |
| 13:35 | So we need to be realistic with this and the problem is there's no magic number. |
| 13:40 | A stock 4G63 which is what we're dealing with here, yeah it should idle quite happily at around 800, 850 RPM. |
| 13:49 | If we go and chuck some really aggressive cams in this engine, it's not going to be happy idling at that RPM and we're likely to have to pull that RPM up. |
| 13:58 | For a mild to moderate cam, maybe we might have to have the thing idling at 950 to 1000 RPM, my drag car which had greater than 300° durations cams, that idled at closer to 1600 to 1800 RPM. |
| 14:12 | So the problem here is if I tried to make my drag car idle at 850 RPM, it's just never going to happen and you're going to frustrate yourself just trying to achieve something unrealistic. |
| 14:22 | Likewise, if we look at a decent sized, decent capacity V8, let's say a stock LS2 with a factory cam. |
| 14:30 | Probably going to make that idle quite happily at 550 RPM. |
| 14:33 | No need to have that idling at 850 RPM but again if we put a big cam in it well yeah maybe we're going to have to pick that RPM up. |
| 14:42 | So it's a case of understanding the type of engine you're dealing with. |
| 14:46 | You can always get a really good idea of what is realistic for a stock engine by looking at the factory idle speed but again for a four cylinder, what we've got here with a stock cam is pretty typical. |
| 14:58 | So that's our target, that's what we're going to try and achieve. |
| 15:02 | How are we going to achieve that? Well the first thing we want to do with any closed loop system as I mentioned, is we want to tune this base closed loop table. |
| 15:11 | Now this one is actually 3D, up to you whether you want to do this but we can see that we actually have vehicle speed as the vertical axis here. |
| 15:22 | Typically this would be more often a 2D table, this is again just the default so it's not necessarily how I choose to set this up. |
| 15:32 | What we can see though is we do have a pretty normal trend where at low temperatures, let's just look at our zero speed row for the moment, we're down at 0°, we've got a base position of 72% and then in our operating temperature that we're at now we're down to 31%. |
| 15:53 | Again if we just look at this, we can see we've got a nice smooth trend which is pretty typical, we should have a relatively linear interpolation between our cold start duty cycle and our normal operating temperature. |
| 16:09 | I did mention this as steps but it is still a percentage, we had that value that defines the number of steps so just this is still a percentage, 0-100 of our step count. |
| 16:20 | OK what I suggest here with this is basically starting from a cold start and we do need our fuelling and our ignition dialled in before we do this so it becomes a bit of a 2 step process with tuning. |
| 16:36 | We can't really do our idle speed control, except for the operating temperature area, until we've got the rest of our tune dialled in. |
| 16:43 | Once we've got our tune dialled in, we've obviously got an engine that's at operating temperature so in order to do the cold start and basically access these lower temperature areas of our idle speed base duty map, we do need to allow the engine to come down to a cold operating temperature. |
| 17:00 | To make matters worse, if you live in an area where you get quite large fluctuations in summer to winter temperature which is exactly what we have here in Queenstown, right now we're on the tail end of summer, down in the mornings it's probably only getting down to 8-12°. |
| 17:18 | In the middle of summer, we're probably only getting down to 15 to 18° and then of course in winter we might get down to maybe -10, -15 even on a very cold morning. |
| 17:29 | Why I mention that is if you are tuning in the middle of summer, obviously you're never going to get down into these areas that I've just highlighted in the table. |
| 17:37 | So it's very possible that once you get into winter you're going to find that during cold start when the engine is in an area that you couldn't access, maybe it's going to need a little bit of tweaking. |
| 17:48 | Now I mention that as well because if you are tuning professionally for customers, it's all about setting expectations for your customer and when I was running my tuning shop I'd always talk to customers and say hey look this is how the cold start and idle speed control tuning works, it may very well be in the middle of winter you find it's not perfect anymore, in that case bring it back to me and I'll be more than happy to sort that out for you. |
| 18:12 | We did that sort of work 'cause it's literally a 5 o 10 minute job, we did that work free of charge but there's nothing worse than sort of sending a customer out, not setting those expectations, middle of winter, doesn't start nicely and all of a sudden they're bad mouthing your work so again setting those expectations. |
| 18:28 | I also mentioned cold start and idle speed control, they are different elements clearly but basically they both need to be dialled in at the same time. |
| 18:37 | So yeah I would suggest starting when the engine is stone cold which again we should be down in this area and just allowing the car to start and idle. |
| 18:47 | And what we want to do, because as I mentioned we are in closed loop control here. |
| 18:51 | We want to monitor these two parameters here. |
| 18:57 | So we've got our idle short term trim and we've got our idle long term trim. |
| 19:01 | So if we don't monitor these, it can be very easy to sort of just look at the idle speed vs our target here and go hey I've done a great job, we're bang on that target. |
| 19:12 | But what we can actually see is that at the moment our idle base output is 31% but after the closed loop corrections have been made, we're actually outputting to that stepper, 27.4% so we're splitting hairs, it's a relatively minor change, in this case the long term trim is -3.6% but if we didn't realise that, we'd be a little bit off the mark so what that really means is that this value in here that's currently 31%, really that wants to be 27.5%. |
| 19:46 | Now when I do that, the long term trim stays active, so we can see our idle speed actually dropped and now what's happening is our short term trim here is stepping that back up to kind of get us to where we should be. |
| 20:01 | Notice actually our idle base output didn't go to 27.5, it went to 28.2 for the eagle eyed amongst you, that is because we're actually interpolating very slightly between the 85°C and the 90°C column. |
| 20:15 | So essentially the takeaway here is we want to monitor our closed loop trims. |
| 20:21 | This is the time to talk about our closed loop trims so we've got our short term trim and that's doing just what it says on the box, basically it is providing an instantaneous response to error and either stepping up or down our idle speed stepper in order to drive it towards our target. |
| 20:35 | Then we've got our long term trim so again does what it says on the box, it is a longer term trim. |
| 20:42 | So basically if we constantly sit there with a positive 2% trim on our short term to get our idle speed correct, over time what that will do is it'll transfer across to the long term trim, driving it back towards the point where our short term trim should be plus or minus close to, pretty much close to zero and while I've been talking, we can see that's exactly what's happening, our long term trim's now worked down to -2.3, our short term trim's +1.7 so we're kind of there or there abouts, we're pretty much back to zero so really important to understand that those two trims exist and understand that they are actually influencing the final duty cycle being sent to our idle control system. |
| 21:22 | On that note, let's come back up now and talk about our long term trim. |
| 21:28 | This is personal preference as to whether you want this or not. |
| 21:32 | I've actually got myself into a bit of trouble in the past with Haltech with their long term trims, forgetting about them because this is one of the few aftermarket ECUs that actually uses them. |
| 21:44 | That's not to say it's not a great thing, it can actually be really good, it's just again reminding yourself and understanding it's there, particularly I find this with this long term trims for our closed loop fuelling. |
| 21:56 | Obviously a different topic to today but that can be really problematic because you'll be trimming your fuelling, changing your VE table, looking at the short term fuel trim. |
| 22:05 | If you haven't got your long term trim being displayed at the same time, out of sight, out of mind, you think you're doing a great job, you've got your short term trims all dialled in close to zero and you're looking at the VE table thinking this looks like an absolute train wreck, what on earth is going on. |
| 22:21 | Then you go into your long term trim table because you remember that's active and see you've got +20% here, -15% here and you sort of have to go back to square one, well not really, you can actually apply that but just important to understand it. |
| 22:34 | So let's have a look at our controls here. |
| 22:36 | First of all, we can enable or disable it and again, up to personal preference, we can reset it back to zero or we can apply, and this is quite a nice feature, we can actually apply the long term trims to our base table and that again does exactly what it says. |
| 22:52 | It will simply apply whatever is in the long term table back to the base table. |
| 23:00 | Now this can be handy, the theory, which to my experience so far does play out pretty well, is that if you just tune the car, get everything pretty close and then drive the car for a week or so, allow that long term trim to develop, that's going to take into account any errors over a longer period of actually driving the car under real world conditions and then you can simply apply that to the base table. |
| 23:25 | It should, if everything works like it says, it should actually correct that base table and mean that the trims are all much closer to zero. |
| 23:34 | So let's go back into our long term trim and we'll actually open up, we've got a couple of sub menus here. |
| 23:40 | So first of all we've got a long term trim gain. |
| 23:43 | And we've got our long term trims themselves. |
| 23:45 | Let's go out of order here, this is our long term trim. |
| 23:49 | So this just stores and is not reset on a key off, just to be super clear, so it just stores the magnitude of the change, so we can see we've only got 2 zones there, as soon as I reset it, +1.9 and +0.9 which is again showing exactly where we are at the moment. |
| 24:08 | And while I've been talking, you can see it's worked really well because our short term trims are now back down to very close to zero. |
| 24:16 | So again if I come back up and I just click apply to base table, cannot be applied while the engine's running but you can kind of get the idea here, it's simply going to apply those values into our base table. |
| 24:30 | Zero out the long term trim table and we're good to go again. |
| 24:34 | Let's have a look at our gains, so these are just raw values here. |
| 24:38 | This is based on engine run time, can change that axis if you want. |
| 24:42 | Simply the larger this number, the more aggressively it will transfer the short term trim into the long term trim table. |
| 24:48 | It's a bit of a balancing act here. |
| 24:51 | You don't want this oscillating and chasing its tail so you can experiment with this to sort of get a result that you're happy with in terms of how long it takes it to zero out that short term trim and transfer into the long term. |
| 25:04 | So what's my stance on this? I actually really like that long term trim, I think it's a nice feature. |
| 25:09 | Again it's just understanding that it's there, understanding what it's doing and not forgetting about these two in combination and how that's influencing your actual base value. |
| 25:23 | Alright so we've covered most of the important elements so far. |
| 25:28 | There are a few other bits that I will talk about here so let's carry on down and we've got our start target offset and our start base offset. |
| 25:36 | So let's have a look at these. |
| 25:38 | Start target offset is relative to our engine run time and what this does is it steps up our idle target for a brief period of time so in this case you can see that we're sort of starting at zero run time with a 200 RPM increase so irrespective of our engine coolant temperature, what that's going to do is just add in this case 200 RPM to our target speed base. |
| 26:03 | So this is again just replicating what we see on factory engines, generally they will idle up briefly and then drop to our target idle speed once they've been running for a few seconds, again you can manipulate that to your liking and likewise the start base offset, so we can actually offset our base duty cycle for our idle speed control system during our startup, so we can use this again just to get crisp startup without the RPM dropping or without the RPM overshooting. |
| 26:35 | Needs to be manipulated a little bit but again pretty straightforward table to actually tune. |
| 26:43 | Next we've got our minimum output, so this is the minimum duty cycle that can be applied. |
| 26:50 | What we can see here is we're pretty much at the minimum or close to the minimum that we're going to need. |
| 26:57 | We've got our idle output at the moment sitting at 27%. |
| 27:00 | So by setting this closer to that minimum value, this just stops the idle control system aggressively pulling the idle duty cycle down which can result in stalling so I like to have this set with a bit of head room for the idle speed to be pulled down but 5% there's probably a little bit lower than it actually needs to be and again it's possible we could end up with a result of stalling in some instances. |
| 27:29 | Next, and this is probably the tricky bit for some people to get their head around, we've got our proportional, integral and derivative gains. |
| 27:37 | So this is really the backbone on any closed loop control strategy, irrespective of whether we're talking idle speed control, boost control, cam control, drive by wire throttle control, and these gains, these three separate gains basically define how the system is going to respond to an error. |
| 28:00 | I'm not going to go into too much detail, we've got other webinars on PID control tuning which you can check out in our webinar archive but in short, the first of those, the proportional gain, what that is is a gain or a change relative to the size of the error. |
| 28:17 | So what it'll essentially do is it will change the output duty cycle for our idle speed control and the size of the change will be relative to the error so the bigger the error, so if we're targeting 850 and we're at 1200 RPM, that's going to drive the system down quicker than if we were at 850 RPM target and we're only at 950 RPM. |
| 28:39 | So the trick with this is the larger that gain, the more aggressively the system will drive towards our target but it's also going to most likely end up with the idle speed oscillating. |
| 28:53 | So we can't go too aggressive with this on its own, otherwise we're going to get oscillation. |
| 28:59 | Proportional gain on its own also won't actually get us to our target because as the error gets smaller and smaller, as we get closer to our target, the power or effectiveness of the proportional gain on its own actually dissipates. |
| 29:12 | Alright so the next gain, we're going to go out of order here, we'll go down to our derivative gain which you can see is actually set to zero, this is again default in the base map, not uncommon with idle speed control systems because they do actually respond relatively slowly but the derivative gain is a gain that responds relative to the rate of change of error. |
| 29:33 | So the faster our error is changing, the more effect our derivative gain has so we'll more often see this used for the likes of cam control, drive by wire or boost control where we do have usually a faster changing element so this has, how I refer to it as a braking effect. |
| 29:54 | So as our target is coming up towards our boost target for example and we're getting closer and closer, what the derivative gain does is it has a braking effect, preventing it from overshooting. |
| 30:06 | This allows us to use a bit more proportional gain to get a faster response without that overshoot and oscillation. |
| 30:12 | Finally, our integral gain which we do tend to use with idle speed control, this works with respect to time and idle speed control again is a relatively slow moving parameter so we can use the integral gain to drive it towards our target and this fixes the problem that I mentioned with proportional gain alone in that with proportional gain we'll never get exactly onto our target 'cause the closer we get to our target, the less effect it has. |
| 30:39 | So again, these aspects here are from the base table, again without going too far into the process of tuning PID, and I would refer you back to our archive if you want to know more, what I tend to do here is start by making quite large changes and checking the effect of those changes, so for example with our proportional gain, I'd probably start by doubling the gains. |
| 31:05 | Now that's quite an aggressive change but what that's going to do is very quickly allow you to see the effect of that and also very quickly get to the point where you start getting into oscillation, at which point you know you've gone too far so at that point you can halve the value again and you'll quickly find the sort of ballpark that you need to be in for your particular control system. |
| 31:25 | Same with our integral gain in this particular instance and again we've got no derivative gain. |
| 31:30 | We're going to move into Q&A very shortly so this is a reminder, if you've got any questions, please start asking those now. |
| 31:39 | We've got one more aspect that I want to talk about here which is our ignition correction. |
| 31:44 | And this is something in the early stages of my career, no ECUs were offering and it is an absolute game changer when it comes to idle speed control, getting very quick control of our idle speed and as its name implies, it's using the ignition timing to help change the idle speed so let's click on that and what we've got here is a 2D table. |
| 32:08 | The axis for this is our idle control RPM error so how far away we are from our actual target idle speed. |
| 32:18 | So what we can see is that we've got basically zero error right through the middle here and as we go to the left, that's where our idle speed is below our target, as we move to the right, that's where our idle speed is above the target. |
| 32:33 | So the principle we're using here is by advancing the timing towards MBT, what we're doing is increasing engine torque. |
| 32:42 | Now when we're decoupled from the wheels because the clutch is disengaged here, we're in neutral, then what this does is it has the effect of increasing our idle speed. |
| 32:51 | When we retard the ignition timing below MBT, it has the opposite effect, no big surprises here, it reduces our engine torque and then in turn reduces our idle speed. |
| 33:01 | The thing with the ignition timing is we can make very quick changes to the ignition timing. |
| 33:06 | So we can respond very quickly to that and jump that ignition timing up and down in response to idle errors so it's a very quick way of making aggressive changes to our idle ignition timing and in turn making changes to our idle speed and this sort of works in conjunction with our idle speed stepper motor here. |
| 33:26 | This can just make quicker changes. |
| 33:29 | I always like to get the base idle speed stepper duty cycle sorted first before I come in and use the idle speed to make any last changes, final changes that are necessary so now that we know how it works, let's have a look at the numbers. |
| 33:46 | So when we are 20 RPM below our target we're using 15° ignition timing and you can see as we move to the left, that becomes 20 and then 25°. |
| 33:58 | Every engine, understandably is different but sort of somewhere between about 23 maybe and 30° is probably a safe assumption for MBT, we can always just advance the timing up and see what happens to our idle speed to get a sense for it, obviously we can't monitor this on the dyno. |
| 34:17 | Then as we move to the right, obviously this is when our idle speed is above our target, we can see we step that down, 20 RPM above our target wer'e at 5°, 100 we're at 0 and then we go into the negatives, so after TDC. |
| 34:31 | Now if you want to see what's actually happening here, we can monitor the actual ignition timing here, we can see this is moving around. |
| 34:38 | Now we have a lot of control with this idle ignition timing. |
| 34:42 | I do also urge you though to be careful because it's very easy to end up with the timing overly retarded and we don't want to be sitting there with negative timing. |
| 34:53 | I sort of like to limit the timing to maybe 5° before top dead centre at a minimum for extended periods of time. |
| 35:01 | If we sort of sit idling with -5 or -10°, yes it can fix our idle error but it's kind of a bandaid of the root cause of the problem which is that our base duty cycle is too high and what that's going to do is cause a lot of heat to be generated in the exhaust manifold, even at idle we can end up with that glowing red and melting components in the engine bay so I don't like to see sustained ignition timing of less than about 5° positive at idle and ideally I want it sitting between maybe 10 and 15° which for the most part is exactly what we've got going on there. |
| 35:38 | So that's the principles behind our idle tuning, just to sort of put them into a nice neat little list, what we want to do is make sure that our mechanical setup and our electrical setup is first of all dialled in, basically meaning that the ECU can actually control our idle speed. |
| 35:52 | Want to make sure that our fuel and our ignition tables are tuned correctly first so we're not trying to put a bandaid on a fuel table that's got the thing running at 1.15 lambda or something of that nature and then it's a case of allowing the engine to cool down. |
| 36:07 | In this case with the Haltech ECU, we want to leave it in closed loop control, or that's my preference, set our idle speed targets sensibly, something the engine can achieve and then we'll cold start and basically go through filling in our base duty, taking note of both our long term and short term trims or long term if you've enabled it. |
| 36:27 | And essentially that's the process. |
| 36:30 | We may need to take two or maybe three iterations at this, particularly if you find that during your cold start, initially maybe your warmup enrichment is a little bit out of the ballpark and needs a bit of work but should take no more than two or maybe at the worst three attempts and then of course with the Haltech Elite, you've got the benefit of using that long term trim over time and applying that into our base table. |
| 36:58 | Alright, we'll shut our engine down now and we'll head across and have a look at our questions, if you do have any more questions, please keep those coming. |
| 37:11 | First question from Anthony Brown is how do we make the maps 3D in the NSP software? Let's just head back across here, so what we can do is right click, no sorry we can go up to our table axis setup, not right click. |
| 37:27 | So we can see here at the moment for the table that I just chose, we've only got one axis enabled which is our idle control error. |
| 37:35 | But all we need to do is go down to our second axis, click on enable axis and choose whatever parameter we want to fill that in and job done so pretty easy. |
| 37:45 | The base closed loop table as I mentioned, typically I would have this set up as a 2D table, so really simple, if we want to do that we can go in there, we do want to keep coolant temperature but probably I would just disable the vehicle speed axis, again personal preference. |
| 38:03 | So pretty straightforward to do that and then of course at the same time, you can manipulate easily all of the break points in those tables. |
| 38:11 | Right we'll head back across to my questions now. |
| 38:14 | Manitou Black's asked, little off topic, where should I plumb my oil return from a turbo on a dry sump system? To a dedicated sump into a scavenge line? I'll tell you what, I won't answer than question here inside of this webinar, give me a moment I'll get into it, we always try and keep these webinars solely on the topic being discussed, just to make sure that the questions don't end up going off the rails. |
| 38:36 | It does look however like that's the only questions that we've got from Anthony there on this particular topic so we will leave it there. |
| 38:44 | As usual for our members, if you do have question that crop up at a later point when you've been watching this webinar in the archive, please feel free to ask your questions in the forum and I'll be more than happy to answer them there. |
| 38:56 | Thanks again for joining us and we look forward to seeing you all again next time. |
Timestamps
0:00 - Introduction
1:11 - What are we trying to achieve?
3:53 - NSP idle speed functionality
7:15 - Stepper motor calibration
8:08 - Open/closed loop
10:31 - Idle ups
12:26 - Target RPM table
16:20 - Must be performed from cold
17:00 - Seasonal variation
18:47 - STFT and LTFT
25:28 - Start target offset & start base offset
27:29 - PID control
31:39 - Ignition correction
35:38 - Summary of processes
37:11 - Questions


