355 | How to work flexible hose & AN Fittings
Summary
Braided Hose and AN fittings are a staple of motorsport plumbing and for good reason. In this webinar we'll cover the basics of how to work with braided hose and the different AN fittings available.
| 00:00 | Hey team, Connor here from High Performance Academy and welcome to this week's webinar. |
| 00:04 | So, today we're going to be talking about how to work with flexible braided hose and the AN fittings that go along with them. |
| 00:12 | So, first of all we're going to cover what it is and why we'd use it in a motorsport application and we're going to talk about the advantages and considerations around using braided hose as well. |
| 00:24 | Then we're going to talk about the different types of braided hose that are available and then the AN fitting options we have or the hose ends for each type of hose because they're not all the same. |
| 00:35 | So, let's just start off with what braided hose is and we'll start, drop back a little bit and just use this as an example of a kind of typical rubber hose that we'd have in an automotive application. |
| 00:48 | This is actually push lock hose which I'll explain a little bit more towards the end of the webinar but this is a typical rubber hose and you can see in here, generally the rubber used is a nitrile rubber, sometimes CPE as well. |
| 01:06 | And then inside here you can see this kind of pattern at the end here, I guess that's just as we've cut through and there's a fabric, integral fabric weave in there. |
| 01:20 | So, basically what that does is it's a weave that goes throughout it and that just stops it from swelling and gives it a little bit more strength in regards to pressure on the inside of it, so a bit more integrity. |
| 01:32 | So, as we move over to a braided hose, just grab an example here. |
| 01:41 | So, this is our braided hose here and this one here has a nylon outer braid here. |
| 01:50 | So, basically we've got the same rubber on the inside here, we've also got a stainless braid in there and a nylon outer braid. |
| 01:59 | And I just wanna jump over to my computer here and show a few different options here. |
| 02:07 | Actually, sorry one moment. |
| 02:14 | So, these are both options on my screen at the moment from, sorry, XRP. |
| 02:23 | So, when we talk about braided hose, it's kinda easy to generalise in that case, but there are lots of different options here. |
| 02:31 | So, this one down the bottom, I'll just zoom in on this. |
| 02:36 | This is a basic option for the stainless CPE race hose from XRP. |
| 02:41 | Which is a pretty well known quality plumbing brand in the automotive space, motorsport. |
| 02:48 | So, on the inside here we see that there's an inner layer here with CPE,m which is essentially rubber in a tube. |
| 02:56 | And then it has a stainless braid here, which is also just outside that. |
| 03:03 | And we can see that that basically adds strength and integrity to the hose and a lot of abrasion resistance as well. |
| 03:13 | And it also stops the hose from collapsing as it's noted here. |
| 03:21 | So, then there's another mesh layer here and then an outer layer here. |
| 03:26 | In this case this is stainless, but it could also be like the example I just showed you with this Raceworks hose, it could also be a nylon outer braid or aramid or a lot of different options. |
| 03:40 | If we jump over to this other option here, this one here from XRP, this is their HS-79 which is a pretty kinda well known option. |
| 03:51 | And this has the PTFE inner tube and then it has a silicon outer tube there as well, wire braid reinforcement. |
| 03:59 | And then it has this aramid fibre over braid and then there's also an option for like a stainless outer braid as well. |
| 04:06 | So, I just wanna make that note that not all braided hose is the same. |
| 04:10 | And generally speaking, most companies will have lots of different options as well. |
| 04:16 | So, if we jump over here to this Raceworks flyer, they have 100 series, 120 series, 140 series, these are all their braid over rubber. |
| 04:28 | And then they also have these different series here for PTFE. |
| 04:33 | We'll get onto what those mean in just a moment. |
| 04:36 | But we can see that not all braided hose is the same and they also have a little thing down the bottom here that shows the different temperature ranges for automotive applications here. |
| 04:49 | Things like gearbox temperatures or transmission temperature here, that kind of expected range it could be in, engine oil coolant temperature, and also brake, clutch, power steering, fluid temperatures here as well. |
| 05:03 | And then they have the different hose types and how that is kind of safely spans that range. |
| 05:08 | But we'll come back to that in just a moment. |
| 05:12 | So, one of the key advantages of the braid over the hose, like I said, is abrasion resistance. |
| 05:19 | Specifically with stainless outer braids, really protects that rubber hose. |
| 05:25 | As we know in motorsport or automotive applications where they're modified street cars, things like that, they typically get worked on a lot more and it's quite easy for the hose to get nicked, things like that, and break. |
| 05:39 | But also motorsport engine bays are extremely abrasive environments, or underneath cars and things like that. |
| 05:46 | So, it's good to have that extra layer of protection around the outside of the hose. |
| 05:51 | Another thing is chemical resistance, so that's chemicals from the engine bay being spilt onto the hose. |
| 05:57 | If it's going straight onto a nitrile rubber hose, it can often cause that hose to degrade. |
| 06:03 | So, the outer braid offers a layer of protection there as well. |
| 06:09 | And one of the final things is strength and to prevent swelling. |
| 06:14 | So, a really common use for braided hose, if we jump onto my computer screen here, this here is the braided brake line for going to the front endless brake calipers on our SR86 or GT86 race car. |
| 06:33 | And in this case it also has a PVC or a silicon outer layer as well. |
| 06:39 | And we'll come back to that in just a moment, the use of that outer layer. |
| 06:44 | So, that's a braided hose and the reason it's used there is to prevent swelling of the brake lines which kind of result in a spongy pedal feel and compliance. |
| 06:55 | But the braid can be used in all plumbing systems to also kind of give that strength and integrity and prevent swelling of the brake lines. |
| 07:04 | So, we'll talk about a few disadvantages as well. |
| 07:08 | Naturally as you'd imagine, it's more expensive. |
| 07:12 | So, if our budget is restrictive then maybe it's not the best idea. |
| 07:19 | But there are also different levels as we talked about of braided hoses available. |
| 07:24 | The rubber ones tend to be less expensive than the PTFE. |
| 07:28 | But again we'll get into the differences between those two a bit more in a moment. |
| 07:33 | It can also be heavier depending on what hose we use compared to the standard rubber hose, obviously extra layers is going to add extra weight. |
| 07:44 | The other thing to consider is that stainless outer braids, while being abrasion resistant themselves, are exceptionally abrasive. |
| 07:53 | So, basically what that means is if we haven't supported our hose very good and it's rubbing on another component, cast aluminium, something like that, it'll rub through it at an alarming rate. |
| 08:05 | So, it's really good for that reason to have it supported well, routed away from components, we really don't want to have braided hose rubbing through other components. |
| 08:17 | And that's probably one of the other reasons for the PVC or silicon outer layer of the brake hose here to prevent that abrasive surface of the stainless braid rubbing through components but also in this application, it's another layer of protection and also in some cases when we're outside in a wheel well like this and we have a lot of dirt and debris getting flicked up, it can naturally get caught in the braid and kind of just keep things dirty, it's a lot easier to kind of keep a smooth surface like this clean. |
| 08:55 | Other than being expensive as well, there's a few different considerations of working with them. |
| 09:04 | It can be a little bit more difficult to work with braided hose compared to just a normal rubber hose, but we are going to talk about those in today's webinar so that's kind of besides the point. |
| 09:18 | So, let's talk about the different types of braided hose. |
| 09:23 | We've already covered already, one of the first most basic ones is the CPE or nitrile rubber braided hose here. |
| 09:31 | So, we've just got a rubber in a tube and in this case there's that stainless braid and then covered with a nylon outer braid as well. |
| 09:43 | And then the kind of, well just make a note on what this is useful for. |
| 09:50 | So, this can be used for coolant and also oil in some cases, and for some basic fuels, but typically we'd want to move over to this here which is PTFE. |
| 10:07 | So, basically inside here we have this PTFE inner tube and PTFE stands for, let me get my notes here, polytetrafluoroethylene and basically that's a type of polymer, so kind of like a plastic. |
| 10:23 | And it's also really well known as Teflon although that is kind of a trademark brand name for it so it's best to refer to that as PTFE. |
| 10:32 | So, the thing about PTFE is it's chemically inert so basically what that means is any of the fluids in our plumbing systems, in our vehicles are going to be safe with this so it's not gonna degrade with different types of fuels, especially as they flow through it or sit in it for extended amounts of time. |
| 10:55 | So, especially things like ethanol, E85, methanol, things like that, anything you use in an automotive application is gonna be safe to use this. |
| 11:06 | The problem with using rubber hose with ethanol for example is it breaks this down and then we get this kind of sediment from the rubber in our fuel system, which goes through and clogs up our injectors and lots of things like that so it's definitely good to avoid this. |
| 11:24 | Rubber braided hose, if you are using ethanol, PTFE is really the go to there. |
| 11:30 | Another important point of it is the permeation resistance. |
| 11:36 | So, permeation is basically where the fumes from the fluid inside will basically seep through the walls of the hose and this has really good resistance to permeation so if you have your racecar in your garage for example and the fuel is permeating through the walls, it's really gonna make your garage or shed smell like fuel. |
| 11:59 | So, that's a good way to cut down on it is using PTFE. |
| 12:03 | It's kind of the, it will last really long essentially so quality PTFE hose could outlast the life of the vehicle so that's another thing to consider, it needs to be replaced less than rubber hose, but in saying that, it is more expensive so that's kind of the trade off there. |
| 12:25 | Another thing to consider if we just look at the rubber hose and kind of the tightness of the bend we can make with it, it can make a relatively tight bend, it's a little bit easier to work with there if you're looking at PTFE hose. |
| 12:43 | Depending on what size you have, it can be really good as well but it's quite a bit stiffer and if I bend it too far it will kink that inner tube so it's a little bit more difficult to work with. |
| 12:58 | So, I will just make a note, if you have any questions come up, come into mind during this example or webinar, just feel free to comment those in the chat and I'll do my best to answer those at the end. |
| 13:12 | We'll just jump back to my computer screen here now that we've covered the different types of braided hose and just have another look at this diagram from Raceworks. |
| 13:23 | So, we can see that this braid over PTFE hose, the 200 series hoses here, kind of covers that whole temperature range so it's safe for all those different temperatures down to negative 70 Celsius here, or what's that, negative 94 Fahrenheit and all the way up to the kind of highest temperatures that we'd expect in an automotive or motorsport application. |
| 13:50 | And we can see that braid over rubber hose, the 100 series hose here, how it compares, it's a lot smaller range so we wouldn't really want to be using that with very hot oils or our brake system, power steering, things like that, that can get very hot. |
| 14:07 | And then we can kind of see just a standard rubber hose here, how the braid is a little bit better than that again and how PVC, polyvinyl chloride hose compares to that as well. |
| 14:19 | So, hopefully that gives you a little bit more reference to the temperature ranges that should be expected. |
| 14:26 | So, we'll move on from there and we'll move into the different hose ends that we can use with each type of these hose. |
| 14:34 | So, just wanna make a quick note before we get into that on the term AN because the term AN fitting gets thrown around a lot and it's kind of a little bit misunderstood, just for those who aren't aware, AN stands for Army Navy and basically that's the standard for these flexible hoses for plumbing systems and that was developed in World War II and eventually made its way over into aerospace applications and also motorsport as well. |
| 15:04 | So, generally speaking if it's good for those applications, then it's probably good for us in motorsport as well. |
| 15:11 | So, just wanna discuss some of the details of AN fittings, what makes an AN fitting an AN fitting I guess. |
| 15:23 | So, one of them are the specifications around the thread and also the size of the lines as well. |
| 15:32 | So, I'm just gonna grab this out here, this is an ORB-10 I think or ORB-8 to a dash six AN fitting here. |
| 15:44 | So, you can see on the end of this, where's a good kind of bit to show, there's this 37 degree taper here and that is the sealing surface of the AN fitting. |
| 15:57 | It doesn't seal on the threads, there's no taper on the threads, we shouldn't use sealant on the threads or any sealing tapes either. |
| 16:04 | This is the sealing surface here, it's this 37 degree taper, this little surface at the end. |
| 16:10 | So, this being the male part naturally goes into the female part here being the hose end and inside that there's the matching taper for that and as they go in and press together, that's where it seals. |
| 16:23 | So, it's really important that this surface here is in good condition on both sides. |
| 16:29 | If that's got any burrs on it or anything like that, that could be a problem and mean that our fittings won't seal and need to be replaced. |
| 16:37 | So, the main thing to remember here is that that surface is 37 degrees and that's something to consider when we're working with brake lines for example. |
| 16:48 | The double flare SAE brake lines have a 45 degree flare and that will not seal against a 37 degree AN flare. |
| 16:58 | The threads would be different as well. |
| 17:01 | Just a note on those dash sizes as well, so like I said this is a dash 8 to a dash 6, so that's on the fitting. |
| 17:09 | This hose for example here is a dash 6 and basically what those dash sizes mean is dash 6 is the number of sixteenths of an inch. |
| 17:22 | So, dash 6 being 6/16, dash 8 being 8/16 for example, or half an inch. |
| 17:31 | So, that's what those dash sizes mean and for the hose here, that is the inner diameter of the hose. |
| 17:40 | So, you'll notice that if I just compare, this is a dash 6 rubber braided hose and this is dash 6 PTFE braided hose and they are both from Raceworks, the same company, and you should be able to see on the screen there that the rubber braided hose has a much bigger outer diameter than the PTFE, but they have the same inner diameter basically for the flow. |
| 18:12 | So, that's just something to consider but in saying that, that is a little bit different depending on what suppliers we're working with, they all use slightly different dimensions for everything so I would recommend if you are purchasing braided hose, AN hose, AN fittings, hose ends, things like that, purchase them from the same supplier. |
| 18:34 | So, purchase the hose ends from the same supplier that you purchased the hose from. |
| 18:39 | If we think about the Raceworks for example, they will have fittings specifically for their 100 series hose and fittings specifically for their 200 series hose and that way we can be sure that they'll fit together. |
| 18:54 | So, I'd always recommend doing that. |
| 18:57 | In some cases it's fine to use a different brand hose end with hose, but if we really want to ensure that everything's gonna work properly together, I'd recommend buying the hose ends and the hose from the same supplier. |
| 19:11 | So, we'll just move on to the focus of today's webinar being how to work with braided hose. |
| 19:20 | Just show a quick example with this part here which is just an old melted part and we'll just lock that in there. |
| 19:32 | So, the first point I just want to cover is cutting it to length. |
| 19:38 | It's pretty common for people to mark the length that they're gonna cut to by wrapping a bit of masking tape around the end. |
| 19:49 | Don't really have an example just here. |
| 19:52 | But basically the thing to consider there is that as you wrap a tape around the end with adhesive on it, as you pull it off it can kind of pull up the braid on the end. |
| 20:03 | There are tapes available that basically only adhere to themselves. |
| 20:09 | So, as you wrap it around you just wrap it up tight enough to hold onto the hose but it won't stick to the hose, it'll only stick to itself, so when you pull it off it won't pull up the braid with it. |
| 20:20 | And then the other option is naturally if you just want to use a paint pen or a marker or something like that, you can mark the distance on the hose that you wanna cut it at. |
| 20:31 | When it comes to actually cutting the hose, some people like to use an angle grinder to cut through, cos it's quite difficult to cut through the stainless braid. |
| 20:44 | The problem with that is it kind of will leave a debris from the rubber hose inside it and that can be really difficult to clean out so as you imagine if we're using that in our oil system or our fuel system, we really don't want that in the system. |
| 21:01 | So, to be sure that we don't do that, a better option is using shears. |
| 21:05 | So, these for example are Speedflow shears and they're just designed to cut braided hose. |
| 21:14 | They're naturally quite big to give you that leverage to cut through the stainless braid. |
| 21:19 | So, basically once we have a mark on there we can just open those up, come over, cos they're quite big it can be quite hard to line up, just line up with whatever mark we've made and then just squeeze and cut through there. |
| 21:34 | The downside to using the shears are found to be more of a kind of problem with PTFE as you'll see that it can kind of kink the hose. |
| 21:44 | So, it's compressed in this way as it's being cut through like that. |
| 21:49 | And that can make it a little bit tricky as we get on to fitting the hose end into it in a moment but we'll see that it's not too bad and you can kind of flex that back into a circular shape again but we'll come back to that in just a moment. |
| 22:11 | So, we'll get on to the reusable hose ends for the rubber system, the rubber hoses sorry. |
| 22:21 | I'll get rid of this hose here. |
| 22:25 | And I don't actually have one in the workshop that was dash six to go on to this rubber hose here, so I have one that's a much larger size, I guess this is dash 10, yeah dash 10 and I'll just show you, so this is actually a 90 degree one with a swivel on there as well. |
| 22:45 | And basically the rubber hose ends are quite simple, they're just two pieces. |
| 22:50 | So, we have the socket here and then the fitting. |
| 22:55 | And basically what happens is, basically what happens is we would slide the socket onto the hose end, onto the hose sorry if it was the right size and then we would be able to slide the fitting into the hose and then until it seats and then bring this up and just basically tighten that up there and that would lock our hose end onto the end if we had the right size hose and hose end to go together. |
| 23:30 | So, that's really simple, there's not much to that. |
| 23:33 | And both of these parts can be reused, which is why these are called reusable hose ends. |
| 23:43 | There's nothing in there, so if we want to change the hose for example to a different one or change the length, we can just take this off the hose, cut it to a different length or change to a different hose, as long as it's rubber and the same size obviously, and then assemble this back onto the hose end. |
| 24:02 | And given everything is in good condition, it should seal up again, it shouldn't be an issue. |
| 24:09 | Another trick is just when this is being tightened down, we basically want to tighten it down so between the top of the socket and the fitting here, as it tightens down we should leave a really small gap and that will just ensure that the swivel still works as well. |
| 24:25 | So, about the thickness of your fingernail or a millimetre or two there usually is about right but the manufacturers for each hose end should probably give a specification on that. |
| 24:38 | So, we'll just move into the PTFE hose end because that is a little bit different. |
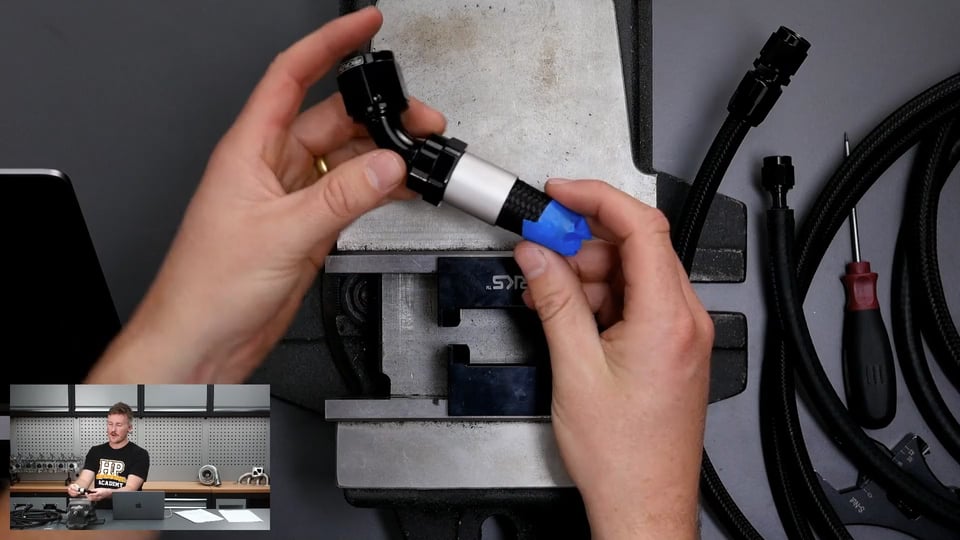
| 24:47 | So, the difference between a PTFE hose end, which I actually have the right size one here, is the use of an olive. |
| 24:57 | So, here we have the same socket and the fitting. |
| 25:02 | But in between these we also have an olive. |
| 25:10 | So, that olive is, it can be made of brass or aluminium or materials like that that are a little bit softer and basically we'll show you how this goes together in a moment, that sits in between those and it basically, this will sit in between the outer braid and the PTFE inner tube and then as they come together, that will seal up against the inside surface of the socket and stop the leaking from there. |
| 25:42 | So, I'll just get this PTFE hose and the vice here, sorry this isn't the best setup, this is our mill, the vice off our mill from the workshop, it's just the only one that we could kind of bring over here to make work. |
| 25:59 | So, the trick here, just find the screwdriver, third draw, this side, there it is, second draw, cool. |
| 26:15 | OK so the trick here is to pull the outer braid away from the PTFE inner tube. |
| 26:23 | And what we have to be careful of here, there are little tools that you can buy to do this but if we use a fine screwdriver or something like this, if it's sharp we really want to be careful basically not to push that into the PTFE tube and push through it and damage that tube because naturally that's going to leak. |
| 26:44 | So, what you basically do is just work around and pull that outer braid away from the PTFE inner tube. |
| 26:58 | It takes a while. |
| 27:09 | And what you also want to be really careful with is this stainless braid here, it can be really spiky and you want to be careful with your fingers on that because if you touch the end it can give you nasty little cuts, it hurts a lot more than it looks like. |
| 27:29 | So, I made a mistake there. |
| 27:31 | Basically you should be putting the socket on first because that can make it quite obvious if you've flared all of that out. |
| 27:40 | So, always put the socket on first. |
| 27:43 | And then the next step is to put this, insert the olive, you'll see there's a little kind of taper here and inside if you can see that there's a bit of a seat on the end. |
| 27:55 | So, we want to put that inside the end here and this can be the tricky part like I was discussing before, when we're cutting with shears and it kind of kinks the end of the hose like that, is to get the olive installed or at least started on there. |
| 28:32 | Just like that. |
| 28:34 | And then the trick here, which I might need to take it out of the vice for, might be a little bit difficult to show on this overhead camera but we want the PTFE inner tube to sit up against that internal step on the olive. |
| 28:56 | And basically there are tools available to do this but what I like to do anyway or what I find easy to do is just force it down on a hard surface like the workbench and we should just be able to get that to a point where we can see that that inner tube is nicely seated on there. |
| 29:17 | The other thing to consider is if that is kind of, the PTFE inner tube is going inside the inner diameter of the olive there as well, that can make it quite difficult. |
| 29:28 | To do the next step and get the fitting inside, so sometimes again really carefully not to damage the inner tube, I like to just kind of run that around there just to make sure that's all clear. |
| 29:43 | Another step here is using a bit of grease or something, obviously we don't want to use too much and get it all inside our hose, or a little bit of kind of silicon spray to allow this end here to be slid into the hose a little bit easier because it can be quite difficult. |
| 30:03 | So, basically want to get that started, again just be careful of your fingers on the outer braid. |
| 30:12 | Again it might be worth using the bench top. |
| 30:21 | You can see that that's just started to slide in there. |
| 30:26 | Our bench here is not very sturdy so I'm just being a bit careful not to flip the whole thing over. |
| 30:33 | And you can push that on until the olive just seats up against the end of the fitting there. |
| 30:38 | And then it's just a matter of sliding the socket up over it. |
| 30:41 | We want to be kind of careful that none of the braid is getting caught in the threads because the inner braid there is stainless steel and the threads or this fitting is all aluminium so if they get caught in the thread we'll damage the thread and our fitting or hose end is no good. |
| 30:57 | And we can just start getting that socket threading up there. |
| 31:03 | Once we've got it going a little bit, we can put it back in our vice. |
| 31:10 | And our soft jaws, it's the reason we use the soft jaws, like I just said, they're aluminium fittings. |
| 31:16 | If you put them in between a steel vice it'll mark up the anodising on the fittings and won't look very nice. |
| 31:25 | And then we can get two options here, either these are AN spanners like this or we have adjustable AN wrench there as well which is another option. |
| 31:38 | We just want to wind that out and start to thread that in. |
| 31:52 | I haven't got my vice done up very well because I don't have the handle for it. |
| 31:58 | But basically keep threading that in and it's the same thing there where we want to thread that in. |
| 32:05 | I haven't gone the whole way because the vice isn't held down to the table. |
| 32:09 | But you want to thread that in so this hex here on the fitting is about a millimetre or so from the socket, but you'll feel it get nice and tight as it's all sealed up. |
| 32:24 | And then that there should be a nice strong fitting and all sealed. |
| 32:29 | One way, we can actually pressure test these, I don't have the kit or anything to show but in a line like this where I now have a fitting on each end, we can get a pressure tester, which basically is a cap that screws into one end and then the other and then that'll have an air valve on it just like what we'd use to pump up our tyres. |
| 32:52 | And then we can seal those all up, pressurise it with whatever pressure we're expecting to see in the line, ideally go a bit more for a bit of a safety factor. |
| 33:01 | And then we can submerge the line in a clear container like a bucket or something filled with water as well and then we'll be able to see air bubbles come out from the fittings if we have any leaks for example. |
| 33:19 | Some of the pressure testing kits also have a pressure gauge on them as well, which you can see if the hose then holds pressure, then there's no leaks. |
| 33:31 | But if the pressure starts to drop then naturally there's going to be leaks. |
| 33:35 | So, a key point on these PTFE hose ends is the olive again. |
| 33:43 | So, you might not be able to see this but this is an olive that's been used before and we can just see on here that this has been tightened up and you see the markings from the stainless braid there and then also it's not really circular anymore either in this case because as it's been pulled apart and taken out with pliers or something, it's just been crushed a little bit. |
| 34:09 | These can't be reused, one, you probably wouldn't be able to get the fitting to give it because the nose of the fitting wouldn't slide down into here because it's not circular anymore, but because of these markings and everything here, it probably wouldn't seal up again either. |
| 34:27 | So, while these are reusable fittings and the socket and the fitting is reusable, the olive is not. |
| 34:34 | So, for example a company like Raceworks who all these parts are produced by, sell kits of spare olives here so you can just buy a kit if you're ever going to be building the hose ends, using the reusable hose ends, then replace the olive. |
| 34:52 | Otherwise you're just setting yourself up for some leaks. |
| 34:56 | Again if you have any questions, just drop those in the chat and I'll do my best to answer them at the end. |
| 35:04 | So, those are the reusable hose ends that we've covered, but I just wanted to look at two different options we have as well. |
| 35:12 | The first of those being push lock hose ends. |
| 35:16 | So, this is push lock hose here as well, which is essentially just rubber hose, reinforced with this integral fibre weave in there. |
| 35:29 | Smooth outer surface, smooth inner surface and that has already been pressed on over this push lock fitting. |
| 35:38 | So, what the push lock fitting here looks like, it's just a smaller option, dash six again I think, dash four sorry. |
| 35:48 | So, it's essentially just a hose end here with an AN fitting with the normal kind of push on barb that we'd see in a lot of automotive applications from the factory. |
| 36:00 | And if we have some rubber hose like this is submersible, this is just fuel hose here, then that can just be pushed on over that and in some cases you need to clamp that in a vice, it can be a little bit tricky to push on, won't get it the whole way. |
| 36:22 | And there's some options as well, things that will basically hold this and hold the hose and then you can wind it in and it uses the kind of mechanical advantage of a thread to push that all the way on. |
| 36:34 | And in a lot of cases a push lock fitting like this, that doesn't even need a hose clamp on it, that's really secure on there. |
| 36:43 | Probably less secure than the reusable hose ends, because that's naturally all locked together. |
| 36:50 | And of course there's the option to also use a hose end there if you want, you just don't wanna over tighten them and break the fitting inside or damage the hose. |
| 36:59 | But that is one example, being the push lock fitting, and of course they're reusable as well, if you can take the hose off it you can reuse that. |
| 37:07 | The other option here is a crimp fitting. |
| 37:10 | So, I've just got a short length of hose, I've taped the end here so I don't get stabbed by the stainless braid. |
| 37:16 | So, this is another AN fitting here, dash 10 or 12 maybe. |
| 37:24 | And this here is the crimp collar, so this is just an aluminium collar. |
| 37:30 | And that gets basically put on the end of the hose first and the hose gets pushed up over it, the inside of this is, this fitting is kind of like the barb of the push lock, and then we slide that up over there. |
| 37:46 | And then this is basically crimped down with a crimp machine onto the end of the hose. |
| 37:52 | I'll show you a picture of that on my computer in just a moment, but obviously once that's crimped down onto the hose, the downside is you cannot reuse that. |
| 38:02 | So, you basically, yeah after you've done that once, you can't take it off, it's on there for good. |
| 38:10 | And if you want to remake the line then you're gonna need another fitting. |
| 38:14 | So, I'll just jump onto my computer screen, and I've got some photos here of some of those crimp fittings on our SR86. |
| 38:27 | So, this is for the water net going into the radiator here. |
| 38:32 | And this one here is an AN hose end, and then on this side here there's actually a Wiggins clamp as well. |
| 38:39 | So, it's possible to get hose ends for these, and why I prefer to call them hose ends rather than AN fittings for braided hose, because obviously this is a Wiggins clamp, it's not an AN hose end. |
| 38:53 | And that's also a crimp style one as well. |
| 38:58 | And I guess the benefit of the crimp fitting is it's the most secure of the three options between reusable and push lock as well. |
| 39:07 | And they are also slightly lighter so if we, I didn't have a photo here, but I've seen it on the Xtreme Racing GTR at World Time Attack, they have the crimp fittings all over the vehicle and I was talking to them about that and actually they're slightly lighter and although each fitting doesn't really make too much difference when you add that up, say over 50 to 100 fittings over the entire build, it is quite a significant weight penalty of using a reusable hose end over the crimp fittings. |
| 39:45 | So, at the higher end of the, the pointy end of the motorsport, like Time Attack for example, where the budget kind of justifies it, then the crimp fittings tend to be the choice over the reusable hose ends, but it just depends on the application that you're working on. |
| 40:05 | So, again, I mentioned this in the pre show, I'll just mention it again, if you're interested in what we're talking about today, we do have our Motorsport Plumbing Systems course live now and I'd recommend going and checking that out if you're interested in learning more about this. |
| 40:22 | So, we cover, what we've covered here in a lot more detail, we also kind of cover all the fundamental knowledge on each of our plumbing systems in the vehicle, so intake and charge air, coolant, fuel lines, oil lines, brake lines, power steering as well, cover a systems overview, the common materials that are used for each of these systems in OEM applications all the way up to motorsport as well. |
| 40:47 | We also look at the routing and heat management considerations and also how to size the lines for the particular application. |
| 40:55 | Then we also cover all the different plumbing components, so things we've talked about here like the different types of hose ends, also hose clamps like the Wiggins clamps and things we had before. |
| 41:08 | We're looking at before dry brake couplings and so on. |
| 41:11 | And then we also look at all the practical skills involved in plumbing your car. |
| 41:17 | So, things from fabrication to bead rolling all the way through to the reusable hose ends that we've covered already. |
| 41:25 | Pressure testing the system which I mentioned, bleeding, boost leak testing and troubleshooting and common issues. |
| 41:32 | And then because it's quite a big course and there's a lot of information we cover, we also wrap this all up into a three step process that you can follow for any plumbing system work that you're doing on a vehicle that you're working on. |
| 41:45 | So, Jordy will drop that into the chat or he has already, I'd recommend going and looking at that if you're interested in doing more of your plumbing work yourself. |
| 41:54 | So, I'll just jump over to my notes and see if we have any questions I can answer. |
| 42:09 | Chicano Performance, "Is there a certain brand that is best?". |
| 42:14 | Not particularly, it's always one of those things with motorsport applications, you kind of pay for what you get. |
| 42:25 | I would again recommend if you're buying hose and hose ends from a supplier, buy the hose and the hose end from the same supplier. |
| 42:35 | The other thing I would say is just look at their specifications if you want to compare different ones. |
| 42:41 | If someone says braided hose, it doesn't mean that's the same between two different companies, they might have different layers used there for different applications and in some cases the most expensive one might actually not be the best for your application. |
| 42:57 | Sometimes the more expensive ones have lots of different layers and it might just be unnecessary for your application. |
| 43:04 | So, I'd consider what you're using it for and go from there. |
| 43:09 | If you are using it with oil or ethanol fuels, different fuel blends, definitely use PTFE over the rubber hose. |
| 43:18 | But if you really have no need for the PTFE, it is an extra expense as well. |
| 43:23 | In terms of a certain brand, I personally haven't used too many of the different ones, so I can't comment too much on that but a little bit of research, you'll be able to find some answers. |
| 43:34 | I use the Raceworks stuff which is a company out of Australia on my personal car and I was really happy with how that went. |
| 43:41 | We also use Speedflow in the workshop on the racecars and that goes really well for us as well. |
| 43:47 | So, maybe those are some places to start or XRP for example that I gave before. |
| 43:52 | Dayton Etna, "What kind of AN hose would you recommend for using for a vacuum hose, just thinking how clean and convenient AN vacuum lines would be?". |
| 44:08 | Yeah definitely, for vacuum line, like I said, just a rubber base hose is going to be fine, you really don't need to use anything too expensive or anything like PTFE for example. |
| 44:25 | Just a simple rubber braided hose would be fine and then from there it's your choice of what you want in terms of the outer braid that you have. |
| 44:33 | I would just say if you're using a stainless outer braid and it could be black or just raw stainless, then just consider having whatever that might be rubbing against that stainless outer braid is extremely abrasive, so just be careful to kind of route it so it's not rubbing through things with vibration. |
| 44:55 | But yeah for the vacuum lines, it does, a lot of people think it's overkill, but I'm kind of with you on that, it's a nice clean and convenient way to do it and working with AN fittings once you get used to it is really nice, taking them on and off is, they're super nice to work with compared to using hose clamps and things like that as well. |
| 45:20 | Overbuilt automotive, "Trying to make my mind up on which engine to install in a street driver Nissan 280ZX. |
| 45:28 | Chevy aluminium 5.3 VQ 5.6 litre, RB20 2JZ, made it to six speed, Tremec. |
| 45:41 | Tell me the one you just like. |
| 45:46 | Also I could use the L28 turbo, that came in the car.". |
| 45:53 | Ok, so I actually have a 240Z personally and mine still has the L24 in it although I would like to build a L28 at some stage. |
| 46:06 | Not the most efficient engines in terms of making power, but personally I think they sound amazing. |
| 46:13 | I ended up just going with ITBs on my car. |
| 46:16 | If I was to start again, I'd still probably go ITBs just because of how good it sounds but in saying that, the type of power I got out of it is just nothing compared to an RB or a 2J or something like that. |
| 46:31 | The L28 turbos though are definitely a different sounding engine and they can sound really cool. |
| 46:39 | Z Car Garage in San Diego I think it is, have done some awesome builds with one of those, a black 240Z, that sounds amazing. |
| 46:49 | But if you want easier and cheaper power then yeah the 2JZs or RBs are definitely an option and of course if you're in the States then the domestic V8s are probably your best bang for buck. |
| 47:05 | 280ZX, pretty small car though and you don't want to overpower it. |
| 47:12 | I know if my car had a lot more power it would probably be undriveable. |
| 47:16 | But yeah, that wraps up the questions so thanks for watching. |
| 47:20 | Again I'd recommend checking out that plumbing course if you're interested. |
| 47:24 | And we'll leave it at that and we'll see you in next week's webinar. |
| 47:29 | Thanks for watching. |