358 | Haltech Closed Loop Fuel Control
Summary
With the addition of a wideband controller, we have the ability to use Haltech’s O2 control functions for closed loop fuel control. In this webinar we’ll look at how to set this feature up and how you can use it to gain improved control of your fuel delivery.
| 00:00 | Hey team, Andre from High Performance Economy, welcome to another one of our webinars and this time we're going to be diving into Haltech's O2 control. |
| 00:08 | Now, there's two aspects to their O2 control but before we get into that, let's talk a little bit about what O2 control is in the first place. |
| 00:17 | Interesting name that Haltech have chosen to go with here, I prefer lambda control or fuel control but O2 control kind of gets the job done, it is of course a wideband O2 sensor or wideband lambda sensor. |
| 00:31 | So, basically it's a way of Haltech getting information about the current air fuel ratio that the engine is running and then if we're not on our target air fuel ratio, the Haltech ECU can then apply trims, short term and long term fuel trims, in order to get our fuelling back on track. |
| 00:50 | So, I have been a big advocate for using closed loop fuel control on both road and racecars for a number of years, particularly now that we've got quality CAN based wideband controllers that can provide some diagnostic information. |
| 01:06 | So, it's a really good way of allowing the ECU to just pick up the pieces I guess if you like to think of it that way. |
| 01:14 | If atmospheric conditions changing, maybe temperatures aren't quite what we saw on the dyno and we see a little bit of error in our air fuel ratio compared to when the vehicle was tuned. |
| 01:25 | Important to mention though that relying on closed loop fuel control is not a band aid for not doing the job properly in the first place of actually tuning the vehicle. |
| 01:35 | So, this is something that I will generally enable once I've finished tuning the vehicle and then allow that to operate when the car's out on the street or the racetrack. |
| 01:45 | There are two aspects to this as I mentioned though. |
| 01:48 | One is the closed loop fuel control, so allowing the ECU to make these manual fueling changes and as I've just mentioned, generally I'm going to be doing that out on the track, but we can also use it to help speed up the tuning process. |
| 02:00 | And then there's the other aspect of this , which is Haltech's quick tune functionality, which is where we can use that lambda input to the ECU to actually speed up the tuning process, in other words we don't have to make manual changes to each cell in the fuel table and we'll be looking at both aspects of that in today's webinar. |
| 02:20 | As usual, if you do have any questions on the topic, we will be having a Q&A session at the end as well so keep your questions in mind and we'll put a shout out when we want you to ask those. |
| 02:33 | Alright, so what do you need in order to use this fuel O2 control? For a start let's talk about the ECU. |
| 02:40 | I am using a Haltech Elite 2500 ECU here. |
| 02:44 | This will be relevant to the Nexus as well and we are using the NSP software so probably some changes and differences compared to the old Platinum Series ECUs, but we have moved on from those. |
| 02:58 | On top of this, you obviously are going to need a wideband controller. |
| 03:02 | And Haltech make this nice and easy, if we just jump across to my laptop screen here. |
| 03:06 | This is what we've got fitted to our Mitsubishi Evo 9. |
| 03:11 | So, this is their WB1 single channel CAN based wideband controller. |
| 03:17 | So, obviously as its name implies, this is a single channel, so designed for an inline engine, not really ideal for a V configuration engine. |
| 03:29 | So, if you have a V6 or a V8 with two banks of cylinders, I would ideally go with the WB2, which has two separate lambda sensors, one for each bank. |
| 03:39 | So, it allows bank to bank corrections. |
| 03:41 | But in our case, four cylinder engine, no real need to have two sensors. |
| 03:46 | So, this uses the Bosch LSU 4.9 lambda sensor, which is sort of OE spec and kind of the gold standard really in the OE world as well as the aftermarket world. |
| 03:56 | So, of course that's going to set you back, in this case, $535 NZD, you can work that out in your own currency. |
| 04:03 | In my opinion, I probably wouldn't set up an ECU these days without a CAN based wideband controller. |
| 04:10 | There's just too many advantages that make the relatively small purchase price just seem like an absolute no brainer. |
| 04:18 | One of the things I really like about the way Haltech have dealt with this as well is that the installation process is pretty painless. |
| 04:26 | With all of Haltech's CAN based products, they've got CAN hubs and pre configured harnesses to extend your CAN bus and it really is just about as simple as plug and play. |
| 04:38 | On top of this, the Haltech Elite has an onboard four pin DTM connector and we can get access to our second CAN bus via that. |
| 04:49 | Now, I will mention here, and you'll see this when you purchase it, actually if I jump back to my laptop screen, there is a little adapter here. |
| 04:57 | While the four pin connector on the ECU does have CAN high and CAN low plus 12 volt and ground, we can't just plug our wideband controller directly into this, we do need to get power ground and 12 volts from another source to handle the current requirements of that wideband controller, particularly when the sensor is heating up. |
| 05:18 | So, generally what we've done there is just wire the 12 volt and ground into the header plug, supplying power and ground of course to the ECU. |
| 05:26 | So, as far as installation goes, it is really about as simple as it can get. |
| 05:31 | You are going to need to obviously weld in a sensor boss somewhere in the exhaust, which also comes in this package here. |
| 05:41 | While it's not really specific to our topic today, just worth mentioning here some of the considerations, because I do hear a lot of questions about where the sensors should be mounted. |
| 05:53 | The reality is it's not as critical as a lot of people think. |
| 05:56 | Generally I'm going to try and mount that sensor somewhere within about 500 millimetres of the turbo outlet. |
| 06:03 | It is important that it goes post turbocharger, because there is a lot of back pressure pre turbocharger and if you fitted the sensor there, A, it would probably end up overheating but B, your output's going to be skewed by the back pressure. |
| 06:18 | So, it has to be post turbocharger. |
| 06:20 | I do not really like putting the sensor right on the back of the turbocharger, again it's going to be exposed to a lot of heat and there's no real advantage to needing it that close to the turbocharger so sort of within 500 millimetres or so of the turbo outlet but generally the location is often more driven by just where we actually physically have room to fit a sensor in a very tight engine bay is because it become more complex, more modern, there's a lot of stuff going on in the engine bay and sometimes there is just a lack of space to fit a sensor. |
| 06:52 | The only other tip I would give is that we don't want to fit the sensor below horizontal on the exhaust, otherwise it can end up being damaged prematurely by moisture in the exhaust system. |
| 07:03 | Alright, so that covers the fitting of the actual sensor. |
| 07:07 | Now, we want to go through the setup in our NSP software so let's just head across here. |
| 07:14 | We've got our engine up and running at the moment and we need to start, if we haven't already, by enabling the O2 control function. |
| 07:24 | So, if we're say just sitting on one of the tables inside of our ECU, we can come up here to our enable or disable functions tab or alternatively as you can see, pressing F4 will achieve the same aim. |
| 07:39 | Now, as I've already mentioned, in the Haltech lingo, this is referred to as O2 control. |
| 07:45 | So, if your little O2 control slider has not already been selected, you're going to need to do that to enable the O2 control, of course in our situation that is already done. |
| 07:56 | And when we enable O2 control, that gives us access to this particular menu here. |
| 08:03 | So, let's get started at the top of this and see how this all works. |
| 08:07 | So, for a start we've got our unbanked or banked bank one, in this case it's unbanked, it's already talked about, it's an inline four cylinder engine so that's wideband one. |
| 08:18 | We can select from our options there but of course for a single wideband, that's going to be what we'd want. |
| 08:25 | If you're running a V configuration then we can enable a second lambda sensor wideband if required. |
| 08:32 | Of course, in our case that's disabled. |
| 08:34 | Ok next, moving down we have our target oscillation amplitude. |
| 08:39 | You might be thinking what on earth is that and why do we need it? Well this is more of an emissions device and if you've ever actually watched what happens with a factory car when it's running in closed loop mode, idle or cruise, what you'll find is that the ECU will actually purposely run the engine rich and lean just past our stoic or lambda one point. |
| 09:03 | And it does this to help improve the efficiency of the catalytic converter. |
| 09:08 | So, if you are required to meet emissions standards, you can set an oscillation amplitude there in order to basically replicate the way the factory does that. |
| 09:19 | In our case this car isn't actually fitted with a catalytic converter, so there's not going to be a lot of advantage in doing so. |
| 09:26 | We've got our engine initial run time so pretty self explanatory, engine's got to be running for five seconds before closed loop control will come on. |
| 09:35 | Our minimum coolant temp, you can choose to set this so that the closed loop control's not going to be active when the engine is in warm up mode. |
| 09:45 | However, I really don't see any reason to disable it, it can still do a great job of tracking our lambda targets while the engine is warming up, personal preference there. |
| 09:55 | We've got a minimum RPM and a maximum RPM if for some reason you want to disable lambda control or O2 control under certain conditions, you've got the ability to do that. |
| 10:07 | Although we do have some other controls there as well , which we'll look at soon. |
| 10:11 | And then we've got our transient throttle rate limit. |
| 10:15 | So, basically this is just aiming to eliminate closed loop fuel control, trying to affect our transient sort of acceleration enrichment. |
| 10:25 | I've left that I believe at the default setting and have not seen any real need to change that. |
| 10:31 | Alright, let's move over to the next option here in our drop down menu. |
| 10:36 | And we've got our delay. |
| 10:38 | This can be a little bit confusing and actually had me confused for a little while when I first started playing around with this ECU. |
| 10:46 | In a lot of ECUs we have a delay or transport time table and that'll be two dimensional like this relative to RPM and what it defines is essentially how long it takes for the combustion event to reach the lambda sensor and this is gonna be related to, relevant to engine speed as well as the location of the lambda sensor in the exhaust. |
| 11:07 | Obviously, the longer or further away from the exhaust port the sensor is located, the longer that transport delay is. |
| 11:16 | So, this is a little misleading because that's not how this table works. |
| 11:20 | This table, what it does is it provides a delay if something like overrun fuel cut comes in to disable our closed loop fuel control. |
| 11:30 | It will wait this amount of time specified in this table before re enabling closed loop control. |
| 11:36 | So, the idea here is to not try and have the O2 control fighting a condition such as recovering from an overrun fuel cut where the engine is likely to show lean for some period of time before re establishing correct fueling. |
| 11:51 | So, that's what that table does. |
| 11:53 | Again, I've left this to default values at the moment and haven't really seen much need to change that. |
| 11:59 | It looks like Haltech for the most part do a fairly good job of giving useful, workable default values, although in some instances you may need to adjust these. |
| 12:08 | We now move into some of the trickier bits for people to get their hair around, which is the proportional, integral and derivative gains. |
| 12:16 | I'm not gonna dwell on these too much because again I actually have found the default values to work really well and I haven't needed to change them. |
| 12:25 | In short what these do is define how the O2 control algorithm will respond to an error in our lambda target. |
| 12:35 | Essentially, the proportional gain will give an output that is proportional to the size of the error. |
| 12:42 | So, basically the bigger the error, the more the closed loop control will trim in order to correct that error. |
| 12:49 | However, proportional gain on its own can be a little bit tricky. |
| 12:52 | If we use a large amount of proportional gain, what this will inevitably result in is an overshooting and oscillation with our closed loop control. |
| 13:00 | So, our closed loop's just gonna be constantly going plus and minus, plus and minus, chasing its tail. |
| 13:05 | That's always a really good sign that your proportional gain is too high. |
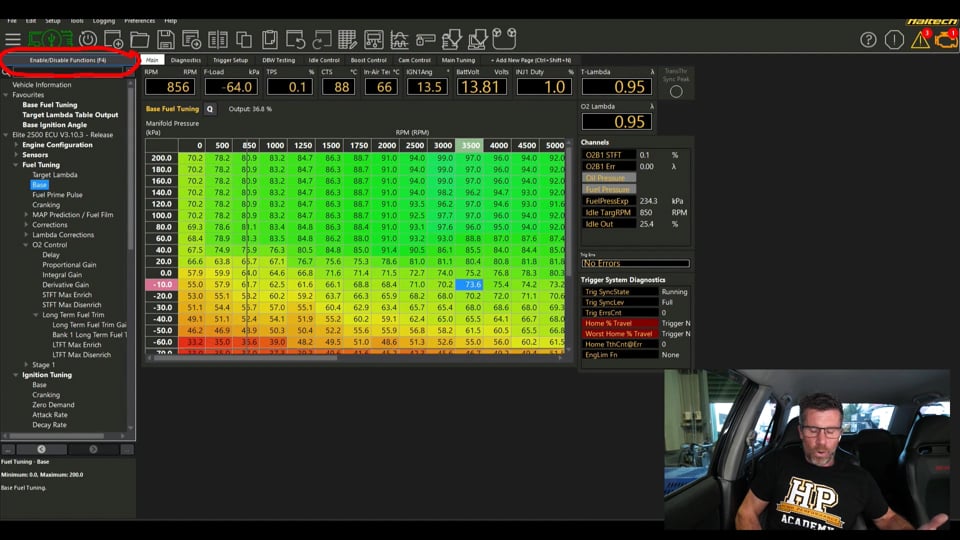
| 13:09 | While we're talking here as well, obviously I've got the engine idling, we can see the relevant parameters here, our target lambda at the top and our O2 lambda at the bottom and of course there, bang on, our target. |
| 13:22 | What we can see though is what's going on in the background here, our O2 bank one short term fuel trim, definitely a bit of a mouthful. |
| 13:30 | And that's actually sitting quite nicely on pretty close to zero but you can see, depending on the conditions, it's trimming plus and minus every now and then, but I mean this is sitting at.1% so it looks like I've done a pretty good job of getting everything dialled in so far anyway. |
| 13:45 | We'll look into that in more detail. |
| 13:47 | So, proportional gain relative to the size of the error. |
| 13:50 | Our integral gain, because the proportional on its own can never get us right onto our target, we do need to rely on integral gain and that basically works over time and will drive us towards our target, basically removing the remaining error that our proportional gain couldn't clean up. |
| 14:07 | And then our derivative gain , which interestingly Haltech don't seem to be a big fan of using. |
| 14:13 | They don't recommend using it for their boost control strategy either, but derivative gain is a braking effect essentially so it allows us to use quite an aggressive amount of proportional gain but this works on the rate of change of error, so as our error is coming closer to zero, the derivative gain can kind of put a braking effect on so it allows us to use more proportional gain, getting faster correction of our errors without any up in that overshoot and oscillation range. |
| 14:40 | So, let's just have a look at what we've got here. |
| 14:42 | These are three dimensional tables, we've got RPM on one axis and we've got our fuel load, load and kPa on the other axis. |
| 14:51 | I don't particularly, my brain just doesn't work with the default way that Haltech display these tables with RPM on the y axis so we can come in here and swap these columns or these axes around, just makes more sense for the way that my brain works, but I mean really it doesn't have too much effect on anything. |
| 15:11 | Integral gain, again same table, basically default values as I've mentioned, we're not going to make any changes to these and our derivative gain, as I mentioned, we've got that full of zeros. |
| 15:22 | How would we change these and when would we want to change these? Great question. |
| 15:27 | What we want to do basically is look at how well, or how quickly the close loop control system is able to pick up and correct our error and we really obviously want that to be done very very fast. |
| 15:40 | Basically, when we've got a reasonable amount of error, which is going to be shown by the short term fuel trim being largely positive or largely negative, we want to see how quickly that cleans up the error between our target lambda and our measured lambda. |
| 15:55 | It's always a good idea with any PID algorithm to start by making quite a large change and assess the effect of that change. |
| 16:04 | So, anyone who's watched these webinars before will have probably heard my advice before but basically what I do is start by doubling the proportional gain and just see what that does. |
| 16:16 | Probably chances are that's going to drive it into oscillation and then it just gives you a sense of what magnitude of change gives us what result rather than trying to creep up by making 2% or 5% changes. |
| 16:29 | And if we get into that oscillation problem, then we can halve it, that'll obviously get us right back where we were and then we can start working out values in between. |
| 16:39 | So, basically we want to use as much proportional gain as we can without driving ourselves into that oscillation condition. |
| 16:46 | Likewise we'll get exactly the same result with our integral gain so again I'd start by doubling and halving that to get a sense of what that's going to do. |
| 16:54 | Again this has actually done a really standout job just with those default values. |
| 16:58 | Alright, let's move down and we'll have a look at our short term fuel trim max enrich and our max disenrich. |
| 17:05 | Interesting terminology, I haven't actually heard disenrich before, in Leinman I would have thought but we get the idea. |
| 17:12 | So, this is a nice feature because it allows us to control how much fuel control the Haltech can do. |
| 17:21 | And this really is a personal preference situation here. |
| 17:25 | We've got our load axis on the y axis here and our RPM on the horizontal or x axis. |
| 17:32 | And we can see the cross here showing us where we are at the moment. |
| 17:35 | And we can see at this point I've allowed 15% trim, I won't go over both of these, because they're essentially exactly the same but we can see if we go to our disenrich, we've got the same control. |
| 17:45 | So, what I've done is I've allowed a reasonable amount of control here at idle, plus or minus 15%. |
| 17:51 | And we can look at what OE factory cars do, generally in closed loop control, they will be plus or minus 25%. |
| 17:58 | Now, I like to think that I've done my job properly in tuning the VE table in the first place. |
| 18:04 | Plus or minus 15% should be much much more than I'll need. |
| 18:08 | But why have I given it more at idle than in the cruise and then again under wide open throttle and high boost? Well, the reason for this is that we're very prone often to heat soak, particularly in the idle condition and the heat soak can be really really difficult to accurately model with the ECU's fuelling. |
| 18:30 | And quite often we will see that under certain conditions, particularly if the car's been driven really hard and then maybe on a racetrack we come into the pits and allow it to sit, idling with the bonnet closed, or even if we shut the engine off and then restart it after five or 10 minutes when it's really heavily heat soaked, this will affect the fuelling accuracy under idle until that heat soak dissipates. |
| 18:51 | So, just giving it a little bit more range of control there allows the ECU to keep the idle condition nice and clean. |
| 18:59 | Under cruise conditions and even under moderate load, I've allowed plus or minus 10% and again this is simply personal preference here, this is not set in stone, do as you please. |
| 19:10 | But again I've tuned this engine properly, I've spent my time and got the VE table dialled in nice and accurately and again plus or minus 10% should be much much more than I actually need. |
| 19:22 | I'd realistically like to see this more like plus or minus 2-3%, that's an indication that I've done a pretty good job there. |
| 19:29 | And then under wide open throttle, high load, I've reduced that trim a little bit and this kind of safeguards ourselves a little bit of hedging our bets in case something does go wrong with that closed loop system or our sensor so that we don't end up with the ECU trimming out masses of fuel and ending up with our fuelling too lean. |
| 19:48 | Of course, we could just simply set zeros under our high boost areas if you really are nervous about the closed loop control, but from my perspective it's definitely worth its weight in gold. |
| 20:00 | Right so, that covers the basis of the closed loop control situation with our short term fuel trims and we do also have the ability to enable long term fuel trims, which we've got down here. |
| 20:15 | So, this again works kind of a bit like how a factory ECU works where the short term fuel trims are an instantaneous trim, but then over time, if we're consistently sitting at let's say plus 5%, what will happen is over time that positive 5% will actually be added into a long term map , which is stored, it's saved so it doesn't reset when the car is turned off and that should drive it to a point where our short term fuel trims should be sitting much closer to zero all of the time. |
| 20:47 | That's really how the Haltech system works. |
| 20:51 | So, first of all we've got the ability to enable it here with our little radio button. |
| 20:55 | We've got a couple of controls here, so first of all our long term fuel trim rich bias. |
| 21:00 | So, what's that? Well it allows us if we want to kind of target our long term fuel trim table so that the fuelling is always going to be just slightly rich or we can choose, if we want to go 2% or 5% rich and then the short term fuel trims will pull that back down and again this is a sort of ability to hedge our bets in case something goes wrong, we'll be biased a little bit rich so if something does go wrong with our Y band controller, we're probably going to be in a safer situation. |
| 21:30 | So, again personal preference on how you deal with that. |
| 21:32 | We can also set a minimum temperature for the closed loop fuel, long term fuel trims to come into play and under these conditions I probably would recommend setting this under our normal operating conditions. |
| 21:44 | We really don't want our long term fuel trims tracking our warm up enrichment, because that's going to be some pretty messy data. |
| 21:52 | We can also disable during post start correction for the same reasons and disable during coolant correction so basically you've got a lot of control over how this works and when it's working. |
| 22:03 | So, we can then choose to reset once we've got some data stored and we can also choose to apply the trims to our base table. |
| 22:12 | Which brings us to our trims, we'll just do this a little bit out of order. |
| 22:16 | So, this is some data that has been stored here. |
| 22:20 | So, we're sitting at idle at the moment and we can see this is all pretty good but 1.5 to 3.9%. |
| 22:27 | So, it's done exactly what I said it would do, it's driven the long term fuel trims to a point where our short term fuel trims are now sitting really really nice and close to zero. |
| 22:39 | We've got some other data that I managed to capture just before when I was setting up for this webinar. |
| 22:45 | But basically everything's pretty close to zero, so no big dramas here. |
| 22:50 | What we can do though is once we've got all of this data, once the car's been driven for a period of time, you can click this button that's going to apply all of those trims to the base table. |
| 23:02 | Essentially what it should do is help us clean up our tune and just correct any errors that creep in over time. |
| 23:09 | I've found it to be pretty good but again it's not a band aid for doing the job properly and you do need to sort of have a look at the data that it's collected in that trim table. |
| 23:21 | Just make a bit of sense of it and make sure that you haven't got any outlier data that's sort of clearly questionable. |
| 23:27 | It is a bit of a case of garbage in, garbage out with the fuel control. |
| 23:33 | Alright, we'll come down to our long term fuel trim gain. |
| 23:37 | So, this is just simply a single value, you can set this up as a table if you like. |
| 23:42 | Basically, the higher the number, the more aggressively the short term trims will be driven towards our long term trim table. |
| 23:50 | I've got this again at a default value, I think 30% and again I can't really tell you whether it's been doing a pretty stand up job. |
| 23:59 | We've got also our long term trim max enrich and disenrich, which again I've left at 10% because if we've done our job properly, that should absolutely be ample. |
| 24:10 | So, that's how everything works there. |
| 24:14 | That's all of the parameters that we've got to set up but realistically it is pretty straightforward and even if you just enable the function in my experience so far, it works very very well with all of those default values. |
| 24:27 | So, as I mentioned, there's two parts to this, that's the actual closed loop fuel control , which you can set up and let the customer or yourself take the car out on the street and that'll clean up your fuelling if it's not quite on point. |
| 24:43 | But the other function that you can utilise once you've got the Y band controller installed is the quick tune functionality, which helps us to speed up the tuning of our VE table. |
| 24:56 | So, I want to just go through a bit of a demonstration of that and there's a couple of ways that that can work as well. |
| 25:03 | So, what we'll do, we'll get our fan up and running here. |
| 25:07 | And we'll just, we'll just reset our error on our dyno. |
| 25:12 | There we go, we'll get our fan up and running. |
| 25:14 | And we'll do some steady state tuning I think to start with. |
| 25:17 | Let's head back to our base fuel tuning table. |
| 25:25 | And we'll get ourselves at 2000 RPM here. |
| 25:29 | And what we can see is again we're right on our target but we can see that the reason that we're on our target is, because our O2 control is taking out 2%. |
| 25:41 | So, what we can do is make sure that we are nice and central in the cell. |
| 25:47 | And then we can simply press the Q button for quick tune, I'll just get back into the centre of that cell, it is really important for accuracy to be as close to the centre as we can. |
| 26:01 | Ok so, a little bit of a warning about our long term fuel trim, I actually will just go and disable our long term fuel trims for the purposes of this. |
| 26:09 | And we will need to just reboot, there we go. |
| 26:14 | Alright, come back to our fuel table here. |
| 26:18 | So, we'll come up to our minus 10 kPa cell and we can see we've got quite a bit of error in there, we're on our target but the closed loop control's sort of minus 5% to 6% so again we'll press the Q key. |
| 26:32 | And we see that momentarily our lambda goes a little bit lean. |
| 26:36 | And we've gone from minus 6% to positive 1% to 2% so it's actually overshot a little bit. |
| 26:42 | And in my experience, generally I'll just press the Q key again. |
| 26:45 | Generally, with this process, it does take a couple of iterations, it's not always going to instantly correct all of your error in one go. |
| 26:54 | But there we go, I've pressed that key a total of three times in that cell and now our short term fuel trim is sitting at zero. |
| 27:01 | So, let's just key up here and we'll come up to our zero kPa cell and we'll just repeat that process to show how well it works. |
| 27:09 | So, we're stable in the cell, central in the cell, minus 2% trim in our short term fuel trim, I'll just circle that so it's nice and easy to see. |
| 27:17 | And we'll press the Q key. |
| 27:20 | And straight away just one press that time has got us pretty much to zero. |
| 27:25 | Right, I'll just come back to idle and talk about a few aspects of that. |
| 27:29 | So, first of all I mentioned that it's really important that we are central in the cell. |
| 27:33 | So, if we are sort of part way between two cells, then the ECU's going to be interpolating between the surrounding cells. |
| 27:42 | And if we press the Q key, it will be applied to the cell that we are closest to. |
| 27:47 | However, it's going to be influenced then by the surrounding cells. |
| 27:51 | So, if there's a big error in a surrounding cell, that's really going to skew the effectiveness of the quick tune function. |
| 27:57 | So, ideally we want to make sure that we're central in the cell, allow everything to stabilise and then press the Q key. |
| 28:04 | Also it's going to be influenced by any sort of conditions like heat soak, which I mentioned before. |
| 28:11 | So, we want to make sure that we are allowing the engine to run for a long enough time to get rid of any heat soak, make sure that our intake temperature and coolant temperature are kind of within the normal operating region and again it's sort of that garbage in garbage out situation, give it good clean data, we're going to end up with a much better result. |
| 28:32 | That's probably one of the quickest ways of tuning our fuel turb table under steady state conditions. |
| 28:40 | And really we don't have to do much other than set our base target lambda, which I haven't actually mentioned yet so let's have a quick look at that. |
| 28:48 | So, this is sort of the place where we want to get started. |
| 28:52 | So, we've got our target lambda table, making sure, this is really a key aspect of any volumetric efficiency based ECU, we want to make sure that these are set to realistic lambda targets that we actually want to achieve and then the volumetric efficiency table is tuned until we're achieving our lambda target. |
| 29:10 | So, we can see in this table here, a little bit richer at idle, just helps stabilise the idle. |
| 29:17 | Under the cruise conditions here, obviously lambda one for good fuel economy. |
| 29:20 | And then when we're sort of up at one bar boost, doesn't really work that well when I use a red marker on red cells but sort of 0.80 to 0.78 lambda, pretty typical sort of values so we just want to make sure that that is set to what we want to achieve first. |
| 29:37 | So, from there it's then just a case of using that Q key while we are running the car. |
| 29:43 | The benefit of using the O2 control along with the Q key is that the short term fuel trumps will be active, so if we move into a cell that's too lean or too rich for that matter, the short term fuel trumps are going to really quickly deal to that. |
| 29:57 | So, what it means is that particularly as we move into higher load, you're not going to be dangerously rich or lean, there's really such a thing as dangerously rich, but we're not going to be excessively rich or dangerously lean for very long. |
| 30:10 | Little bit of common sense is required here. |
| 30:12 | If I start seeing a trend as I'm moving up the table, so let's say we're sort of in a higher load, higher RPM area, maybe sort of 5500 RPM here and we're moving up the cell, so obviously this point is zero kPa, this is where we cross over into positive boost pressure as we move up from here. |
| 30:31 | So, maybe around 40 to 60 kPa, I'm not really going to be too concerned if we're a touch lean. |
| 30:36 | There's not a lot of load on the engine, it's going to be relatively safe but once we sort of start getting higher in the load, I don't really want to be sort of 5% or 8% lean for an extended period of time so what I'll do is I'll start to see a bit of a trend emerging where each cell progressively as I go into it has been lean. |
| 30:55 | Well, before I move up into the next cell I'll just apply a percentage change and guess ahead, maybe we can use the P key to add 8% to 10% to the next cell and that's just going to help get us on target quicker and mean again we're not in that excessive rich or lean stage for very long. |
| 31:13 | Ok so, that's the Q function. |
| 31:16 | There is another quite interesting technique that we can use here with the O2 control. |
| 31:22 | And let's just have a look at that now. |
| 31:24 | So, what we're going to use is the trace function. |
| 31:27 | So, we'll come to, let's just try raising this RPM a little bit. |
| 31:35 | We'll come up to 3000 RPM. |
| 31:43 | Just making sure that I'm central in the cell. |
| 31:45 | The other point I was going to make before I forgot about is we want to make sure that all of our movements on the throttle are nice and smooth, so that we aren't bringing in transient enrichments, which can mess up our data as well. |
| 31:57 | Alright, so what we can do now is press the T key. |
| 32:00 | It's going to turn our trace on. |
| 32:02 | So, what we can see at the moment is our O2 control's still operational, we've got a 3% trim here. |
| 32:08 | What I can do now is just slowly move my foot on the throttle here. |
| 32:12 | Want to allow a little bit of time in the centre of each cell. |
| 32:15 | What this will do is catch up to two seconds of data averaging our lambda while we're in the centre of that cell. |
| 32:22 | And again we've got the short term fuel trims, picking up the pieces, making sure that we stay on track. |
| 32:32 | And we can see that it's colour coding as well so at a glimpse we know whether we're too rich or too lean. |
| 32:40 | So, we'll probably just back off the throttle there. |
| 32:43 | Ok so, what this is showing us is what each of those cells was doing and if we click on it we can see, so it gives us quite a bit of information here. |
| 32:52 | It shows us that the average lambda that we had was .98, the target was also .98, the error was zero, our quick tune though is 3.2% because that was the short term fuel trim. |
| 33:06 | And if we press R, that is going to apply that change. |
| 33:08 | So, we can do that, press R and that's gonna make the change. |
| 33:12 | However, what we can do is actually highlight all of the data that we want to change, and even we can highlight outside of that and press the R key and it's gonna make changes to all of those cells in one go. |
| 33:26 | It's only gonna make changes to the cells where we gathered data so that's why we can highlight the entire table if we want, it doesn't matter. |
| 33:33 | And let's now go back to that same location and we'll have a look and see what our trims are looking like now. |
| 33:44 | Ok, I'll just turn the trace off because we did gather some data where we weren't operating before. |
| 33:50 | So, that cell now, 1.5% trim. |
| 33:54 | Again, it is quite important to just allow the engine to settle in each of these cells for a moment. |
| 34:01 | The more data we get, the more data we get and the better our average will be. |
| 34:05 | And then more data, more quality data is going to just do a better job. |
| 34:10 | But we can see that that's cleaned up most of those errors now and we're sitting generally around 1% error or less so we'll just back off that. |
| 34:17 | So, quite a powerful way of correcting your errors without actually doing it manually. |
| 34:22 | Again, and I sort of am harping on about this, but it is a case of garbage in, garbage out so very important to drive the car smoothly, don't bring in that transient enrichment, make sure that we are central in the cells. |
| 34:35 | Ok so, that's useful for steady state tuning but it can also be used for our wide open throttle ramp run tuning as well. |
| 34:45 | Quite difficult traditionally to sort of gather data, or time consuming I should say, not difficult, to gather data and clean up our fuelling under wide open throttle. |
| 34:56 | So, generally the process is there to perform a ramp run, we'll data log that and then we'll analyse the data at each of the points through the fuel table and then make individual pinpoint changes to get our fuelling right. |
| 35:08 | What I'll do here is let's just give the system something to work with. |
| 35:13 | So, I will just highlight everything from zero kPa and above and let's use the P key and let's just, we'll start off a little bit safer, let's add 5% fuel to that entire area. |
| 35:28 | What I'll do now is we'll do a couple of ramp runs and I will log this as well so we can actually have a look at everything. |
| 35:36 | But we'll get ourselves ready to run here. |
| 35:41 | Actually, I'll just get rid of that last run as well, there's not much point really overlaying that. |
| 35:46 | So, we'll watch this on the dyno screen and then we can come back and look at the laptop. |
| 35:51 | What I'll do is I'll get ourselves sort of up to a point where we are in fourth gear, wide open throttle, ready to start that ramp run and then I'll just press the T key on the laptop screen, let's click ok and we'll get our run underway. |
| 36:18 | Ok so, as the dyno comes back down and stops, we'll see our power, 312 horsepower, 232 kilowatts at the wheels, definitely not the world's most powerful Evo 9. |
| 36:30 | Let's have a look here at our laptop screen though. |
| 36:35 | We'll just press F7 to stop our log and on our log here we can see our lambda trace and our lambda trace should be pretty much on point. |
| 36:44 | So, if you haven't used the Haltech software before, we can now click anywhere on this data log and it'll show us the data from that point in time, not our live data. |
| 36:54 | Now, we can see that we were right on our target, 0.78 but of course the reason we were doing that is that the short term fuel trim was pulling out 4.4%. |
| 37:03 | So, we'll just click it a few more places through this, 4.6, 4.7%, 5.6%, 5.4%. |
| 37:11 | So, straight away should be getting a sense of the fact that our map was previously pretty much on point because I added 5% and on average we're pulling 4-5% out of it. |
| 37:23 | So, that's basically undoing what I had just done. |
| 37:27 | We'll close down the little log file here. |
| 37:31 | So, again, we've got all of this data that we have gathered and it's showing us the quick tune, the short term fuel trim that was applied. |
| 37:41 | Basically, this is what's going to happen if we use the R key and apply that. |
| 37:46 | So, let's just have a look here. |
| 37:50 | Let's just highlight this entire lot of data I think. |
| 37:54 | And I really, I wouldn't probably want to actually make this change to this cell here because as you can see with the trace, we just basically fell through that. |
| 38:07 | So, that's a case of where we definitely wouldn't be getting reliable data. |
| 38:11 | And that's going to take 9% out. |
| 38:14 | So, I would probably do this by hand and avoid that cell. |
| 38:17 | However, for the sake of speed, let's just highlight the entire lot and we'll come up here and we'll press the R key. |
| 38:24 | That's applied those changes now. |
| 38:26 | So, what we'll do is we'll do another ramp run and we'll see how close our trims are now. |
| 38:34 | So, again I'll just press F6 to start our datalogger. |
| 38:36 | We can head over to the dyno screen. |
| 38:39 | No real point saving our run there. |
| 38:42 | Shouldn't really see a difference in our power. |
| 38:45 | Press the T key to start our trace and let's get our run underway. |
| 39:05 | Alright, so we'll let the dynos come back to stop and yeah pretty much the same power. |
| 39:09 | Let's have a look at how we got on in the laptop software. |
| 39:12 | So, for a start if we just simply look at the colour of our trace, we can see that everything colour coordinated is pretty close. |
| 39:23 | So, how this works, I should have mentioned before, if we are richer than our target and our closed loop trim is pulling fuel out, it'll be blue. |
| 39:30 | If it is leaner than target and it's adding fuel it'll be red. |
| 39:34 | But how dark the blue or red is will dictate or signify how much our error is. |
| 39:42 | So, everything here is quite light , which means that we're pretty much on the money. |
| 39:46 | Let's again just have a quick look through here. |
| 39:49 | And as I click through, what we want to do is look at our lambda, are we on target, and what was the trim doing. |
| 39:56 | So, remember before we were pulling out 4.5% to 5%. |
| 40:00 | Now, we're 0.7, 0.7, 0.4. |
| 40:05 | Looks like it's pretty much doing what it says on the box. |
| 40:09 | Let's close down our datalog. |
| 40:12 | And we'll have a look now at each of these individual cells. |
| 40:15 | So, this one here, bit of an outlier, we can see from the trace we've only just clipped the corner of that. |
| 40:22 | So, under those conditions it's going to be interpolating from the surrounding cells. |
| 40:25 | So, again we want to be a little bit careful of how much notice we take of this. |
| 40:29 | But if I look at these individual cells, we're here 0.2%, 0.7%, 1%, 0.7%. |
| 40:40 | I mean suffice to say it's worked exceptionally well. |
| 40:44 | We will go into questions and answers in just a moment. |
| 40:47 | I should have already mentioned this is a great time to ask those questions if you've got any and I'll try and answer those in a moment. |
| 40:54 | So, basically that's just done in one iteration of ramp runs what would probably take at least a lot longer to do manually, because we'd be clicking through that datalog, updating these individual sites by hand. |
| 41:09 | But it's also most likely done a better job than we would do manually as well. |
| 41:14 | So, again can't necessarily expect that we're going to get a result that's perfect in just one iteration but that's quite an impressive result for that 5% trim that we were out. |
| 41:27 | Where you may find that this needs a little bit more work is obviously under those conditions I just added 5% to a car that was already reasonably well tuned. |
| 41:37 | So, we weren't getting big swings from sort of rich to lean and rich to lean as we move through the rev range. |
| 41:43 | So, if you do have significant differences from neighbouring cells then this might take a little bit more work or a few more iterations to get dialled in. |
| 41:52 | But it is an impressive result for just one iteration and used correctly it is definitely a powerful tool to use with this software. |
| 42:03 | Right, we'll jump into our questions so if you do have any more, please keep them coming. |
| 42:09 | First question from Osger I think it is, "LSU 4.9 or all wideband O2 sensors really needs an open air first calibration, why?". |
| 42:21 | No they don't actually. |
| 42:24 | So, this is something I don't actually see too much now, because in the early days of wideband controllers, I don't manufacture these so I'm kind of taking a bit of a guess on this. |
| 42:40 | I don't think maybe the aftermarket ECU manufacturers were able to use the calibration resistor that is part of the O2 sensor. |
| 42:50 | So, that was the days when free air calibration was kind of a requirement. |
| 42:55 | These days most of the quality wideband controllers will actually utilise the built in calibration resistor, so they auto calibrate. |
| 43:02 | That being said, there is still the option with some of them to perform a free air calibration but yeah not necessary like it used to be. |
| 43:11 | Next, question,"Hi, which conditions would you use for closed loop lambda for big cams NA? How's it superposed loop lambda and idle control and ignition idle control, which method would you use first?". |
| 43:27 | Ok so, even with big cams, it's not really going to affect how and when I would use the O2 control. |
| 43:38 | One thing you do need to be a little bit mindful of is that under idle conditions, particularly with a really aggressive cam, you can end up with a bit of a lope to the cam, most likely you will. |
| 43:48 | That can end up seeing some unstable fueling and the actual air fuel ratio that you'll be measuring under those conditions is most likely inaccurate anyway. |
| 43:59 | But that's not to say that we can't still use O2 control. |
| 44:02 | Generally, I'll be targeting a leaner air fuel ratio than what I actually want. |
| 44:07 | So,metimes because you're not really able to actually accurately measure the air fuel ratio, it's almost a case of leaning the air fuel ratio out and picking when the engine RPM picks up. |
| 44:19 | So, almost tuning by ear, that's just an aspect of what we need to do with really aggressive cams where we do have a lot of overlap. |
| 44:27 | But unless we're seeing wild oscillations in our closed looped trims, there's no reason not to use O2 control. |
| 44:36 | And then within the Haltech software, we've got the ability if required to trim down the proportional gain under those conditions to stop that oscillation as well. |
| 44:47 | So, yeah essentially I'm going to be using that all of the time. |
| 44:50 | Idle ignition control, it's a very separate thing used for controlling our idle speed. |
| 44:55 | I will always be incorporating that as well, but completely separate to our O2 control. |
| 45:01 | Next, question from same person, sorry I don't quite know how to pronounce your name. |
| 45:08 | "Can I disable transient throttle for Q quick tune tuning?". |
| 45:12 | You could but there's really no need. |
| 45:15 | Basically, as long as you are smooth on the throttle, then a transient enrichment is not really going to be an issue for you. |
| 45:24 | But if you feel the need then yes you could disable the transient enrichment. |
| 45:29 | Two Tons of Light has asked, "is it reasonable to use a MAF SD calculations of VE values to make a starting point for a VE tune, assuming the MAF tuning is well done?". |
| 45:38 | I mean there's lots of things you could do. |
| 45:42 | I would say absolutely not. |
| 45:45 | That is not going to be a benefit for you, it's going to be a lot of work. |
| 45:49 | And you could probably replicate this in real time and actually get the real values into your VE table that you need quicker than that process. |
| 45:59 | And there's, I'm missing something with your question here. |
| 46:02 | So, first of all I would not be tuning on a MAF first and then converting to speed density or volumetric efficiency and generally as we teach inside of our practical standalone tuning courses, most people do worry about getting an engine started and up and running for the first time when they don't have a base fuel table. |
| 46:22 | And I get it, it can be a little bit scary. |
| 46:24 | The reality though is it's very very quick and easy to start with a VE table. |
| 46:29 | And generally I will just start by setting the entire table across the board to a value of 50%. |
| 46:35 | Obviously that's not going to be right everywhere. |
| 46:38 | However, it should, under most situations, particularly if the rest of your fuel characterisation and injector characterisation is done correctly, that'll be enough for your engine to start and run and from there you're going to be able to see with your lambda output whether you're rich or lean and then you're going to be tuning individual cells but let's just jump back into the Haltech software for a moment. |
| 47:00 | So, how this works is we get the engine up and running at idle and we can see that we've got VE values of sort of let's call it about 38% to 40% there. |
| 47:10 | So, again if we'd started with 50% everywhere, that'd be enough for it to idle, it's going to be probably 8% to 10%, 10% to 12% rich but that's not really an issue. |
| 47:19 | And we sort of start at low load in RPM so maybe this 1500 RPM column would be a good place to start. |
| 47:27 | And we start by getting the engine running down here, as light a load as we can, run the engine on the dyno and we'll start tuning that particular cell and then we'll just simply add more throttle and work our way up this column until we get to wide open throttle and that might result in maybe 20 kPa of positive boost. |
| 47:44 | So, we might be able to tune basically this section of that column. |
| 47:47 | I'll also sort of guess ahead to what the values up above would be and then what we're going to do is copy that entire column, Control C, and paste it over into our next column, Control V. |
| 48:00 | And we know when we're starting at such low RPM and increasing the RPM, almost certainly the VE's going to increase, so I might also guess ahead and add maybe 5% more VE at 1750. |
| 48:11 | And then we'll basically go into the 1750 column and repeat the process. |
| 48:15 | So, why I'm telling you this is because we're building up a pattern that we're then transposing out into the untuned area so that when we get to those, we're probably going to be very very close to our target already. |
| 48:27 | And then when we combine these with the tuning functions that we've looked at today, becomes very very simple and easy. |
| 48:33 | That's going to be faster than trying to develop your own VE table values, which are probably still going to not be spot on based on running data from a MAF. |
| 48:43 | So, hopefully that answers your question. |
| 48:46 | Right, that looks like that's all the questions we've got. |
| 48:49 | If you are watching this in archive at a later point, please ask any questions you might have on the forum and I'll be happy to answer them there. |
| 48:56 | Thanks for watching and we'll see you all next time. |


