364 | Dodge Artificial Neural Network
Summary
If you're tuning a modern Dodge ECU, you're going to need to understand how to deal with their Artificial Neural Network or ANN for short. In this webinar you'll learn what the ANN is, how it works and how to set up your scanner, as well as working with HP Tuners Neural Network Trainer in order to optimize the fuel delivery.
| 00:00 | Hey team, Andre from High Performance Academy here, welcome to another one of our webinars and this time we're going to be diving into the world of Dodge's artificial neural network or ANN as it's also known. |
| 00:11 | Which is a mouthful and probably in and of itself doesn't really explain too much. |
| 00:17 | However, if you are going to be dealing with tuning on a late model Dodge ECU, then you are going to need to understand what it means, how it works and most importantly, how to address it when it comes to our fuel delivery tuning. |
| 00:33 | We'll take a little bit of a step back and before we dive into the software, we'll just talk about what the artificial neural network is and why it exists. |
| 00:42 | So, essentially when our engines were a little bit less complicated and we didn't have things such as continuously variable cam control, we could get away with a single volumetric efficiency table in the ECU. |
| 00:56 | And that's because essentially the volumetric efficiency, which defines in essence how completely the engine is filling its cylinders with air at any particular time, was mainly due to or defined by the current engine RPM and the current throttle position. |
| 01:13 | Now, there are a few other factors that go into here but I'm just trying to simplify it. |
| 01:17 | However, once we got to a position where we have maybe in some instances, quad continuously variable cam control, maybe also variable inlet runner length, now we've got a number of other factors that are playing into the volumetric efficiency of the engine and that makes it essentially impossible to tune the engine completely off just a single volumetric efficiency table. |
| 01:40 | Different manufacturers have different techniques of dealing with this and if we look back at one of the still more simple takes on this with Honda's K20, with this essentially we've got 50 degrees of camshaft movement and we have a set of tables for fuel and spark every 10 degrees and then we've got a separate set for high and low cam, essentially when the VTEC changes. |
| 02:07 | So, it gets the job done, it's a little bit messy from the tuner's perspective, but it's relatively easy to understand and we've just got a lot of tables that we're going to need to fill in. |
| 02:19 | More modern ECUs have sort of gone away from this and what Dodge are doing is using this artificial neural network, so now what we've got is a range of weights and biases in the ECU tables, which to us as tuners are absolutely meaningless. |
| 02:34 | So, we can't really figure out ourselves how these actually equate to the ECU calculating volumetric efficiency but that's what happens. |
| 02:43 | Basically, depending on the cam position and all of these parameters for the artificial neural network, this calculates a virtual volumetric efficiency table and that's what the ECU then uses to define what the current volumetric efficiency is. |
| 02:58 | So, that's how it works in a nutshell. |
| 03:01 | If that's a little confusing, it'll make a bit more sense once we dive into this. |
| 03:05 | But the problem this creates for us as tuners is that if we can't see and manipulate this VE table, how are we going to make changes to the fuel delivery or effect changes if the fuel delivery isn't on point? And the answer is it's not very easy. |
| 03:22 | Prior to HP Tuners bringing out their tuner tools and their artificial neural network trainer , which is what we're going to be looking at shortly, this was kind of done in a bit of a dodgy manner. |
| 03:36 | One of the techniques that a lot of people use was to simply manipulate the fuel mass to injector pulse width tables, which is kind of a way of fudging the fuel delivery to try and get it to line up. |
| 03:49 | Not really my preference but if we just jump into the software here for a moment, and again we'll get into a bit more detail. |
| 03:55 | If we come across to our fuel tab, and then we can see we've got injector control here and we've got this injector pulse width versus fuel mass, we can see that table there and this is kind of one of the options available, just fudging these numbers. |
| 04:13 | So, I don't really like doing that, I want to make my tuning changes the correct way, the way the manufacturer intended, but of course without access to the artificial neural network, this was for all intents and purposes basically impossible for us to deal with. |
| 04:31 | Alright, so what HP Tuners did was added their neural network trainer. |
| 04:36 | So, what we can do now, actually before we do that, let's just come across to our airflow tab and I'll just show you what this artificial neural network looks like. |
| 04:43 | So, we come across to neural network and this is what we've got here. |
| 04:48 | So, obviously no VE table as I've already mentioned, we've got first layer, second layer and output layer and we've got weights, biases, etc. |
| 04:58 | If we just have a quick look at what these look like, yeah not really anything in here that I could look at and go yeah well I'm a little bit rich at 2000 RPM and maybe 50 kPa so what do I change? Who knows, absolutely nothing. |
| 05:17 | This is not just Dodge though, basically GM have done essentially the same thing with their virtual volumetric efficiency model, which has been around for a fair while and HP Tuners now fortunately, as far as the aftermarket is concerned, pretty well understood and again HP Tuners have made it pretty easy for us to deal with. |
| 05:36 | So, why would we need to make changes to this? Well maybe we don't need to. |
| 05:43 | If we are dealing with a car that fundamentally the engine configuration is stock, then the base artificial neural network should, for all intents and purposes, be correct and our fuelling should be on point. |
| 05:57 | So, we wouldn't need to make no changes. |
| 05:58 | Now, how are we going to know that our fuelling is where it needs to be? Well in closed loop conditions we can use our short term and long term fuel trims as a bit of a guide to let us know if the fuelling is where it needs to be or if it's a long way out and the trims are picking up the pieces. |
| 06:16 | So, for most instances under closed loop conditions, cruise, idle, etc, part throttle, we would be targeting a stoic air fuel ratio, 14.7 to one and we should be matching that. |
| 06:29 | The late model Dodge does use a wideband air fuel ratio sensor. |
| 06:34 | Sorry, no I take that back, this one did not. |
| 06:38 | Under closed loop conditions obviously the narrowband sensors will be targeting stoic and we can see if we're out there, the short term and long term fuel trims will be either positive or negative, adding or subtracting fuel. |
| 06:50 | There's always a bit of variation here and it wouldn't be uncommon to see a absolutely completely stock standard production road car with trims in the range of maybe plus or minus 5% to 6%. |
| 07:03 | Much more than that though is indicative of a problem and something that we really should be adjusting, we don't really want to be relying on the closed loop trims to be cleaning up any mess that's left there and our fuelling isn't accurate. |
| 07:16 | With the model that I tuned for the Dodge worked example in our practical reflash tuning course, this was a 2020 Dodge Challenger RT Shaker and albeit that it wasn't almost completely stock standard condition, I think maybe the rear mufflers had been removed to add a little bit more exhaust note. |
| 07:39 | Nothing that I would have thought would have made a dramatic change to the VE of the engine. |
| 07:45 | I was consistently seeing the closed loop trims adding around about 15%, I think it was adding, I can't quite remember now, actually no sorry I think it was the other way, it was trimming out 15% and 15%, that's definitely more than I would expect to see. |
| 08:01 | So, in this case I've got some work to do even though the car is stock standard. |
| 08:05 | More serious changes though to the engine configuration, maybe complete new intake system headers, an exhaust system or any hardware changes such as hidden cams, these would definitely require dramatic changes to the artificial neural network to get our fuelling correct. |
| 08:26 | Alright, so that's the problem, that's why we need to make these changes, let's jump back into the software and see how we do so. |
| 08:31 | I'm going to give you sort of an abbreviated tour here because this process can actually take a little bit of time if we're doing it. |
| 08:38 | So, what we do is we come up to edit here and we come down to VE neural network trainer and we can click on that. |
| 08:46 | So, to start with what we'll do is we'll click on this little icon here, which will create a new file for training from the existing tune. |
| 08:55 | So, it does exactly that and asks you if you'd like to create a file for the VE neural network, I'm going to click no because I've already done that but basically what that does is creates a file that we then have to go to a website, which I'm just going to do now, bear with me for a second, there we go. |
| 09:12 | So, this is HP Tuner's Tuner Tools website and we are on their neural network trainer. |
| 09:18 | So, there is a little bit of cost involved in doing this and you buy some tokens essentially which you can apply to your neural network training. |
| 09:29 | So, from the top of my head, this was about 25 tokens, I want to say that's around about $50 or $60 USD so it's not a huge expense and that gives you access to the neural network trainer for a period, I think it was 30 days, which I mean if you're doing a one off tune, that should be absolutely plenty. |
| 09:48 | So, what you do is basically upload the file that has just been created and then the network trainer will create an output file, which will end up down here and you can then download that file and we then head back to our editor and we then open the file that we've just created , which I think I can use this one right here. |
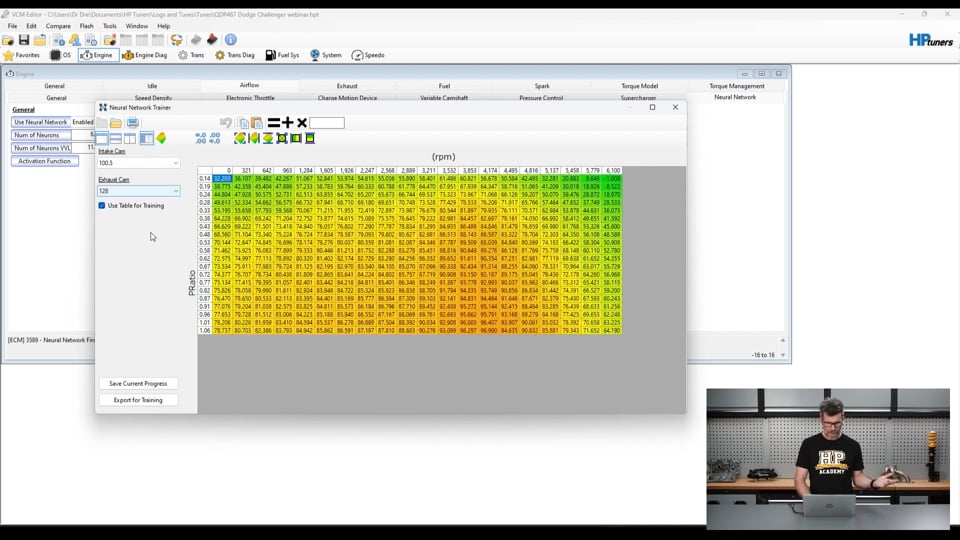
| 10:14 | So, now what it creates is something that we can actually understand. |
| 10:19 | We've got what now looks like a conventional volumetric efficiency table. |
| 10:24 | We've got our P ratio, pressure ratio on the vertical axis, engine speed on our horizontal axis and the numbers in here are simply volumetric efficiency numbers. |
| 10:35 | It is a little bit more complicated than that though because as I mentioned, part of the reason why manufacturers have gone down this path is due to variable cam control. |
| 10:46 | So, we don't have just one table. |
| 10:49 | You can see up here we've got intake cam and exhaust cam. |
| 10:52 | And we can see that we've got 5 positions for each. |
| 10:58 | So, 100, 111, 122, 132 and 143.5 and then exactly the same again for the exhaust cam. |
| 11:06 | So, we've actually got essentially 25 sets of tables here, 25 different VE tables. |
| 11:11 | That's pretty daunting, however on this particular engine, given that it is a single cam engine, it's continuously variable, but it is a single cam engine, of course that means that the relationship between the exhaust cam centreline and the intake cam centreline can't be changed, that's always going to stay the same. |
| 11:30 | So, straight away we essentially go from 25 different sets of tables to only 5. |
| 11:36 | So, essentially when we're on 100.5 centreline for our intake cam, that means that we are at 128 on our exhaust cam. |
| 11:45 | So, this table that we're seeing here, this is one of the tables that the vehicle will potentially access and use. |
| 11:53 | We can also display this graphically and we can see yep we've got something that does look like a conventional shaped VE table. |
| 12:00 | Alright, so once we've got this, we can then actually manipulate the volumetric efficiency numbers in these tables and then there's the next step of the process. |
| 12:11 | Before we get into that, how do we know what changes we need to make? So, that's where using the histograms in the VCM scanner software comes in. |
| 12:22 | So, let's head across to our scanner. |
| 12:25 | So, this is a log file that I made as part of the Dodge Tuning worked example. |
| 12:32 | And the first part of this starts with making sure that over on the left hand side here, we have appropriate channels so that we've got all the channels logged that's going to give us all of the information that we need. |
| 12:45 | I'm not going to go through every parameter here but one of the things that we do need to understand here is what our cam position is doing. |
| 12:56 | We need to be able to log our cam position , which we can see we have got here, intake cam centre position and exhaust cam centre position because that's going to tell us , which of the EE tables we are operating in. |
| 13:09 | Now, this is quite a big file, I'm in steady state here on our dyno and basically this is allowing me to manipulate both the RPM and throttle position to access as much of the engine's operation as I possibly can. |
| 13:22 | I can't really do too much useful with just looking at our charts versus time like this because there is so much data but we'll just bring our graphs over here. |
| 13:34 | And this is where things start to get interesting. |
| 13:37 | So, what I've done is I've made up a set of histograms that basically match the break points for our artificial neural network. |
| 13:46 | So, we can see we've got the same axes, we've got pressure ratio and engine RPM here. |
| 13:51 | And if we quickly take a look at the numbers that we've got here on our pressure ratio axis and take a note of those and we'll head back to our editor. |
| 14:01 | And these match perfectly, the pressure ratio axis here, break points, as well as of course the same can be said for our engine RPM. |
| 14:09 | That's really important because it's going to mean that we can make use of this data that we're going to collect really easily. |
| 14:17 | Ok so, what we've got is a bunch of different tables here. |
| 14:22 | We've got them split up and what I've done is I've worked this on exhaust centreline. |
| 14:30 | So, I've made up a set of five tables for closed loop operation and then another set of tables, of five tables for our power enrichment where we are out of that closed loop operation. |
| 14:43 | So, let's have a quick look at how this is set up. |
| 14:46 | We'll right click here and we'll go to our graphs layout and let's come down to what I've called here our ANN exhaust 85 degree map. |
| 14:55 | OK so what do we want to do with this? Well what we want to basically look at is the error with, in this case in closed loop, I'm actually using our short term and long term fuel trims. |
| 15:07 | There's two ways we can do this and I'll talk about the other way when we get into our power enrichment. |
| 15:12 | So, we're using a math channel, which is our long term plus short term fuel trims. |
| 15:17 | So, basically under closed loop conditions we should be able to expect that the commanded air fuel ratio should be stoic, 14.7 to one and our measured air fuel ratio should match, they should be the same but that on its own looks like everything's working properly and we're just meeting our targets. |
| 15:36 | However that is most likely going to be achieved because our combined short term and long term fuel trims are there picking up the pieces. |
| 15:42 | So, that's the parameter that we're logging and we want to add a little bit of precision here with one decimal place. |
| 15:49 | However, because we've got a set of five maps here, we want to make sure that we're only logging into this particular graph when our exhaust centreline matches our target. |
| 16:00 | In this case we can see 85° and what we're doing here is using a filter, this little function here in brackets, this is our exhaust cam centreline parameter. |
| 16:15 | And I've basically said we're going to log into this graph when the exhaust cam centreline is less than 90°. |
| 16:24 | So, anything greater than 90 is going to completely ignore and that's really really important. |
| 16:30 | Then we've got just a little bit of shading here so that at a glance I can sort of tell by the colouring whether we're rich or lean and also how dramatically rich and lean we are. |
| 16:39 | And then we've got the parameters for our column axis , which is engine speed. |
| 16:44 | And we've got the parameters for our row axis, which is pressure ratio. |
| 16:48 | Now, as I mentioned, really important to make sure that the breakpoints match and that's really easy to do. |
| 16:55 | What we can do is go back to our scanner and we can right click here and we can go to our row axis for example and click copy labels and that is going to copy all of this data here to the clipboard and then we can simply go back into the scanner and we can, we'll have this, obviously would have nothing in it to start with, right click and paste and that's going to populate that correctly, obviously do the same for our RPM. |
| 17:19 | So, that's nice and easy, this particular one because 85° cam centreline is our lowest so anything less than 90. |
| 17:27 | If we look at our next cam centreline, which is 95.75, now we want to add a little bit more complexity to our filter, so what we can see is we're going to log into this particular graph. |
| 17:40 | So, our next cam centreline is less than 101° and it is greater than 90°. |
| 17:48 | So, obviously this repeats for the remaining three graphs, but the process is essentially the same, basically we're looking at about a 10° span for each of these graphs that we're going to log data into. |
| 18:02 | And technically of course this is only going to be accurate at the actual centre point where we're at exactly, in this case 95.75, but we're always going to be moving around and the ECU will be interpolating so I found that this was a pretty effective way of doing it. |
| 18:18 | Alright, so that covers our closed loop and as again I mentioned, we're using the short term and long term fuel trim math channel to populate that. |
| 18:30 | The other option we've got, if we come down here to the one that I've labelled power enrichment, so this is where we're now no longer in closed loop mode and this time we're using our parameter, which is another math channel , which is equivalence ratio error. |
| 18:46 | Essentially this is the calculated difference between the air fuel ratio that the engine management system is asking for and what we're actually measuring with a wideband in the exhaust system. |
| 18:58 | And we're doing exactly the same for everything else, we've got the same sort of parameters here for our filters so nothing basically new to learn. |
| 19:05 | So, that's how we've set that up. |
| 19:07 | In our worked example, these are all available for download so you don't actually have to make them up yourself. |
| 19:14 | So, what's this all look like? Well, this is again from that data in steady state that I produced and we can see that in this case our centreline of 85°, we've actually got quite a bit of data gathered in here. |
| 19:28 | So, the ECU is using this particular exhaust cam centreline quite a lot, particularly at low RPM. |
| 19:36 | If we click through at 95.75 you can see that it seems to favour that at the lower pressure ratios. |
| 19:43 | And then if we keep clicking through here, we can sort of see how the ECU uses these different tables and in this case particularly here at idle, that's about all we're using. |
| 19:55 | If we look at our power enrichment again, sort of similar things here but actually before we do that, let's just look at the magnitude of these numbers. |
| 20:02 | Let's come back to when we've got a bit of data. |
| 20:05 | Not tragic, this is probably a fair way through the process of tuning but we can see that we're sort of seeing errors in the range of minus two to minus six, minus 7% so definitely something that would need a little bit of work. |
| 20:21 | Using the data from these, actually we'll go through our power enrichment ones first. |
| 20:26 | These ones are a little bit better by the looks of it here so yeah probably pretty close to finishing this thing off by the looks of what I've got here. |
| 20:35 | But coming back here, so how do we use this data? Well there's a couple of ways we can do this. |
| 20:41 | We can, because we have matched breakpoints here, what we can do is simply highlight all of this data and we can right click and click copy and then we can come back in here, make sure that we are on the correct table , which in this case is 85 degrees. |
| 20:59 | So, that one will be 85 there and 143 and we can right click and we can go paste special and we can multiply by percent and what it does is makes that percentage change just to the cells that we actually had data for. |
| 21:19 | This is a function that needs to be used with a huge amount of care because it is absolutely a case of garbage in, garbage out. |
| 21:28 | While on face value it seems like a very fast way of making bulk changes, if you've got poor quality data that you've gathered, then it's simply going to blindly make those changes. |
| 21:39 | So, I'm actually going to just control, no I'm not. |
| 21:43 | There we go, this one here. |
| 21:46 | I'll just remove those changes. |
| 21:48 | So, let's just head back to the scanner and I'll just sort of explain what I'm talking about here. |
| 21:54 | The data here actually looks reasonably consistent. |
| 21:58 | So, we've got a reasonable consistency between the numbers. |
| 22:02 | What I'm looking for is problems where we've got maybe a value of minus 5% in one cell and an adjacent cell's got a value of plus 15. |
| 22:11 | So, seeing a massive jump like that, it's a bit of a red flag for me. |
| 22:16 | And what we can also do is use these controls here. |
| 22:20 | So, at the moment we're looking at the average values, but what I also want to do is look at the count. |
| 22:26 | So, this shows you how many counts of data, how many samples have been taken in each of the cells. |
| 22:32 | So, we can see we've got a few cells here where we've got sort of 190 odd samples, which is enough to give me a bit of confidence that yeah I've probably got realistically good values there. |
| 22:42 | When we start getting down into sort of 30 or in this case even 5, it's not really enough data for me to be confident. |
| 22:49 | So, if I'm seeing some really big changes from cell to cell, I'm going to have a look at the count, see how many counts I've got and I may choose to disregard some of those numbers and I'm hoping this might show us, actually it's not too bad. |
| 23:04 | This is a reasonable example though. |
| 23:06 | So, at idle here, 640 RPM, 0.24 pressure ratio, we've got 481 counts. |
| 23:13 | That's a lot of data. |
| 23:15 | However, when we get up to 900 RPM, 960 RPM and 0.24, we've only got 64 counts. |
| 23:22 | And if we look at the average we can see, this is kind of what I'm talking about, negative 10.9 with a positive 5.9 right beside it, probably not really very realistic. |
| 23:31 | So, again there's a little bit of care is required. |
| 23:34 | The other thing is if we come back to our 85 degree map, get back out of our count, back to average, while we've obviously only accessed these cells that we've got data for, there's a good chance that we might end up accessing some of these other cells out on the road under different conditions. |
| 23:55 | So, if we're only just making these changes to these cells, chances are we're going to have errors outside of the cells. |
| 24:01 | I'm much more inclined to basically use trends and make changes by hand as opposed to religiously relying on the pace special function. |
| 24:12 | So, for example with our 1284 RPM column, you can see we sort of start at 3% and sort of go to 6%, I'd probably extrapolate that 6 down to the bottom and I'd probably extrapolate that 3, maybe 2.5 up to the top. |
| 24:28 | That might not quite be right but it's probably going to be closer than doing nothing. |
| 24:32 | So, that's the process of going through and making these changes. |
| 24:36 | Now, I did talk about the two ways we can gather that error data using our short term and long term fuel trim parameter. |
| 24:43 | This is reactive and it does have a bit of latency, so it's not always going to be perfect but it is probably also more than sufficient, I know a lot of tuners do this. |
| 24:54 | The other option is to use our equivalence ratio error, which we've already talked about and use that everywhere including in closed loop and in order to do that, we simply need to disable the short term and long term fuel trims for the purposes of our tuning, otherwise of course they're going to be fighting us and like I said before, under those conditions, our equivalence ratio error probably is going to show very close to zero because our commanded and measured air fuel ratio should be the same but we're ignoring what the short term and long term fuel trims are doing. |
| 25:25 | So, two different ways of essentially getting the same result. |
| 25:29 | A lot of it comes down to personal preference, it's just a case of understanding what you need to do if you are going to use that equivalence ratio error under closed loop conditions as well. |
| 25:41 | Alright, so let's head back to our editor. |
| 25:44 | So, basically once you've made the appropriate changes to all of these tables, also you can see here we've got this little tick box here, use table for training. |
| 25:54 | So, we want to make sure that that's ticked for all of the combinations of tables that we are going to be wanting to train. |
| 26:01 | But the more tables we want to use for training, the more time it's going to take for this to process when we upload it. |
| 26:09 | So, it can be useful, particularly if you're just focusing on one area, to only tick that particular table combination and only train that. |
| 26:17 | Now, what we can do is click this button here that says export for training. |
| 26:21 | I'm not going to do this again, I've already gone through this process. |
| 26:24 | It's basically going to make you another file, which we can then head back to our Tuner Tools website, we'll upload that new file and then what that's going to do is provide an output file, this one actually takes quite a while to process. |
| 26:40 | Basically, what it's doing is reversing the first process. |
| 26:43 | The first process we took all of those artificial neural network weights and biases and the neural network trainer converted them into a visual volumetric efficiency table. |
| 26:54 | Now, we've manipulated that VE table to suit our supposed requirements. |
| 26:58 | We then output that file and the neural network trainer does the reverse, it takes that visual VE table of sets of numbers and then converts that into our weights and biases. |
| 27:09 | And once we've done that we can then download that file, come back to our editor, we can open that file and what it's going to do, I think I can find that one there. |
| 27:23 | No, not that one there. |
| 27:25 | Basically, when you upload that it'll ask if you want to apply those changes to the neural network and we can come back to this and if I'd done that, you'd see that these little boxes here, these little parameters will go change colour, indicating that changes have been made. |
| 27:42 | If you want you can also go into these and you can look at it, compare with the original file and see exactly what the magnitude of those changes are. |
| 27:51 | Again relatively useless just on account of we can't really directly use these parameters. |
| 27:59 | So, it's just a tool that for a relatively modest investment makes it very very easy for us to convert those weights and biases into a visual VE table, manipulate that and then convert the manipulated VE table, it should now be correct, back into weights and biases. |
| 28:17 | We do this and if everything works correctly we should find that we've corrected all of those errors in our fuelling. |
| 28:25 | From my own personal experience, this is normally going to take you between two and maybe four iterations to get it right. |
| 28:33 | You're probably going to find that just doing it in one go is probably unrealistic. |
| 28:39 | So, expect to devote a little bit of time to it but realistically once you've got the scanner set up with those graphs, which I showed you, this becomes a relatively quick and easy process. |
| 28:52 | It's just a case of logging that data, getting good quality data and then we're going to use that Tuner Tools website in order to make those corrections. |
| 29:01 | Worth talking about how we gather that data and get good quality data. |
| 29:07 | So, what we want to do is make sure that we're gathering data under realistic operating conditions. |
| 29:13 | So, we want to make sure that the engine is up to normal operating temperature and just as importantly we want to make sure that the engine isn't heat soaked. |
| 29:21 | Now, this can be a real big problem, particularly mainly for people who are road tuning, because you tend to drive the car, gather data, then stop on the side of the road or in a rest area or something and make changes and while that's happening, the whole engine bay is heat soaking. |
| 29:37 | So, once you start driving again, for a period of maybe two to three minutes, the engine's going to be quite heavily heat soaked and that can negatively impact the results that you're scanning. |
| 29:49 | So, really important under those conditions to drive the car for a reasonable period of time at speed, get airflow through the engine bay, get rid of that heat soak so we're getting realistic solid data. |
| 30:02 | The other consideration is how we drive the car. |
| 30:04 | We want to be very very smooth on the throttle, because anything that's going to bring in transient enrichment or overrun fuel cut, these are going to impact on our data as well. |
| 30:16 | So, much easier to do on the dyno, but I know obviously not everyone has access to a dyno. |
| 30:23 | It can be done on the road but it just does require a little bit more care and it's going to take a little bit more time. |
| 30:30 | Right I'm going to move into questions and answers really shortly, so this is probably a good time to mention if you've got questions on anything I've talked about today, please ask those in the chat, Jordi will get those through to me and we'll jump into those in a moment. |
| 30:44 | I did want to just talk about another little oddity in the way Dodge deal with the fuelling though. |
| 30:51 | This is sort of outside the VE but just the way their fuelling model works. |
| 30:55 | So, jump back into my software here and we'll go to our fuel little tab there. |
| 31:03 | And we start here with the first problem is that Dodge don't use air fuel ratio. |
| 31:09 | They don't use lambda, instead they use fuel air ratio. |
| 31:14 | No biggie, it's just the other way around. |
| 31:17 | Technicalities easy to work with but it's just a little bit confusing. |
| 31:21 | So, if we come over here to our parameters here, we've got our fuel air stoich and if we click on that, you can see that we have this value here, default value in this particular table is 0.068. |
| 31:37 | So, what does that mean? Great question. |
| 31:41 | Let's just bring up our calculator here. |
| 31:43 | No we won't want to be on programmer, that's not going to work. |
| 31:47 | 0.068, so if we just use our little inverse function here, that's going to turn it into something that hopefully we now recognise, 14.721. |
| 31:59 | So, it's just the inverse of air fuel ratio. |
| 32:02 | So, no biggie, but it does require a little bit of a rejig and the thought process of how to use that. |
| 32:11 | The other thing that's a little bit interesting is the way they deal with power enrichment. |
| 32:16 | This is a term that's pretty common in factory engine management systems. |
| 32:20 | So, power enrichment essentially is when we transition into open loop mode, we're now asking for significantly more power from the engine, we want to target a richer air fuel ratio. |
| 32:31 | So, we'll come across to our power enrich tab. |
| 32:33 | And we've got our power enrichment here, this defines, which of the two PE tables we're using, in this case air charge. |
| 32:41 | As a matter of course I tend to make the air charge and P ratio tables the same but let's have a look at one of these. |
| 32:49 | So, on face value, pretty hard to kind of make much sense of what this is actually trying to achieve. |
| 32:59 | So, let's just bring up our calculator again. |
| 33:01 | Now, we know that the stoic air fuel ratio or fuel air ratio I should say is 0.068. |
| 33:09 | Now, what we can do is add the value from this table to it. |
| 33:13 | So, in this case we can see that a large majority of this table is filled with 0.006. |
| 33:19 | So, let's add that in, 0.006. |
| 33:23 | We'll click equals and now we'll click the inverse and we can see that for the most part the ECU is targeting an air fuel ratio of 13.5 to one. |
| 33:34 | Ok, not too bad. |
| 33:36 | Let's have a look at what it's doing in the higher load, higher RPM region. |
| 33:42 | So, we again start with our 0.068 stoic value, we can add in this case, let's say 0.016. |
| 33:56 | Which I imagine's going to be fairly rich and it is, 11.9 to one, which is a little out the gate for something that is naturally aspirated. |
| 34:05 | Suffice to say that there was actually a reasonable amount of power and fuel economy to be gained on this vehicle by leaning these numbers out to something that's sort of a little bit more realistic and obviously we wanna be very careful while doing this and monitor what's happening in the way of detonation as well. |
| 34:26 | We've also developed as part of this worked example just a little fuel air ratio to air fuel ratio conversion tool just to make life a little bit easier. |
| 34:36 | Nothing particularly advanced here, but basically you just enter data into any of the green cells. |
| 34:42 | The first of these sheets is our fuel air ratio to AFR/lambda conversion. |
| 34:50 | So, you enter the FA stoic value , which we already know about, you enter the power enrichment table values, the stock ones, and then this will output our air fuel ratio target so basically the same process I just went through manually for you. |
| 35:05 | And then if you prefer to work in lambda, it'll also output that in lambda. |
| 35:10 | And then we've also got kind of the inverse of this so when you've got some air fuel ratio targets that you personally want to achieve, you can enter them into this power enrichment table here and then the sheet will punch out some numbers that you can simply copy and paste into the power enrichment table in the ECU. |
| 35:33 | Again not exactly rocket science, you could absolutely do this manually with a calculator, but this tool just makes it a little bit easier to do. |
| 35:40 | Right that's a quick introduction to artificial neural networks, I know there's a fair bit to take in, obviously I haven't touched on the spark side of things at all but if you do want to go into this in a lot more depth, we do have a full worked example in the Practical Reflash Tuning course covering that Dodge Challenger, 2020 Dodge Challenger, which the same process is applicable essentially to a fairly wide range of late model Dodge vehicles, goes into a lot more detail, you'll see everything first hand including dyno demonstrations plus you've got access to the likes of this Google Sheet as well as the logger setup for all of those graphs and channels etc. |
| 36:20 | For now we'll jump into our questions, if you've got any more, please keep those coming. |
| 36:31 | Ok, first question comes from John who's asked, "Would you recommend going to a standalone ECU rather than investing in all the tools to tune the stock ECU, if it is a car that you'll be slowly modifying and having to retune multiple times, is there a downside to either?". |
| 36:46 | The problem with this John is that for a vehicle like that Dodge Challenger, I wouldn't say it's going to be impossible to go to a standalone but it's going to be pretty close and if you can do it, it's going to be incredibly expensive. |
| 37:00 | The reason for this is that with the complexity of modern late model cars and everything talking to everything else via CAN bus, you could remove the factory engine control module and fit maybe a Link or a Haltech ECU, which would absolutely be able to control the engine. |
| 37:21 | However, you're probably going to find that the gearbox will no longer change gears, your gauge cluster won't work, maybe your air conditioning won't work and just about everything else. |
| 37:30 | So, there's so much integration now that unless you're building a stripped out race car where you're only dealing with the engine and you've got an aftermarket motorsport sequential gearbox, maybe an aftermarket datalogger dashboard, that's the only time where it would really make sense to go to an aftermarket standalone. |
| 37:47 | That being said, it's not overly expensive to tune one of these vehicles once you've kind of unlocked it for the first time. |
| 37:56 | There's a bit goes on with the Dodge, you need a smart access cable that allows the ECU to actually be accessed and tuned and the ECU also needs to be unlocked by sending it to HP tuners. |
| 38:09 | So, there is a bit of a hurdle to get over that first time but once you've licensed the vehicle, you can retune it as many times as you like. |
| 38:16 | Of course, with that artificial neural network, it does only give you a certain period of time to make your changes; so yeah if you're continually modifying the car, you might be revisiting the tuner tools a little bit and that will be an added expense. |
| 38:31 | Flying fence posters ask, "Should we expect more and more manufacturers utilising these fuel and engine management strategies, specifically neural networks?". |
| 38:40 | The answer sadly is yes, this is what we're going to be dealing with, because of the complexities of modern engines with the likes of that continuously variable cam control. |
| 38:50 | This is kind of what it's going to look like, probably at least for the foreseeable future. |
| 38:56 | Alright, that's the only two questions we've got there so remember as usual, if you've got questions that crop up when you're watching this in the archive, please ask those in the forum and I'll be happy to answer them there. |
| 39:09 | Thanks for watching and we'll see you all next time. |
0:00 - Introduction
2:19 - Modern ECUs (e.g. Dodge) tuning problem
5:36 - Why make changes to the neural network?
8:26 - Utilising HP Tuner's Neural Network Trainer first time
12:11 - How do you know what changes to make (VCM Scanner histograms)?
20:35 - How do we use the new data from VCM Scanner?
26:17 - Export your new tune files to the Neural Netwrk Trainer
28:57 - How do we get good quality data?
36:20 - Q&A


