374 | RPM Limit Configuration - Haltech Elite/NSP
Summary
While an RPM limit is a seemingly simple feature that every ECU offers, there’s a little more to understand if you want to set up an effective limiter that will protect your engine.
| 00:00 | Hey team, Andre from High Performance Academy, welcome to another one of our webinars. |
| 00:03 | In this webinar we're going to be looking at some of the essential knowledge you need around the setup of an engine RPM limiter in the Haltech NSP software. |
| 00:13 | Now, this is on face value pretty straightforward, but there are a few key pieces of information that I really want to focus on through this that could end up saving your engine. |
| 00:23 | Because it is a relatively simple webinar, this one is probably going to be also pretty short. |
| 00:30 | As usual we will have questions and answers at the end of the webinar. |
| 00:34 | I usually ask people to hold off with these questions until I ask them at the end. |
| 00:39 | Because there is a little bit of a delay or latency in getting those questions through, and I do expect this to be reasonably quick and to the point, you are free to ask those questions as we go and I'll get into those at the end. |
| 00:53 | Alright, so RPM limits, it's really one of the most critical setup parameters that I always do when I'm setting up a new ECU or potentially setting up an ECU and tuning one that's already been tuned that's come to me for a retune. |
| 01:09 | The reason for this is that setting your RPM limit up early in the tuning process means that once you get the engine up and running, if something goes wrong, let's say you have a drive by wire failure and it fails wide open throttle, or the same happens with a cable throttle, you know that you've got that peace of mind that you've got that RPM limit set up and that's going to save your engine until you can get to the point of shutting down the ignition and turning the engine off. |
| 01:35 | For this reason, when I'm dealing with a freshly installed ECU and a fresh engine, I'll actually purposely set my RPM limit lower. |
| 01:45 | So, let's say I've got an engine that I expect to rev to 7500 or 8000 RPM, I might actually start with that rev limiter set down at 4000 to 5000 RPM while I'm just getting the engine up and running and starting the tuning process. |
| 01:58 | Once I'm comfortable that everything's essentially working as I expect, then I can go ahead and raise that RPM limit. |
| 02:05 | Now, a little caveat with this, you do have to remember that you have set that RPM limit lower because yes I have also been caught out when I've left the RPM limit low and I get to 4500 or 5000 RPM and start scratching my head as to why the engine is now misfiring. |
| 02:22 | So, do as I say, maybe not necessarily as I always do. |
| 02:27 | Alright, so the setup of the RPM limit, why this is important is not just about protecting the engine in terms of preventing an over RPM situation that could mechanically damage the engine, the more subtle aspect of this is that the RPM limit itself could in fact damage your engine. |
| 02:46 | Now, this isn't always going to be the case and it's very engine specific as to how this is going to pan out. |
| 02:53 | If you've got an engine that is known to have what I'd refer to as a sensitive valve train though, this is a really really big problem. |
| 03:01 | A really good example of an engine with a sensitive valve train would be the likes of the SR20DE and DET. |
| 03:09 | So, these use a really big heavy rocker assembly that the camshaft runs against and the rocker assembly then actuates both the valves. |
| 03:19 | So, on the intake side there's one rocker per cylinder and on the exhaust side there's one rocker per cylinder. |
| 03:25 | Probably should have had a photo up, but if you haven't seen the SR20 rockers, just google that and you'll get a sense of what I'm talking about. |
| 03:34 | Now, the problem is if we're using an ignition type cut and I'll talk a bit more about these cut types as we go through this, what that essentially means is that in order to maintain or control the engine speed, we're still going to inject fuel, but we're going to stop the ignition event occurring on each particular cylinder and this will be a randomised pattern generally. |
| 03:57 | So, this will be effective in that as soon as we stop the spark, obviously no combustion is occurring in the cylinder, so hence no torque is produced at the crankshaft on that cylinder. |
| 04:08 | The problem with an ignition cut limited however is that what we get as an upshot of this is that unburned fuel and air is going to pass through the cylinder because we are still injecting fuel. |
| 04:21 | This can end up igniting in the exhaust system and when that happens with turbocharged engines, we essentially end up with a big pulse of exhaust gas energy that can end up popping the exhaust valves back off their seats. |
| 04:35 | Now, when that happens, we end up losing control essentially of the valves via the rocker, that rocker can end up loose between the valves and the camshaft and it can end up popping off its position, basically loses control and it gets munched up, it can bend valves, it can damage your camshaft and essentially do a whole lot of pretty nasty damage. |
| 04:58 | Worst case scenario you could also end up breaking the head off a valve and destroy a piston and a cylinder head, the list goes on. |
| 05:06 | Essentially, nothing good is going to come from that. |
| 05:09 | To a lesser extent there are other engines where we don't necessarily have that problem but there are other side effects of this. |
| 05:17 | Two examples I'll give there, the Mitsubishi 4G63. |
| 05:23 | That uses a rocker to actuate the valves as well. |
| 05:28 | Less of a problem than the SR20DE and DET because the rockers are individual, so one per valve, much much lighter and they are a roller rocker style. |
| 05:39 | However, the problem with the 4G63 is that they use a hydraulic lifter. |
| 05:45 | So, this is a little unit that one side of the rocker sits on, it pumps up with engine oil. |
| 05:51 | So, once the engine oil is pressurised it'll pump that up to basically take up the lash clearance. |
| 05:57 | Now, what happens with this style is if you sit on the rev limiter, and this is more of an issue, it can happen on an actual engine RPM limit, but this is normally part of a two step launch control strategy where we essentially have exactly the same thing going on, but if we're using an ignition cut we get that same pressure pulse occurring in the exhaust system and what that does is it pops the exhaust valve off its seat. |
| 06:23 | What then happens is the hydraulic lash adjuster will expand to take up the clearance between the rocker and the valve and what that does then is it artificially holds the exhaust valve open. |
| 06:37 | So, this will show up because let's say we're talking a two step launch control, you hold the engine on the launch limiter and it'll pop and bang, which is a sign that isn't actually great for hydraulic lifters and then when you come back to idle, the engine will maybe idle very rough, maybe stall and then if it hasn't stalled after maybe 20 or 30 seconds, it'll come back to idling correctly. |
| 07:01 | And the reason for this is that when we come back to idle, the exhaust valves on one, two or maybe in worst case three cylinders are held open, we've got no compression on those cylinders obviously and until the lash adjusters basically bleed back down and the valves close, we're only running on a couple of cylinders and that's why it sounds so rough. |
| 07:20 | Upshot of this as well, depending on our valve to piston clearance, pumping the lifters up like this could also result in valve to piston contact and all of the ugliness that I've already talked about. |
| 07:33 | So, basically we need to be very mindful of the design of our cylinder head, the limitations that head design produces and then deal with this accordingly. |
| 07:42 | I will add a little caveat in here because there are situations where we may want or absolutely need to run an aggressive two step style launch control for drag racing. |
| 07:54 | If you've got a really big turbocharger, you're going to need to use a two step launch control with ignition cut and probably quite a bit of ignition retard in order to build boost. |
| 08:06 | In that situation though, we would need to adapt the valve train to suit. |
| 08:10 | So, back when I was drag racing with the 4G63, we would convert the hydraulic lifters to mechanical or solid and that essentially got rid of that problem. |
| 08:21 | Before I carry on as well, there are another range of problems with engines that still have solid lifters that I haven't talked about yet. |
| 08:30 | Quite often we will have a lifter arrangement that uses a bucket and a shim. |
| 08:36 | That on face value should be able to cope, but what we often find is when we lose valve control in that style of valve actuation, we can end up spitting the shim out. |
| 08:47 | So, there's a range of problems depending on your particular engine. |
| 08:51 | The other thing I've found as well is the type of use has a real big effect here. |
| 08:58 | So, basically if you're dealing with a drag application, while yeah you might have an engine that's producing quite a lot of power and being beat up on very hard, a drag run might only last 7 to 10 or 11 seconds, we might only be shifting four or five times per run and on a good day we might only get six to 10 runs down the drag strip. |
| 09:20 | So, it's not a lot of time for the engine to hit the limiter. |
| 09:23 | Maybe we're using the same style of limiter for a flat shift or gear cut control or something like that as well, but it's not happening that many times. |
| 09:34 | So, the engine can actually live a long and healthy life compared to using the same exact setup on a road race or a circuit race application where in one lap around a racetrack we might end up performing more gear changes than we do in a season of drag racing. |
| 09:50 | So, it's very different and it can be much harsher for a road race application than a drag car. |
| 09:58 | Alright, so now I've done enough talking, let's actually jump into our Haltech NSP software and we'll have a look at what we actually have available here. |
| 10:07 | So, we're going to find this down here, we're going to start with our main limiter, I was on over boost cut so I'm going to talk briefly about that as well. |
| 10:15 | So, it's not a very complicated setup as I've already sort of alluded to, we only have a few parameters that we need to consider here and we'll just go through them in order. |
| 10:27 | So, the first of these here of course is our cut method. |
| 10:30 | So, at the moment, I think this is the default, which is ignition, which I actually think is probably, in my opinion, that's the wrong way to default because as we've already discussed, this is probably the cut style that can be potentially dangerous with some of those cylinder head designs. |
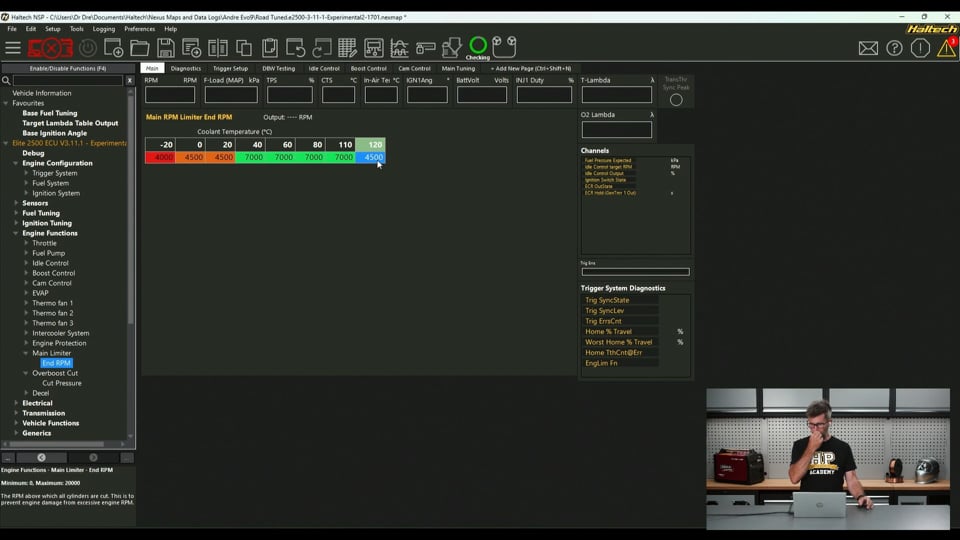
| 10:49 | Now, this also works, I'm going to go a little out of order here, this also works in conjunction with our end RPM table here, which isn't overly complicated. |
| 10:57 | By default here, I think this is default, we've got a 2 dimensional table relative to coolant temperature. |
| 11:04 | So, here we're essentially just programming in our desired maximum RPM. |
| 11:09 | We can get a little bit fancy here with the setup of this cut table if we want. |
| 11:17 | So, essentially when the engine's cold, let's say down at sort of 0-20°, what we might want to do here is artificially bring the RPM limit down, probably wouldn't make much sense having the minus 20° above 4500 RPM. |
| 11:35 | So, no, probably not 400 either. |
| 11:38 | Something like that. |
| 11:39 | And then 40 to maybe 110°, that's kind of the area we expect the engine to be normally operating in and then if we go up to 120°, maybe we want to bring that back down a little bit to 4500 RPM. |
| 11:56 | So, this is just a way of sort of subtly, passively preventing engine damage if the engine is too cold, we don't really want to drive a stone cold engine too hard. |
| 12:07 | And likewise if the engine's overheating, obviously driving the engine hard is not going to help us cool the engine down, so again we might want to bring this down. |
| 12:16 | Now, this is how I would normally set up my own engines. |
| 12:20 | If you are tuning for a customer, you need to treat a little bit carefully with this and discuss it with the customer. |
| 12:27 | I would still be a strong advocate for doing exactly this, but you do also need to communicate this to your customer, otherwise you're going to get your customer leave and the next day later they're going to ring up and say they started the car this morning and it was misfiring until it got up to temperature. |
| 12:42 | So, it's just really all about education, but this is definitely a powerful tool for passively protecting the engine. |
| 12:49 | Alright, let's get back to our main limiter settings anyway. |
| 12:52 | So, if we look at this from the drop down table here, we have our options here of ignition, obviously is just going to cut the spark, we've got injection, obviously just going to cut the fuel. |
| 13:04 | We've got the option to cut both ignition and injection at the same RPM. |
| 13:08 | Probably not a bad option , but not generally the way I do go with this. |
| 13:12 | Ignition with injection cut 100 RPM above and then the opposite, injection with an ignition cut 100 RPM above. |
| 13:21 | Ok so, those are your general options. |
| 13:23 | Personally, I would almost always be running a injection or fuel cut only. |
| 13:30 | Now, there are some concerns I know with using a fuel cut. |
| 13:35 | The normal concern I hear with this is oh well there's going to be some residual fuel on the port wall, which absolutely there will be with a port injected engine. |
| 13:44 | We have a fuel film that forms on the intake port and the port wall. |
| 13:49 | When we stop injecting, obviously no more fuel is added to the fuel film, but that fuel film will vaporise and disperse into the cylinder. |
| 13:57 | So, yes we will still have some fuel going through the cylinder. |
| 14:01 | However, the overall effective air fuel ratio is going to be so lean that no combustion is going to occur. |
| 14:09 | So, that's not really an issue. |
| 14:11 | The other subtle issue, which honestly in my 20 plus years of experience, I've just ruled out as being an issue at all , but I know some people will consider it so I'll touch on it. |
| 14:21 | When the cut is eliminated and we reintroduce fuel delivery, what we're going to end up with is a very brief period where the effective air fuel ratio will be marginally leaner than target and that is because when we reinitiate fuel injection, we need to build up that fuel film on the port wall again. |
| 14:42 | So, that might use a microscopic amount or very small amount of the fuel being delivered by the injector until that fuel film is reestablished. |
| 14:50 | So, yes there will be a potential very short lean period when we reintroduce the fuel injection. |
| 14:56 | As with a lot of tuning, this does come down to your own personal preference, but again from my own experience, that brief lean period, I have never seen any issue as a result of this. |
| 15:08 | Now, it is worth mentioning here with both the ignition with injection 100 above and the injection with ignition 100 RPM above, that 100 RPM above is acting on your end RPM table , which we just looked at. |
| 15:25 | So, that's a 7000 RPM end RPM value. |
| 15:29 | That is where your, let's say we've just selected here, injection with ignition 100 RPM above, we'll cut the injection initially and if we get to 7100 RPM we will also then cut the ignition as well. |
| 15:46 | So, it will actually give you the potential to maybe go as much as 100 RPM above your limiter. |
| 15:50 | This is important to understand if you've got a very sensitive engine where you are very very close to the mechanical safety limit of the engine with your RPM limiter setting. |
| 16:01 | Honestly, I don't think I've ever been in a situation where I feel like my RPM limiter is set that close to the mechanical safety limit of the engine that 100 RPM could be a game changer , but maybe you are in that situation, it's just important to understand. |
| 16:18 | So, that's your cut method options, again I think I've explained the differences between those and why I think probably for most instances, injection is probably a pretty safe option. |
| 16:32 | Next, we come down to our cut type. |
| 16:37 | So, we've got three options here. |
| 16:40 | Also we'll mention here, we've got this little blue arrow, all of the information I've basically talked about, a lot of this comes from these little built in help files. |
| 16:49 | So, if you're ever at a loss, you can always click on that little blue arrow. |
| 16:52 | So, we've got a hard cut, we've got a soft cut and then we've got cut off. |
| 16:57 | Let's deal with these a little bit out of order and we'll start with our soft cut. |
| 17:02 | So, I've actually been talking to Haltech about this, so I can make sure that I can give you guys the most accurate information that goes a little bit above and beyond what's included in the help file as well. |
| 17:14 | So, this soft cut uses Haltech's per tooth RPM calculation and this updates much faster than what we're actually going to see in the front end in terms of data displayed on our laptop. |
| 17:27 | So, it's basically raw data, a raw calculation of the engine RPM that comes before the RPM information is actually filtered and displayed or yeah displayed on our laptop or logged on our laptop. |
| 17:41 | So, for that reason it happens very very quickly and we may get a situation where you're noticing cuts occurring when on face value, all the data on the laptop's saying that we're close, but not quite at that RPM limit value. |
| 17:55 | That's why, it's because this calculation is happening faster, it's non filtered, so it could actually happen when you think that you're below the RPM limit or the end RPM value. |
| 18:09 | So, these cuts will occur in a randomised pattern in order to make the cut style smooth or softer and generally what this means is it's going to feel smooth when you're on the limiter, it's not going to feel harsh on the engine. |
| 18:23 | This is also important as well on some very very high specific power output engines, mainly very very powerful drag engines, using a cut, any type of cut on one of those engines can actually be damaging to the engine over time so we want to be very mindful of the style of the cut. |
| 18:42 | So, that's our soft cut, which again in most instances, this is the combination I would be using would be an injection cut method with a soft cut type. |
| 18:53 | Next, let's deal with our hard cut, which is essentially exactly what it sounds like. |
| 18:59 | Basically, with a hard cut, when we get to our end RPM value, we're going to be cutting all of the cylinders simultaneously. |
| 19:07 | This can feel very harsh, it's just definitely not a comfortable style of cut, you absolutely are going to know when you've hit the limiter. |
| 19:16 | The injection or fuel or both are then not going to be reintroduced until we drop below our end RPM value by the hysteresis value. |
| 19:26 | So, what that means is with an end RPM of 7000 and a hysteresis of 200, we will cut all cylinders when we hit 7000 RPM and if we stay at full throttle, we're not going to reintroduce our operation of our engine until we drop down to 60 or below 6800 RPM. |
| 19:45 | The only real valid reason that I've come across in my time for this style of cut is when I was involved in a racing series that was tightly controlled, we had an RPM limit that was mandated. |
| 20:00 | With that style, we wanted to be able to, the drivers wanted to be able to get as close to their RPM limit as they could so hard cut it was, personal preference again. |
| 20:10 | Lastly, we'll come down to our cut off , which is not in fact where our cut is turned off. |
| 20:16 | Basically, this gives the end user a bit more control over the RPM limit. |
| 20:22 | And this really comes down to people who want a very distinctive style of RPM limit in terms of how it sounds. |
| 20:28 | I know this is not for everyone, personally what I want is an effective RPM limiter, I want it to be smooth and I don't really care what it sounds like, but some people want the sort of machine gun AK47 sound to their limiter. |
| 20:42 | This will allow you to essentially tune that in. |
| 20:45 | So, this gives you a couple more parameters that will need to be tuned. |
| 20:50 | The first of these is our cut off RPM range. |
| 20:53 | So, this is the range in RPM over which our cut will occur. |
| 20:58 | In this case the default value there's 500 so let's say we've still got our end RPM set at 7000, subtle difference with this one is that the cut off is below our end RPM value. |
| 21:11 | So, 500 RPM there, what this would mean is that a value in an RPM value of 6500, we would start getting into our cut range. |
| 21:21 | So, we'd be zero cut at 6500 and we would smoothly increase that from zero to 100% over that 500 RPM range. |
| 21:30 | Hence, once we get to 7000 RPM, we would be at a 100% cut. |
| 21:35 | The other part that goes hand in hand with this is our cut off adder , which I think's probably maybe not the best naming strategy for this, it's not really an adder. |
| 21:47 | I would call this a randomiser. |
| 21:50 | So, this value is just a raw value between zero and 255 and basically it controls the cut pattern between the different cylinders. |
| 21:59 | So, by changing the cut pattern you can change the sound of the cut or how rough or smooth it is. |
| 22:06 | Recommendation from Haltech here is to start with a value of 50, if we lower that value, that will make the cuts rougher, if we raise the value, that will make the cuts smoother. |
| 22:18 | Interestingly, once we go past a certain range and we go right up to the maximum of 255, it goes back to a rougher cut style. |
| 22:26 | Essentially, it is a case of testing and finding what works for you. |
| 22:31 | Alright, pretty much we're done here so I'll just put a call up again, if you do have questions please ask those, we'll get into those in a second. |
| 22:40 | Now, I've only really dealt with the main limiter here. |
| 22:44 | The other aspect here is essentially any time we're using a cut, let's say the other one that's worth just mentioning here is our overboost cut, we come down to here, we've got the same parameter here for our cut method and we can have exactly the same problems if we are using an ignition cut. |
| 23:03 | Same would go for gear cut control, if we need to use a cut for a dog engagement gearbox to reduce engine torque, we'll have the ability to use fuel or ignition and again we can have exactly the same problems if we are using an ignition cut for that. |
| 23:18 | And we've got parameters where you can have different cuts set up for different functions, it's really really important to thoroughly go through and make sure that each of these cuts is set up to your liking so that you don't get yourself into a situation where you randomly hit a cut one day that you don't normally hit, maybe you hit the rev limiter, which you don't typically run into and then you find out that that was an ignition cut. |
| 23:45 | We actually had that in the very early days with our SR20 with the VE turbo cylinder head. |
| 23:51 | That cylinder head's actually a pretty stout cylinder head, because it uses a shaft mounted rocker so it gets away from the potential of that rocker actually flying out and jamming between the cam and the valves. |
| 24:05 | However, it does use a shim style for setting the valve lash that sits in the top of the retainer between the tip of the valve and the rocker. |
| 24:15 | And I don't usually hang that engine up on the rev limiter. |
| 24:19 | We had someone else in the car who touched the limiter for a brief period of time and that was enough to spit out one of the shims. |
| 24:26 | There are ways around this, a little bit of digression here, there are ways around this for applications where we need to use an ignition cut. |
| 24:34 | Mazworx who have a huge amount of experience with the SR20 engine and drag and circuit applications make a special valve, so the valve is purposely made longer and instead of having that shim that you need to change to adjust the lash, what you do instead is just tip the valve to actually set the valve lash so there's nothing to fall out. |
| 24:58 | Obviously some downsides with this in terms of wear as well, but for a drag application, that's probably just fine. |
| 25:05 | Alright, we'll just go and have a look and see what we've got in the way of questions. |
| 25:10 | If you've got more, please feel free to ask them. |
| 25:13 | Right the first question, "With something like an SR20 that's prone to rocker issues at high RPM, what is the safest way to do the limiter?". |
| 25:24 | So, fuel is definitely the best way and a soft cut. |
| 25:28 | If you're using a fuel cut limiter, you should have no issues with those rockers on the SR20. |
| 25:35 | I mean the rockers themselves are problematic at higher RPM anyway and that's really just to do with the mass and hence the inertia of the rocker. |
| 25:44 | That's something that's a mechanical limitation that we can't fix with tuning. |
| 25:48 | There are products like the rocker stoppers that are popular for the SR20, my own experience with those is that they are effective to a point, but definitely not a silver bullet for fixing all potential SR20 rocker options. |
| 26:05 | The expensive, but recommended technique for me would be swap to a VE cylinder head and then enjoy the massive increase in cylinder head flow and hence performance that you're going to get as well. |
| 26:18 | Now, I know that's not realistic for everyone, it's going to be an expensive swap, but yes the SR20 is a problematic cylinder head and in some ways there's no real way of fixing this if you want to run very very high RPM. |
| 26:33 | Matt B's asked, "Do you ever implement a drive by wire throttle limit combined with a typical fuel cut and when, why, how would you go about that?". |
| 26:41 | Just trying to think. |
| 26:45 | No, is the answer. |
| 26:47 | Absolutely possible, you could definitely do that and I do think that some ECUs, might be Link ECU had the option to reduce your throttle opening a little bit along with retarding ignition timing at or very close to the engine rev limiter. |
| 27:04 | There's no black and white with a lot of this. |
| 27:08 | A lot of it really comes down to your own personal preference in how you want to set up the car. |
| 27:14 | What you do might be completely the polar opposite of another tuner, so really I'm not necessarily trying to say you have to do it the way I do it, it's more about educating you on the options that are available and the potential downsides in this instance with some of the options. |
| 27:28 | But I don't really find that just using a fuel cut RPM limiter that's randomised smoothly, that's enough, I don't typically hang the engine up on the limiter very often, so the need to also close down the drive by wire throttle opening and reduce torque that way, I just don't really see that that's actually necessary. |
| 27:51 | Zento's asked, "Is it possible to have a preset profile RPM cut off on a CAN bus line and connect that to a switch?". |
| 28:01 | Not on the Haltech NSP and not on any ECU that I'm aware of. |
| 28:09 | You could, just thinking if you could, as I say, not that I'm aware of, it might be possible, I mean essentially what you're talking about there I think is a secondary RPM limiter that's on a switch although you're just bringing that in as a CAN bus message. |
| 28:30 | When you bring it in as a CAN bus message, that's difficult, because you need an ECU that can then decode a specific CAN bus message, but you could bring it in just on a digital input instead and set up a secondary rev limiter that way so I guess the answer is maybe. |
| 28:47 | Why you'd want to do that, short of a two step rev limiter for a launch control, I'm not too sure, maybe you want to have a learner mode or something like that with a reduced RPM limit for inexperienced drivers, this is one example. |
| 29:00 | DIY Mods has asked, "How long should it take to set up a soft cut with timing adjustments, is there a good way to test soft cut that isn't too stressful on the engine or do you just give it a go and see if it works well?". |
| 29:11 | Yeah, that's a tough one. |
| 29:13 | Essentially, I'm not making timing adjustments unless we're talking about a two step control so I'm not sure if that was where you're going with that, where you want to actually use retarded ignition time to build boost. |
| 29:26 | If you're doing that, really the only way of doing it is to test and see how it works. |
| 29:32 | A little bit of care is required, obviously if you're testing an aggressive two step launch control strategy, it's going to be building boost and it's going to be producing a lot of heat in the exhaust manifold and turbocharger. |
| 29:44 | So, common sense applies here, I'm not going to be holding it on that limiter for 30-45 seconds and I'd always be allowing the engine to cool, everything to cool down for maybe a minute or so between tests, but it shouldn't take too many iterations to kind of dial that in and see where you need to be. |
| 30:02 | When you are dealing with just the actual overall engine RPM limit and you want to test the smoothness or harshness of that cut, generally I would start, just to be a bit easier on the engine, I'd probably start around maybe 4000-5000 RPM and test the setup there before extending that out to where you actually want to limit the engine. |
| 30:23 | But you will still need to actually see how it performs at your desired maximum RPM limit, because things can change as well. |
| 30:32 | C Bailey's asked, "Are there similar concerns for how fuel and ignition cutting is accomplished for launch control?". |
| 30:40 | Yeah, absolutely, I mean the cutting effect and the negative implications on the engine are exactly the same whether it's at 8000 RPM or you're launching at 4500 RPM using a secondary rev limit. |
| 30:53 | As I mentioned earlier though, in some instances, particularly with dedicated drag applications with really big turbochargers, we need to use that ignition cut with ignition retard to build boost. |
| 31:05 | In which case, if you've got one of these engines with a problematic valve train, you're going to need to come up with options to sort of address that and allow you to run this style of launch control. |
| 31:17 | Alright, that's taken us to the end there. |
| 31:19 | As usual if you're watching this in our archive at a later point and you've got further questions, please ask those on the forum and I'll be happy to answer them there. |
| 31:28 | Thanks for watching and hopefully we can see you all next time. |