340 | Plex Knock Monitor V3
Summary
The Plex knock Monitor has long been one of our favourite knock monitoring devices. In this webinar we’ll take a look at their third generation of this product line and cover off the installation and configuration process.
| 00:00 | - Hey team, Andre from High Performance Academy, welcome to another one of our webinars and this time we're going to be having an introductory look at the Plex Knock Monitor V3 which is their latest and greatest knock detection system. |
| 00:15 | We've actually previously had a look in one of our earlier webinars, probably a good few years ago now at the last version, their Knock Monitor V2, no big surprises there and we demonstrated that being used on our turbocharged FA20 powered Toyota 86 and it really did impress then as a really advanced knock detection tool. |
| 00:39 | The V3 from my admittedly relatively limited testing so far, basically takes everything from the knock monitor V2 and basically turns it up to 10, it is genuinely a really dramatic improvement in just about every sense of the term. |
| 00:57 | Before we get into it, and we're going to go through some sort of interactive demonstrations of it, we'll go through it as thoroughly as we can. |
| 01:04 | Before we get into that though, probably we need to take a step back and talk about what knock or detonation is to start with and why it is so destructive to our engines and therefore why we want to really carefully monitor it. |
| 01:17 | So we really need to start by taking a step back and understanding what happens during normal combustion and while we're actually talking about this I will just try and bring up a little bit of a graphic here which I think I can, I think I can find. |
| 01:36 | Maybe I actually can't, that's OK, basically we need to understand what happens under normal combustion and what we've got is the piston moving up the bore towards top dead centre and as it's doing that, the pressure and hence the heat inside the combustion chamber is continually rising. |
| 01:52 | Somewhere before the piston reaches top dead centre, we're going to initiate the combustion process with the spark. |
| 01:59 | Now most people who are new to engine tuning think that when that spark occurs, we just get an explosion and all of that fuel and air just spontaneously combusts, kind of like a stick of dynamite exploding in the cylinder. |
| 02:13 | Under normal combustion that's actually not the case and what happens is that the spark ignites the air and fuel right by the spark plug and that creates a flame front that propogates out through the cylinder. |
| 02:22 | This happens in engine terms relatively slowly and the flame front will ignite the unburned fuel and air ahead of it. |
| 02:32 | What this results in is a slow and steady rise in the cylinder pressure and what we're trying to do is achieve peak cylinder pressure after the piston has gone past top dead centre. |
| 02:42 | Ideally somewhere around about 16-18° after TDC, that's because at that point we've got some angulation between the piston and the connecting rod and then the crankshaft and that means that that force acting down on the piston actually has some mechanical advantage over the crankshaft, it converts that pressure acting on the piston into torque at the crankshaft. |
| 03:04 | You could imagine if we had peak cylinder pressure occurring at top dead centre when the piston was right at the top of the stroke, got the piston and the connecting rod in a vertical line and if we force down on that piston, it's not going to move, it's not actually creating torque at the crankshaft. |
| 03:19 | So that's what we're trying to do. |
| 03:21 | However, in abnormal combustion circumstances we can run into knock or detonation. |
| 03:27 | I use these terms interchangeably, they are two terms that essentially mean the same thing and this occurs after the spark has already initiated combustion and as I just mentioned, under that process we're getting the heat and pressure constantly rising inside the cylinder quite rapidly and at some point if the heat gets too great we're going to get unburned pockets of fuel and air around the outside of the combustion chamber spontaneously combusting. |
| 03:54 | Now then spontaneously combust, that is actually like little sticks of dynamite exploding inside the cylinder. |
| 04:02 | It releases all of its energy incredibly quickly and this creates sharp spikes in pressure that act down on the piston, it's a bit like someone slamming down onto the crown of the piston with a sledgehammer and it's just as destructive as that sounds. |
| 04:16 | And it's destructive in a couple of ways. |
| 04:18 | First of all that pressure can actually exceed the mechanical strength of components so we can crack or break the brittle cast piston, forged pistons put up with that a little bit better but factory cast pistons don't tend to live well with detonation. |
| 04:33 | Can also actually end up buckling or damaging connecting rods and it can also hammer out connecting rod bearings. |
| 04:40 | The other side of this as well is that under normal combustion, the crown of the piston is protected from the full heat of combustion by a boundary layer of gases. |
| 04:50 | Now when we get detonation occurring the little sharp spikes in pressure actually puncture through that boundary layer, allowing the full heat of combustion to reach the piston crown and under light, sustained detonation if we actually examine the piston we'll see that it has kind of a sand blasted appearance. |
| 05:09 | Under heavy sustained detonation we can actually heavily melt away the piston and obviously do some dramatic damage to it so that's the downsides, that's what we want to stay away from and that's why monitoring for knock or detonation is so important. |
| 05:25 | Not relevant to today's topic but just for the sake of completeness, knock and detonation are very very different to pre ignition, although they're often confused. |
| 05:37 | Pre ignition is a different type of abnormal combustion. |
| 05:39 | This actually occurs, as its name implies before the spark event occurs and this is generally started by a hot spot or something glowing in the combustion chamber that can ignite the unburned fuel and air and this will generally happen very very early in the combustion cycle, maybe where the piston is still near bottom dead centre and just starting to come up the bore on the compression stroke. |
| 06:03 | Pre ignition is actually much much more dangerous and much much more damaging than knock so just wanted to clear those up but we're not going to be picking up pre ignition using a knock monitor. |
| 06:18 | Alright so probably also worth mentioning what causes detonation. |
| 06:23 | Really it's anything that's going to increase the likelihood of spontaneous combustion so there's a range of elements that can do this. |
| 06:31 | One would be the octane rating of the fuel, so the higher the octane rating, essentially the more resistant to knock the fuel is, the more resistant to auto ignition it is so it's less likely to occur. |
| 06:45 | So that's one element. |
| 06:46 | That's why we always run the highest octane we can in our performance engines. |
| 06:50 | The other element really is anything that's going to result in higher combustion charge temperature because really it's that charge temperature that is going to initiate spontaneous combustion or auto ignition, knock in other words. |
| 07:05 | So let's look at what that could be, high coolant temperature, if we're running the engine way too hot, that can in turn result in higher charge temperature. |
| 07:15 | Larger, increased boost pressure. |
| 07:19 | This generally comes with an increase in charge temperature. |
| 07:23 | We're also packing more fuel and air into the combustion chamber and that results in higher charge temperature as the charge is compressed. |
| 07:32 | Also advanced ignition timing, if we advance the ignition timing too far, we're creating more pressure inside the cylinder on the compression stroke and again this results in more heat and the likelihood of spontaneous combustion and anything else that's going to also increase our intake air temperature. |
| 07:49 | That's basically our main drivers behind the drive towards knock and these are the things that we can avoid. |
| 07:57 | From our practical purposes when we're optimising the calibration on the dyno, really with a turbocharged engine, it's the gentle balance between boost pressure, air/fuel ratio and ignition timing. |
| 08:09 | And all of those elements sort of go around in circles to get us the optimum results while staying away from detonation. |
| 08:16 | Naturally aspirated engines, obviously our tuning envelope is a little bit simpler and a little bit wider but air/fuel ratio and ignition timing and compression ratio really all go hand in hand. |
| 08:26 | Also just worth mentioning how knock is detected with systems like the Plex Knock Monitor and we use a piezo electric knock sensor which is essentially a little microphone that goes on the block. |
| 08:40 | Let's just jump across to my laptop screen here and we'll have a quick look at it. |
| 08:42 | This is actually what we've got mounted up on the Evo that I'm sitting in at the moment and I'll also talk about why where we've put it is actually not the ideal location but do as we say, not as we do. |
| 08:54 | So this is a little vibration sensor that basically outputs a voltage in proportion to the vibration it's detecting. |
| 09:04 | So that's the premise of its operation and when knock occurs basically we get a resonant frequency occurring in the block, it's kind of no different to if you actually hit the engine block with a hammer and it would have that ringing effect and it rings at a specific frequency. |
| 09:19 | There's a few elements that dictate the frequency that knock will occur at but essentially one of the biggest drivers is the diameter of combustion chamber, sorry diameter of the bore or the piston. |
| 09:32 | So that will determine the frequency that knock occurs at and we do need to understand that because we'll program our knock monitor so that we can zero in on that particular frequency. |
| 09:47 | This helps us with what is referred to as signal to noise ratio. |
| 09:50 | Obviously the engine is a mechanical item, there's a lot of moving parts, there's a lot of mechanical noise in there, these are happening at a variety of different frequencies and what we're trying to do is basically make sure that we don't end up kind of confusing our knock signal with just background engine noise so by dialling into the specific frequency that we're interested in, this is going to help get a better signal to noise ratio. |
| 10:19 | Right so on top of that, we also need to talk about the options available for detecting knock and probably one of the earliest techniques was audio knock detection using just a stethoscope essentially, bolted to the engine block and run through the firewall to a set of headphones. |
| 10:40 | I know this is a popular technique, there's a lot of people still doing this, mainly because it's incredibly cheap to do. |
| 10:47 | I haven't actually tested this myself, I've always gravitated towards the more professional audio knock detection tools. |
| 10:54 | On top of that there are audio knock detection tools like the Plex Knock Monitor, another one that's been a firm favourite at HPA is the Link Knock Block and I'll talk about the pros and cons between these two in a moment as well and then of course these days just about every high end aftermarket ECU has built in knock detection or knock control. |
| 11:18 | So people I think now are under the impression that if you've got an ECU with knock control then we don't need to worry about audio knock detection because the ECU's going to do everything for us. |
| 11:31 | The answer to that is not quite that cut and dried, it's not quite that simple. |
| 11:36 | The reality is that yes the ECU knock detection can do a great job of detecting knock and then employing safety strategies like retarding the ignition timing if required. |
| 11:47 | But in order for the knock detection to work, it still needs to be set up correctly and this actually requires validation which typically still requires audio knock detection so long story short there, even if you've got an ECU with built in knock control, you're still going to need an audio knock detection device in order to calibrate and validate that. |
| 12:08 | About the only area that gets a little bit grey is if you are reflashing late model vehicles, then I've found that in most but not all circumstances the factory knock control strategy works exceptionally well and provided that you can datalog that with your reflashing software, then generally you can rely on that to know when the engine is knocking. |
| 12:31 | There's not a lot of black and white in engine tuning though and for every rule there is an exception so I have had situations, funnily enough quite often with Mitsubishi Evos, where the knock detection is not working correctly, sometimes this will be because the engine has been built with aftermarket forged pistons, maybe a solid lifter conversion, it's mechanically noisier and it's triggering the knock detection system when it's actually not knocking. |
| 13:01 | So what this results in is a sub par performance because the ECU is retarding the ignition timing when it doesn't need to. |
| 13:08 | Conversely I've also had a much scarier situation where I've audibly heard knock occurring using my audio knock detection system and the factory ECU's blissfully unaware of it for whatever reason. |
| 13:19 | So unless you're really familiar with a particular car I would say it's always a good idea at least while you're learning how the factory ECU works and the pros and cons of their knock control strategy, I always still use audio knock detection while I am setting that up. |
| 13:37 | Once I'm familiar and I know that I can trust it then maybe it's less of a concern but basically long story short again, I always recommend audio knock detection while you are tuning on the dyno. |
| 13:49 | So if we look at probably the 3 options that are out there on the market for audio knock detection as a standalone device, we've got the Plex Knock Monitor we're going to look at today, I've already mentioned the Link Knock Block. |
| 14:03 | The other one that I've tested and found quite good is the Tuner Nerd Knock Monitor. |
| 14:08 | Interesting name but there you go. |
| 14:11 | Now these kind of span a wide range of different functionality and price points. |
| 14:18 | The Plex Knock Monitor is at the top of that list in terms of functionality and price by quite a long shot. |
| 14:27 | It is pretty expensive, I think the one that we've got here is sitting at around about maybe €1200 but you'd have to fact check me on that, you can find that at the Plex website. |
| 14:36 | So €1200, it is a pricey unit. |
| 14:40 | Straight away it's probably going to price itself out of the market for many entry level enthusiasts but it is really targeted more towards the professional tuning industry so it has a price point that suits that industry. |
| 14:53 | Next one down would be the Link Knock Block. |
| 14:58 | I haven't bought one of these for years which is probably testament to the fact that they last really well. |
| 15:04 | Last time I bought one I think they were around about the $500 or $600 mark so I'm now talking New Zealand dollars, just to add some confusion but you know significantly cheaper than the Plex Knock Monitor but it is also a much much simpler device, it's standalone and it is audio only, there's no graphic display, there's no logging capabilities, it will not interface with an ECU or a dyno so you're cutting out a lot of the functionality that the Plex has introduced. |
| 15:32 | The Tuner Nerd, that is slightly lower, entry level again. |
| 15:37 | Does actually have some of the functionality of the Plex Knock Monitor, a little bit more fiddly to set up but you're getting a cost benefit for the additional sort of work required to set that up. |
| 15:51 | So yeah each of those has a place in the market. |
| 15:56 | I would say from my own personal experience, the Plex suits as I said, the professional tuning workshop. |
| 16:02 | Probably really ideally suited to those workshops that are doing a lot of really in depth engine development work. |
| 16:08 | As we'll find out as we go through this, it is quite a time consuming process to set the Plex Knock Monitor up if you want to utilise all of its functionality such as individual cylinder knock control, or knock detection, because it will need inputs for basically a trigger input so it knows which cylinder is firing at any particular time. |
| 16:29 | So on that basis, if you want to use all of the functionality, it's going to require a little bit of time wiring that up and I ran a performance workshop for 13 years, you're getting dozens of cars through the workshop every month and they're all different brands, mostly so that would be very time consuming to connect this up on every single vehicle so on the other case though, if you are doing engine development on maybe one or two specific engines, then you're only doing that job once, it makes a lot more sense. |
| 17:02 | Also if you are a tuning workshop that specialises in only maybe a handful of brands, wouldn't be too difficult to make yourself up a few jumper harnesses, yeah you're going to spend maybe a few hours doing those but it's a one time job, once it's done then it's probably a 5 minute quick connection to get the knock monitor set up so that's kind of where I see this positioned. |
| 17:26 | Again because of the involvement of connecting it and the price point. |
| 17:30 | I will mention though it absolutely can be used as an audio only standalone unit with none of the additional functionality but I think the reality is that if you are going to do that you're really losing out on some of the feature set that the knock monitor offers. |
| 17:47 | So let's have a quick look at the knock monitor. |
| 17:52 | First of all, I've been talking about it, we haven't actually seen it, let's jump across to our iPhone for a moment and this is the knock monitor here. |
| 17:59 | We've got it mounted to a suction cup on the windscreen and this is actually nice because this fixes one of my pet peeves with the earlier Knock Monitor V1 and V2 which was that there was no easy way of actually mounting it. |
| 18:14 | So this uses, obviously can't see it, it's on the back, the industry standard threaded insert there which basically every Go Pro or camera will also use so really easy to adapt to a range of off the shelf accessories to get that mounted up and it's nice because here mounted up on the windscreen it's visible in my peripheral, whether I'm on the dyno or I'm testing out on the road or a racetrack, I can see exactly what's going on. |
| 18:38 | We've got a full colour, I think it's a 2.8" screen, so really easy to see, it's high intensity so it's really easy to see also in bright sunlight. |
| 18:52 | We've got the ability to set up a variety of pages here and we'll look at some of these in bit more detail. |
| 19:00 | We can move through these, we can also, using their software, set up these to show whatever we want. |
| 19:08 | We've also got some LEDs here which are configurable. |
| 19:11 | We've got 2 of these at the moment in the base configuration that are set up for light knock which is a yellow indicator LED and heavy knock which is red so again we can catch these out of our peripheral vision. |
| 19:24 | These actually stay active until we reset them as well so we know at a glance what's gone on during a full wide open throttle acceleration run or a ramp run on the dyno. |
| 19:35 | So full CNC machined aluminium enclosure so it's a really really high quality item. |
| 19:42 | The wiring harness which obviously we can't see here because it's behind it, I really like the fact that they've put a lot of effort into this as well. |
| 19:49 | It is a high quality harness and just behind here which again we can't see, we've actually got a clip that will support these so you're not actually going to end up with strain going into the connectors, so this is going to allow this unit to live a long and healthy reliable life. |
| 20:08 | We're not going to end up with connector failures. |
| 20:10 | On the top here, which we don't have fitted at the moment, we've also got a USB stick which comes with the unit which can be used for logging so we can actually log this while we're driving, out on the racetrack or whatever and then analyse in a bunch more detail with Plex's data analysis software as well once we're sort of back in the pits and have a little bit more flexibility and time on our hands. |
| 20:36 | So lot of ways we can use this. |
| 20:39 | USB on the side here, USB-C which is going to my laptop and then we've got a connector here for our headset so the unit doesn't come with ear buds. |
| 20:53 | Couple of options here, quite a lot of people I know use noise cancelling headphones and plug those int an audio knock detection unit. |
| 21:01 | I've tried just about everything and I've ended up coming back to using a high quality ear bud and then using a set of high grade Peltor ear defenders over the top. |
| 21:16 | These ones are from 3M but wherever you are in the world, basically you just want a very high quality set of ear defenders, ear muffs. |
| 21:25 | These just cut down all of that ambient noise and allow you to listen to that knock signal. |
| 21:31 | So a quick rundown on the V3, what's changed and really only relevant if you've come from the V2 or you're already up to speed. |
| 21:40 | So it is a complete overhaul, basically every function has been addressed and changed so it's essentially an all new item. |
| 21:49 | It can be set up as I mentioned to be as simple or as complex as you want it to be so I don't want the sophistication of the unit to come across as a downside to those who don't need it. |
| 22:00 | You literally can fit this, power it up off your laptop via USB, connect it up to one or two knock sensors depending on your preference and your engine style and you're basically good to go but really the power of this unit is when you start using the trigger inputs, maybe the sensor inputs, the CAN bus communication, both input and output. |
| 22:21 | It is really really powerful. |
| 22:24 | So in terms of that as well, getting an RPM and trigger signal into this, so there are a variety of ways here. |
| 22:32 | Simplest, which is what I've got set up at the moment to our Haltech Elite 2500 ECU, we've simply got a CAN high and low running from the Plex unit and that goes to the ECU, we'll see how that's set up in the software shortly and basically we can bring in the channels that we need which realistically in the simplest form here is simply the engine RPM signal and that allows us to set a threshold for knock vs engine RPM, again we'll have a look at that. |
| 23:01 | And then you can also bring in trigger inputs, so if it's got a trigger input from a cam sensor and we configure that in the setup, basically we can tell the Plex Knock Monitor which cylinder's firing essentially at any time and that's when we can start getting into individual cylinder knock detection. |
| 23:21 | So this is something that never used to exist at the start of my career, in fact knock detection in general was pretty rare but there was always an assumption when knock detection came about that at the point where the engine starts to knock, then all of the cylinders are knocking and that's actually not the case. |
| 23:38 | Almost always it's not the case, we'll generally start getting one or two cylinders begin knocking first and this might be the result of those cylinders running a little bit hotter than the others. |
| 23:49 | Maybe the air/fuel ratio distribution is not flash and these cylinders are running a little bit leaner, basically anything that I mentioned before that's going to increase the charge temperature on those cylinders. |
| 23:59 | So if we're really aiming for an all out performance engine, we may want to find which cylinder is knocking first and then we can start trimming individual cylinders for timing. |
| 24:11 | Maybe we pull a little bit of timing out of that particular cylinder but maybe we can still creep another 2-3° into some of the other cylinders so the net effect, if we start getting that granular with our tuning, we can keep a safe calibration, making sure that the knock prone cylinders are a little bit more conservatively tuned. |
| 24:28 | Leaning on the other cylinders a little bit harder and we're going to see a net improvement in our engine performance so this is no joke, I don't know if it's something that I would suggest everyone worry about for a street engine but certainly for a race application and certainly if you are in a controlled class where everyone's basically got the same hardware and 1 or 2 horsepower additional is going to be the difference between maybe a podium placing and midfield then these are the sort of tuning elements that we really do need to concentrate on. |
| 25:01 | In terms of other inputs as well, we can connect two analog voltage sensors into this and configure them. |
| 25:09 | So I'm not sure I see a case study for where I would use this but of course I'm almost always using aftermarket ECUs where my sensors will be run into the ECU. |
| 25:20 | Simply having the flexibility to be able to do it means that if you need to, you absolutely can. |
| 25:26 | There's auxiliary outputs as well. |
| 25:29 | Data logging which I already mentioned, we've got audio filtering controls which are really important. |
| 25:35 | So if we just listen to the raw noise signal that's coming from our knock sensor, sometimes it can be quite difficult to discern knock from the background engine noise. |
| 25:48 | I mentioned signal to noise ratio earlier. |
| 25:50 | So by using specific filters, we can actually make it much easier for us as the operator to pick out the knock signal from that background engine noise. |
| 26:02 | There's a few options, we'll have a look at them, really my experiences come down to a case of trying each one and seeing which gives you the clearest signal. |
| 26:11 | I can't sort of say to you oh this is the best option for every engine, it's just not that simple. |
| 26:17 | So we can control all of that and then also with our knock threshold, so can think of this as basically a background engine noise level under normal operating conditions and as you can probably imagine, the higher the RPM, the higher that background engine noise gets so what we're doing with the Plex Knock Monitor is setting a threshold for what we consider normal no knock operation and then anything in terms of input from the knock sensor that exceeds that level that is considered knock and that's when the unit will alert us to the fact that the engine is knocking and we can get a lot more granular with what that looks like, where it's occurring and what we need to do in order to fix it. |
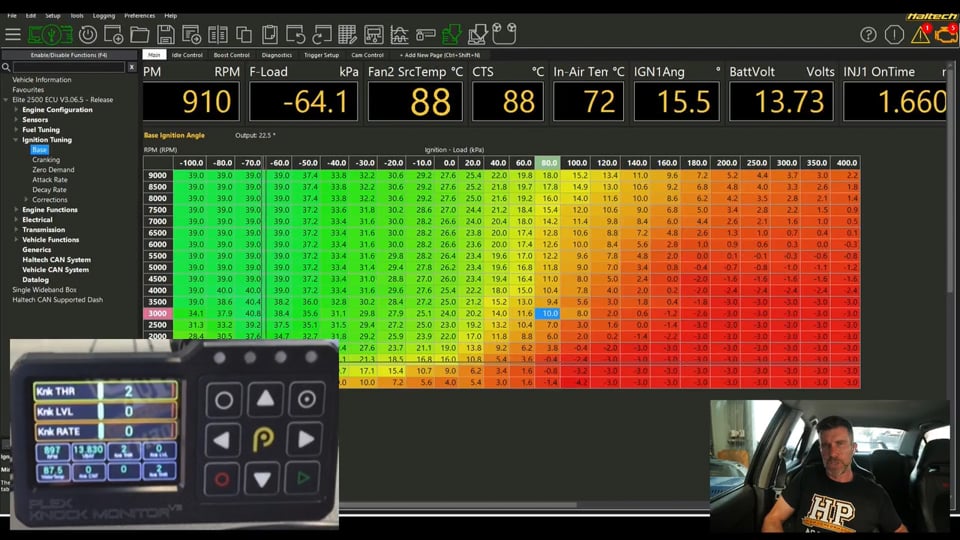
| 27:04 | So now we've got a bit of a background understanding of it, let's jump into my laptop screen here and we'll have a quick look, this is the Plex Device Manager software, this is used for setting up a number of their products including the Knock Monitor. |
| 27:19 | Now it's a powerful way of doing this but it is also a little bit more cumbersome in that we do need our laptop while we're doing this. |
| 27:30 | The important thing to mention here is a lot of this is sort of one time setup and once you've got a configuration set up we can actually save multiple configurations and then, this going to be perfect for tuners who are dealing with maybe 4 or 5 main vehicle types, then when we power up the unit on the unit front face, we can select the particular configuration we want to load, job's done and we don't really need the laptop there. |
| 27:58 | That being said, I mean if we're tuning an aftermarket ECU, we've got the laptop in the vehicle anyway so it's not really much of a chore. |
| 28:06 | Let's have a look here anyway, so this is our pages, we can see that's the little tab we're on at the moment and this is just a way of allowing us to set up the different pages that are available on the Knock Monitor, you can basically go to town with this and set them up as you see fit so we can see at the moment we're looking at the first page which is labelled as logging, this is a default page and we can basically change around anything on this page that we want to give us the information that we are after. |
| 28:40 | Looking at this next page here, knock one, we've got our knock level page here which I have had a little bit of a play around with so we've got our knock threshold. |
| 28:51 | So I already mentioned what that is, the current knock level, we can click on these and choose what we want them to be. |
| 28:58 | Let's just escape out of that one. |
| 29:01 | Our knock rate, so let's change that to our knock count. |
| 29:06 | Then down here in smaller digits we've got a little bit more information we well so I've got our engine RPM coming from CAN, I've got our battery voltage, our knock threshold, knock level, water temperatures the only other channel that I've got currently coming in via CAN. |
| 29:23 | Then this page here gives us a rolling graph of our knock threshold vs our knock signal and that will auto scale as well, let's just actually go to that page, jump across to the iPhone again so you can see if I give that a rev, and the yellow's the knock signal, obviously our blue line there is our knock threshold, we will do a ramp run on our dyno in a moment and kind of get a feel for how that works. |
| 29:53 | This one here is one that I added, so this is our knock vs RPM graph page. |
| 30:00 | So this, kind of a little bit like what we just had there, but again if we jump across to the iPhone, so this allows us, the blue line there is, break points edit, no threshold edit, so the blue line is our threshold so what we can do is actually edit this directly on the unit. |
| 30:20 | So I go to this point here and that's at 4500 RPM, the original threshold was a value of 26, 25 sorry, I can use the up button and change that to 26 and we'll come along here to 5000 and bring that down to 35, basically whatever you want to do and then we can save those changes. |
| 30:40 | So gives you the flexibility again to be able to make those sort of changes without the need to actually have the laptop connected. |
| 30:47 | Alright so again, you can set up as many pages as you want showing as much or as little information as you want really, just comes down to personal preference. |
| 30:56 | If we come back to my laptop software here and what we'll do is move across to our main page here which is our setup. |
| 31:06 | So this is sort of the key to the whole setup of the Knock Monitor. |
| 31:11 | We'll come through here and look at some of the options here. |
| 31:15 | So our knock detection setup here, so we start with our trigger and we can double click on this and give us our trigger mode. |
| 31:24 | So you can see at the moment I've got RPM coming from CAN, we can run no trigger if we want to simply run audio only, an external RPM trigger, we can take our trigger from an ignition source so you can connect this to the trigger connection to number one coil. |
| 31:41 | Not quite so easy on the stock 4G63 because it runs waste spark so basically cylinders one and four run off the same coil. |
| 31:52 | Or you can connect directly to a crank position sensor as well so lot of flexibility there. |
| 32:00 | Then our actual knock detection, so let's double click on that. |
| 32:03 | So our trigger mode here, RPM from CAN. |
| 32:07 | The bore size, so we don't really need to think too much about this. |
| 32:12 | The Knock Monitor will calculate that frequency which we can see here, 6800 Hz, directly from the bore size so basically we just need to make sure that this is accurate, also important to know if the engine has been built and maybe it's been over bored, these are only going to make relatively small changes if we haven't got it right but I mean we know for example a stock Mitsubishi 4G63 has an 85mm bore, we can change this to suit, let's actually do exactly that. |
| 32:44 | So that takes us from 6800 Hz to 6900 Hz. |
| 32:49 | Active sensors, so this comes with 2 sensors and we can choose to use 1 or 2 sensors. |
| 32:57 | Generally on an inline 4 cylinder, I don't see too much benefit from using 2 cylinders but in this case if we're running maybe a V configuration, an inline 6 or maybe a boxer style engine then we would want to, where possible, use 1 sensor per bank for better detection. |
| 33:18 | Then we've got our sensor gain. |
| 33:20 | So this essentially controls the overall level of the signal that is coming from the sensor into the unit. |
| 33:30 | This may require a little bit of manipulating once we sort of get up and running, it depends a little bit on how noisy the engine is as well, basically we want to get a signal out of that knock sensor that gives us enough resolution but doesn't exceed limits at higher RPM where there is a lot of noise. |
| 33:48 | Interestingly the instruction manual suggests that we start with 3 dB but as you can see, you can't, you can have 2 dB or you can have 4 so not quite sure what that's about but there you go. |
| 34:02 | Then we come down to our knock detection itself. |
| 34:05 | So the knock mode, we can have either automatic which is where the knock monitor is basically going to automatically alter the knock threshold based on the current engine signal level or we can use an RPM table which is what I've got here. |
| 34:27 | We'll have a look at that threshold calibration as well. |
| 34:31 | So this is exactly what we just looked at on the knock monitor itself, we can do this initially on the laptop software so we can see first of all, I'll show you another place to find this but we can see we've got a valid RPM signal because this is absolutely going to be worthless if we don't have a valid RPM signal coming in. |
| 34:51 | We can, I won't do this because I'll have to go through everything again, we can click here and set up our RPM break points. |
| 34:58 | Basically what we want to do is make sure that our break points are somewhat sensible, 1000 RPM break points are enough and we just want to be able to span the entire usable rev range of the engine. |
| 35:08 | Then we've got this little button here, auto cal, it does exactly what it says on the box. |
| 35:13 | Basically you click that button and it will talk you through what you need to do. |
| 35:18 | Essentially what it wants you to do is a full sweep through the RPM range under conservative tuning conditions where we absolutely know that we're not going to have any knock. |
| 35:29 | How do we know we're not going to have any knock? Well that's because we're also still going to be using the audio output and listening for knock. |
| 35:35 | And what it's going to do is basically monitor and log all of the data points for the knock signal while we're doing that ramp run, or we can do it out on the street, doesn't really matter. |
| 35:46 | And it will build a knock threshold that sits just a little bit above that and again the premise is that we can then detect knock because any time that signal exceeds the knock threshold that is knock. |
| 36:01 | Now a mistake that I've seen a lot of tuners make and I've made it myself in the early days of working with units like this or knock control strategies in an ECU. |
| 36:11 | Might be tempting to think well we'll just make sure that the engine isn't knocking by setting the ignition timing to something stupidly conservative, let's say 5° right the way through the rev range, we absolutely know there's no chance of knock occurring, happy days. |
| 36:24 | The problem is that if you actually listen to the audio output from any knock detection device, as we adjust the timing, understandably as we increase the timing towards MBT, the noise profile of the engine does change. |
| 36:42 | The engine starts to sound a little bit sharper, starts to sound, this is probably a silly way of explaining it but it sounds crisper and it sounds more aggressive and that actually comes through in that background noise profile as well so we do still, we want to make sure the engine's not knocking but we do still actually need some reasonable ignition timing in there to make sure that we're getting a realistic sample of what that knock threshold should be. |
| 37:08 | And on that same note, as we start increasing boost pressures, we may find that we need to come back and address the knock threshold and something I haven't tried with this, I believe that we can also set up a 3D knock threshold where the knock threshold is relative to load as well to get around that exact problem. |
| 37:26 | So anyway I'll exit out of that but I can assure you that it is really really simple to go through and do that. |
| 37:34 | Right so that's our knock detection so that's how the actual knock detection is going to occur. |
| 37:41 | If we come down here we've got our audio detection and this is basically controlling our output to our headphones. |
| 37:49 | So filter, this is what I talked about here, if we click on our drop down menu, we've got all of these options with high pass, band pass filters and it can be pretty daunting, what on earth are we doing here. |
| 38:05 | So a good place to start is actually with unfiltered and as its name implies, this is just the raw signal with no digital signal process being applied and it'll give you a sense of what the engine sounds like but most often you will find that particularly on noisier engines it can be really tricky to actually detect knock and kind of separate that out from that background engine noise. |
| 38:27 | So then we've got band pass filters so a good place to start would be somewhere around our calculated base knock frequency and we know that that was I think 6.9 KHz so 6 or 7 KHz, let's go 7 KHz would probably be a pretty good option. |
| 38:45 | The other element there is we can go with a high pass filter, quite often we will find that we get better signal to noise ratio at what's referred to as the second harmonic of knock so what that simply is is let's say we calculate that our base knock frequency is going to be 6 KHz and the second harmonic we get a resonant frequency as well at the second harmonic which would be of course 6 x 2 is 12 KHz so going down and trying the high pass 10 KHz filter, that can potentially be beneficial but as I mentioned it's really a case of just trying each of these filters and seeing which gives you the clearest definition of knock and it's going to be different for every engine, just a little bit of sampling to see which is best for you. |
| 39:33 | We can also select how the channels mix so sensor 1 to the left, sensor 2 to the right, if you're only using 1 sensor etc you can set that up as required and then our output volume. |
| 39:46 | So we can set the output volume here. |
| 39:49 | This is something I think was maybe a little bit more intuitive on the V1 and 2, they actually had a little thumb wheel on the side of the unit itself which we could adjust. |
| 39:59 | We can still do that on the unit, so if we come back over to our iPhone and we press the up and down buttons we can change our input gain and we press this little top right button, that will show our headphones and we can change our output volume using the up and down arrow keys there and just wait for a moment and that will disappear. |
| 40:23 | So relatively easy to change but I don't know, maybe I think the little thumb wheel on the last version was probably a touch more intuitive. |
| 40:32 | We've got our knock channels here, so these are the channels that are generated. |
| 40:38 | So it just tells you basically what these are going to be, these will depend on the way you've set this up so you know obviously we're not going to get individual cylinder knock levels if we haven't configured the unit so that it can know when number one cylinder for example is firing so that's how that is set up. |
| 40:59 | Then if we come down here we've got our communications. |
| 41:01 | So in this case we'll expand out on our CAN bus, device here is our ECU, port setup, can double click on that, we can give it a name, we can electronically enable or disable the termination resistor, I won't get too deep into that but you do need to know a little bit about CAN In order to set this up, also the CAN bus speed, typically that's on an aftermarket ECU going to be 1 Mbit or 500 Kbits. |
| 41:30 | The decoding mode and then basically at this stage, we don't need anything more than this because we can come down here to our receive setup wizard and we can basically load up a template for just about any of the common aftermarket ECUs so don't have to know how to set up the CAN bus, don't get too scared off, it is relatively straightforward, we will click on this and we show here that we are bringing in our RPM and our water temp from the ECU and you can see the way that's set up in terms of the scaling etc. |
| 42:13 | Pretty self explanatory here, we've got our hex ID for each of those messages so if you are up to speed on CAN, you absolutely can write your own templates here. |
| 42:27 | But again for those who aren't into doing that, if we click here on import, we can come to our Plex templates folder and we can see there is a pretty extensive list of these templates for just about any of the popular ECUs out there on the market so we'll close that down. |
| 42:48 | Not a lot more that I need to touch on here really, we've got our inputs here, so I've already mentioned that we can have analog inputs, we can also have digital inputs here so we can set those up to suit. |
| 43:04 | Maybe you want to bring in, I don't know, maybe a manifold pressure sensor or something of that nature. |
| 43:09 | Analog outputs as well and then we've got our LED outputs. |
| 43:13 | We can see how these are set up. |
| 43:15 | At the moment we've got LED 1 is for our log time and then LED 2 and LED 3 is our knock level so yellow for LED3 is going to be for light knock and red is for heavy knock so again as I mentioned, these stay active once they've been triggered so we don't need to be staring at the unit all the time, we can also as I mentioned data log as well so we can get into a little bit more detail with it once we are not driving the car for example. |
| 43:48 | Lot more functionality in here that currently I haven't used and probably beyond the scope of today's webinar anyway. |
| 43:59 | Really focusing on just the fundamentals of setting this up and using it. |
| 44:05 | It is important here that once we've made changes we do need to use the little write icon here and that's going to actually write the new configuration through to the Knock Monitor. |
| 44:18 | I did mention this already but here we can see we've got configuration 1 of 1. |
| 44:22 | If we can click on that here, configuration 1 obviously not the most creative name but we can edit that and let's call this, not configuration 1, we'll call it Mitsubishi Evo and then we can add configurations as well so obviously there's a bit of work goes into this, probably Mitsubishi Evo or Haltech would have been more fitting there. |
| 44:49 | But we can go and set up maybe another configuration for MoTeC and another one for Syvecs and another one maybe for Link and then as I mentioned when we power the unit on, we'll be able to select from those but based on the particular vehicle we're going to be configuring. |
| 45:07 | Don't think we've got anything much more that we need to talk about here. |
| 45:11 | We'll come across to stream, oh that's actually going to tell me that I need to change, need to upload that which I don't actually want to do. |
| 45:21 | But basically this will show you all of the data coming through live so you can actually see what's going on, make sure that everything matches, make sure for example that your engine RPM is somewhat realistic. |
| 45:35 | Alright so let's have a quick look at this, we'll get our fan up and running here and what we'll do is I'll just show you what I'm going to do, we'll come across to our Haltech NSP software and for our first demonstration here what I'm going to do is simply sit ourselves at wide open throttle, 3000 RPM and that lets us get up to about 80 to 100 kPa of positive boost so around about 12, 13, 14 psi and we can see at the moment we've got some pretty conservative numbers in there, 10 and 8° of timing. |
| 46:08 | So that shouldn't create any knock but what we'll do is I'll advance that timing up and we'll, while I'm doing this, probably haven't actually set Jordi up very well with this, would have been nice that we could show the ignition timing and the knock monitor but I didn't prep him for that so that's my fault. |
| 46:29 | What I'll do is I'll explain, we'll go to our iPhone shortly once we start running it, I'll explain what I'm doing in terms of the timing and when I make that change and you'll straight away start to see the knock effect on that. |
| 46:42 | So let's just get ourselves up and running now. |
| 46:47 | So we can see on our Knock Monitor, we've got 3000 RPM, our water temperature 87°, our knock threshold is currently 4, we'll just increase our, we're at wide open throttle now and absolutely no knock occurring so what we'll do is we'll just advance that timing up to 18°, so I've entered 18 now and see straight away we can see we've got our yellow and our red light on. |
| 47:14 | Now we didn't actually need audio knock detection for that, I could actually audibly hear that occurring in the engine bay. |
| 47:20 | And straight away I imagine a few people are sort of cringing and thinking what sort of an idiot makes the engine knock? And let's just talk a little bit about that. |
| 47:29 | Obviously we don't want to make the engine knock where we don't have to but understanding the implications of knock vs outright cylinder pressure is also quite important. |
| 47:39 | we can't properly set up a knock control strategy without actually introducing knock and making sure that the Knock Monitor in this case or our ECU can accurately detect knock when it is occurring so we simply are sort of between a rock and a hard place, in order to validate this, we must make the engine knock. |
| 48:00 | So we want to be a little bit mindful of this. |
| 48:02 | You'll note that I did this at 3000 RPM at what is a relatively low boost pressure. |
| 48:07 | So the likelihood of damage occurring from knock is down to two factors, one is the intensity, let's call it 3 factors, one is the intensity of knock, two is the amount of time that the knock is occurring for and the third is the specific power level or liken this to cylinder pressure. |
| 48:27 | What I'm getting at here is making the engine knock at light load, just low boost, 3000 RPM is, and for only a brief amount of time there, it was probably a second or so if not less, is not likely to damage the engine immediately. |
| 48:42 | If I tried to do the same demonstration at 8000 RPM or 7500 RPM where we might be making maybe 300, 350 horsepower and we made the engine knock heavily there, yeah it's going to be much more likely to be damaged so just a little bit of care is required, we don't want to induce more knock than we need to and we don't want it to last for longer than it has to so we can see there that our two lights are displayed here, we can see that our knock counter is showing at 153 which is a little worrying and we can reset those with this little top left button, brings us back to zero, our lights are back off so this is probably what we'd want to do before we do a ramp run on the dyno so let's just come back into our NSP tuning software on my laptop here, we'll just control Z to remove those and what we're going to do now is we'll do a ramp run here on the dyno so this should relatively speaking I think probably be knock free so what we'll do is we'll go across to our Knock Monitor here and we've got our rolling graph which we've already talked about but let's have a look at this graph here and what we'll do is our ramp run, so we'll just get our dyno set up, not going to show the dyno, the power numbers don't really matter, we're more interested in just looking at what happens on that Knock Monitor as we go. |
| 50:04 | Actually what we'll do, we'll go back to our rolling graph, you'll be able to see the scale and really what we want to do, ideally our yellow knock signal should stay below our blue knock threshold so let's go. |
| 50:26 | OK so you can see that in that case, we did actually have a couple of hits where we exceeded that knock threshold so this is where we'd also need to go back and, well we'd be listening for this audibly while we're doing this. |
| 50:44 | And we may need to go back and modify that knock threshold. |
| 50:48 | This also comes down to, I just did a really quick and dirty setup on that knock threshold there with a ramp run under just part throttle so it was probably maybe 60 or 70% throttle. |
| 50:58 | Whether that's realistic, as I mentioned obviously as we increase the cylinder pressure and the load, the engine noise profile does change so it's really important to actually monitor that audibly and go back and if we need to, go back across to our iPhone here, we need to modify the knock threshold, we can do that either via the software there or straight onto the knock monitor. |
| 51:23 | We're going to stop now and get into questions so if you've got any questions on this, or the topic of knock, I'll just keep it to those two topics at this stage, please ask those in the chat. |
| 51:36 | So just in sort of assessment of this unit, I'll just kind of reiterate a couple of those key points so it is probably the most sophisticated knock monitoring device I've seen out there on the market, particularly at least as a standalone. |
| 51:53 | As I mentioned, the price point is pretty high but so is that feature set so you absolutely are getting what you pay for and again just to reiterate I think really the use case for this really is around the more professional workshops, particularly those who are dealing with a relatively small subset of vehicles or engines, so that the time spent making up the required harnesses to adapt this in is relatively short, you definitely, if you're tuning sort of 20 or 30 different vehicles regularly, I don't think you could really make up all the adaptions or get this wired in and still really make good money on your tuning so you do have to consider what you're actually working on, what you're actually tuning and how this would suit. |
| 52:45 | If we reference the earlier V2 example that I did back on our FA20 turbo engine, I actually found that the standalone knock detection was so good, particularly with that I demonstrated the individual cylinder knock control, it was so good that it actually made me go back and revise some of the knock control settings on the MoTeC M1 ECU in line with basically the Plex Knock Monitor was picking up knock that the MoTeC wasn't and the MoTeC was picking up false knock that the Plex was saying wasn't knock so there's, it was an eye opener at just how good this was on an ECU that I'd already spent a reasonable amount of time dialling in the knock control strategy and thought I had that pretty well set up but of course it is not a unit that i s going to be suitable for everyone and if you are in the sort of enthusiast market, I would say that for most people the price point alone is probably going to put you off and that's absolutely fine, there are some other cheaper options which I've already mentioned. |
| 53:52 | Alright we'll jump into these questions, if you've got more, keep them coming. |
| 53:56 | First question from Tom who's asked, is water methanol injection effective at reducing knock or does it just help with inlet air temperature? No it is a pretty well proven method of reducing the chances of knock. |
| 54:11 | I've had little experience with water methanol injection, we do actually have a webinar in our archive where we demonstrated the AEM water methanol injection system on our turbocharged Toyota 86. |
| 54:26 | In that particular case, I didn't find it hugely beneficial but it definitely does have some effect but you know, it probably does require quite a bit of, I say probably, I mean it does require quite a bit of testing to find out where your ideal nozzle sizes are etc to really get the water methanol injection dialled in and working at its best but yeah no doubt it does absolutely work. |
| 54:56 | Wolfsblade's asked, how does this or can it differentiate between loud pistons, AKA forged pistons vs actual knock? So this really all comes down to the knock frequency which I mentioned. |
| 55:09 | So remembering that the knock actually occurs at a specific frequency so the knock monitor is basically looking at a very narrow slice of frequencies of noise and ignoring everything outside that range. |
| 55:24 | And generally, there might be some overlap here but generally we'll find that the likes of piston noise, valve train noise for example will occur at frequencies that are different enough to the knock frequency that it makes it easy enough for the knock monitor to actually distinguish those noises. |
| 55:46 | Harmon Long has asked, what are considerations for knock placement from V to inline configuration engines? I'm glad that you asked that question because it just reminded me that I didn't go into any detail on where these knock sensors should be mounted so let me correct that. |
| 56:03 | Let's jump into my laptop screen and we've already seen this phone here which is where the knock sensor was placed on our 4G63, basically removing the engine lifting hook that normally sits here. |
| 56:16 | This is not the ideal location. |
| 56:19 | This was for simplicity and speed because it's very very difficult on the 4G63 to actually get access to a better location so for the purpose of our demonstration that's what we've gone with. |
| 56:31 | Ideally for an inline 4 cylinder engine, and we'll get onto the rest of your question in a moment, what we actually want to do is find a mounting location on the block itself, not the cylinder head and we want that to be high up on the engine block so go to the next slide here, this is the turbo side or the exhaust side of the block, so we've got a couple of locations, I quite like this bolt hole here. |
| 56:58 | Generally we can get access to this but it is manifold and turbo location dependent. |
| 57:02 | Because obviously there's a lot of heat here, if you don't have enough clearance to the turbo or manifold, you're likely to simply melt your knock sensor and wiring. |
| 57:11 | It is also a little bit lower than ideal but you know the likes of up here, very very difficult to get to. |
| 57:19 | If we look at the back of the block, the inlet side, this is the factory knock sensor location and you can sort of see it's pretty much ideally located, central between all 4 cylinders, it's between 2 and 3 and it's relatively high up on the block. |
| 57:35 | We'll also look, this is the inlet side of our SR20VE turbo engine and the location we've got here, again high up on the block, we could have actually mounted a second sensor here or for that matter over here but the inline 4, the engine is short enough that it's not really such an issue. |
| 57:57 | V configuration, really what we want to do is try and get one sensor mounted on each side of the block, maybe that's going to be on the valley side, on the inlet side, or we might have to go on the outside of the block on the exhaust side, obviously I'm assuming here that it's a cold V. |
| 58:15 | Often our hand is sort of forced by what is available, we may not have a lot of flexibility and sometimes we are simply forced to take a sub par location for our sensor just because there aren't a variety of mounting holes or bosses on the block that we can choose from. |
| 58:36 | On an inline 6 we would probably try and mount a sensor forward on the block maybe between cylinders 1 and 2 or maybe around cylinder 2 and another one maybe around cylinder 5 or between 5 and 6. |
| 58:49 | Just essentially getting the best detection we can but I've also used a single sensor on a V configuration engine and a single sensor on an inline 6 and we can still get good results but this can often requite the gain levels from individual cylinders to be adjusted so that we're sort of matching them and I didn't talk about that, we talked about the signal gain level but of course I'm not set up with individual cylinder knock detection for our demonstration today so we have one overall. |
| 59:22 | If we were set up for individual cylinder then we would have 4 individual gain levels that we can set and it's all about trying to sort of optimise the gains so that the average noise level on all 4 cylinders under no knock operation is very similar, that again gives us the best resolution to actually detect knock when one of those signal levels exceeds the threshold. |
| 59:44 | Right I'll go back across and have a look and see if we've got some more questions. |
| 59:53 | Wolfsblade's asked, when testing or trying to introduce knock, are you basically lugging the engine in a high gear and a low RPM? Yeah kind of I mean basically we want that sort of situation where we don't have massive amounts of specific cylinder pressure or specific power levels so that when we do introduce knock, it's not going to be very likely to damage the engine. |
| 01:00:19 | So in a turbocharged engine we really need enough RPM that we can actually get the engine on boost, particularly if we've got a larger turbo, if we sit at sort of 2000 RPM, we're probably not going to be able to make enough boost to be worthwhile and it may be difficult if not impossible to make the engine knock so a little bit of testing is required but generally I'd be doing that testing between maybe 2500 and maybe 4000 RPM at the absolute most and at as low a boost level as I can, I'd absolutely be starting at our minimum wastegate spring pressure level and we should be able to get the engine to knock. |
| 01:00:56 | There are some caveats to that, I mean if you're on a really really good quality fuel, maybe a race fuel or E85, you may not be able to make the engine knock at all but then the requirements for knock control or audio knock detection sort of become a little bit of a moot point. |
| 01:01:11 | Last question, Tom has asked, what is your opinion on the Haltech knock sensor? Hmm I don't have an opinion because I'm not quite sure what you're referencing there. |
| 01:01:21 | I might be a little bit behind the times on Haltech's latest offerings. |
| 01:01:26 | If you are talking a sensor itself then I know that Haltech offer sensors so that when you're speccing your ECU and harness, basically you can order your sensors, your manifold pressure sensor, coolant temperature sensor etc, so you've got everything to go so if that's what you're referring to, I would imagine that Haltech are probably offering the generic wideband Bosch knock sensor anyway, it's unlikely that they're making their own sensor but again I'm not 100% sure exactly what you're referencing there so I could be off the mark. |
| 01:02:01 | Another question's popped up from Mike who's asked, does this knock sensor only look for knock in one specific frequency? I thought that different engines varied the knock frequency? No it is, the sensor itself is wideband meaning that it will react to a wide range of knock or vibration frequencies, remembering it is just a vibration sensor, it's going to pick up any vibration. |
| 01:02:23 | The detection is set by the Knock Monitor, remembering that we can adjust, if you watch he demonstration, not sure if you've just come in here, we set the Knock Monitor up for the bore diameter and that straight away will set the default knock frequency we can adjust that as well independently if we need to so that's how that all works. |
| 01:02:45 | Alright that's all the questions we've got so remembering for our members if you've got any questions, if you're watching this in the archive at a later point after it's aired live, please ask those in the forum and I'll be happy to answer them there. |
| 01:02:57 | Thanks for watching and we'll see you all again next week. |
Timestamps
0:00 - Introduction
1:04 - What is knock?
5:25 - Different to pre ignition
6:18 - What causes knock?
8:26 - How is knock detected with Plex?
10:19 - Other methods of knock detection
13:49 - Pros and cons of 3 different standalone devices
17:48 - Physical overview
22:00 - Trigger inputs
25:01 - Analog voltage sensor input
25:29 - Noise filtering
27:04 - Software walkthrough
30:56 - Knock detection setup
37:34 - Audio setup
45:35 - Demo
47:20 - Need to induce knock to validate strategy
49:32 - Demo 2
51:36 - Summary
53:52 - Questions