348 | Transient Tuning - Haltech NSP
Summary
Transient fuelling, or acceleration enrichment and deceleration enleanment is critical for great drivability. In this webinar we’ll be taking a look at the options within the Haltceh NSP software.
| 00:00 | Hey team, Andre from High Performance Academy here, welcome to another one of our webinars. |
| 00:05 | This time we're going to be diving into the transient acceleration enrichment in the Haltech NSP software. |
| 00:12 | Bit of a mouthful there but we'll get into this and understand how this all works. |
| 00:17 | I'm doing this because Haltech recently introduced a different method of transient enrichment and in my experience, my opinion, one that works really really well, really seamlessly compared to their older throttle based transient enrichment. |
| 00:34 | So, you can still use either but definitely I recommend trying this out. |
| 00:40 | Also if you're on older firmware, which almost caught me out with this particular webinar, make sure you update because the older firmware won't actually have this functionality built in. |
| 00:52 | Alright, before we actually dive into the software and have a look at our options for the tuning process, let's actually get an understanding of what transient enrichment is, what that actually means and why we need it. |
| 01:05 | So, this really is one of the common areas I see a lot of tuners struggle with and it's one of those things that really makes such a difference to the drivability of your car, particularly if it's a street driven car. |
| 01:18 | If it's not done correctly, what you're going to find is that maybe the car will drive fine under steady state conditions where you're essentially holding a relatively constant RPM and constant throttle position. |
| 01:29 | But if you put in a sharp throttle input, basically you want to go from maybe 20% throttle to 100% throttle, what you might find is that the car's going to hesitate and sort of buck instead of accelerating smoothly. |
| 01:42 | So, really frustrating and not much fun to drive, obviously also not ideal for a competition car, it's going to affect your lap time or ET depending on what your particular chosen competition is. |
| 01:56 | So, really important to actually get all of the parameters set up so that you've got smooth transient enrichment, basically the fuelling is going to track your target regardless of what you're actually doing on the throttle. |
| 02:09 | So, that's fine and I think probably most tuners understand that under sharp throttle input we're going to need to add some additional fuel but not a lot of understanding as to why that's the case and as usual I think it's always beneficial if you've got a good understanding of what's going on inside of the engine and that's going to in turn allow you to do a better job of tuning. |
| 02:32 | So, this does get a little bit deep but I'll try and keep it as simple to understand as I can. |
| 02:38 | And there are a few aspects that go into this. |
| 02:42 | The first is that if we're tuning using a manifold absolute pressure sensor for our load axis which in 95, maybe 98% of circumstances that's exactly what we're going to be doing, then the load input is based on our manifold pressure sensor. |
| 02:59 | The problem with this is that while the manifold pressure sensor can respond really quickly, there's also a fair amount of filtering that is applied to get a usable signal that's not super noisy. |
| 03:11 | So, any time we add filtering, this results in some sort of lag or latency in the signal that's reaching the ECU. |
| 03:19 | And it doesn't have to be very much when we're talking about transient conditions to have a big impact on the way the engine operates. |
| 03:26 | Other elements that can affect this as well is if you've got a manifold pressure sensor that's mounted in your ECU and you've run vacuum hose from the ECU to the inlet manifold, well obviously that increases the volume of air to the manifold pressure sensor and that in turn also will introduce some lag or latency in that signal. |
| 03:47 | That's one of the problems from a mechanical standpoint for the sensors that the ECU is using. |
| 03:53 | And we actually also know that the OE will deal with this in a unique way, not necessarily just around transient enrichment. |
| 04:00 | If a vehicle that uses a mass airflow sensor for example, let's say the GM LS, what a lot of people overlook is there's actually a speed density subsystem that the LS uses, and this is sort of another aspect here where the mass airflow sensor under transient conditions can be a little bit laggy as well. |
| 04:22 | So, the ECU there will actually switch to the speed density subsystem momentarily under these transient conditions and then switch back once steady state has been achieved. |
| 04:32 | Alright, so first prime, manifold absolute pressure sensor, we just know that there's going to be a little bit of latency there which will affect us under transient conditions. |
| 04:40 | The other aspect that's a little bit more complex is what's actually happening in our engine. |
| 04:45 | So, let's dive into our laptop for a moment. |
| 04:48 | And this is a representation of what's actually happening with our injector in the inlet manifold. |
| 04:54 | So, of course we've got our injector there delivering our fuel and we've got our intake valve here. |
| 04:59 | Now we've got some varying conditions here, we've got our air temperature, our air pressure and our air speed. |
| 05:05 | Air temperature itself, not going to strictly change really really quickly but our air pressure particularly absolutely can do and with it our air speed. |
| 05:16 | Now these parameters all affect what's happening with this fuel that is delivered out of the fuel injector. |
| 05:23 | Most people think that all of that fuel is simply delivered past the open valve straight into the combustion chamber. |
| 05:30 | The reality is that's not the case and depending on the engine speed and the injector size, we're going to find that particularly at higher RPM, some amount of fuel is almost inevitably going to be delivered onto the back of the closed valve. |
| 05:46 | Now on face value this might sound problematic. |
| 05:49 | The reality is once the engine's actually operating temperature, this can be a good thing because that hot valve is going to then evaporate off that fuel, it's going to go through a phase change from liquid to vapour and then when the intake valve's open on the next intake stroke, that vapour's going to be ingested into the cylinder, vapour is much much easier to combust than even finely atomised fuel. |
| 06:13 | OK, so that's one aspect is the closed valve versus open valve injection. |
| 06:17 | Regardless of that though, what we're going to find is that some amount of this fuel, some volume or mass of this fuel is actually going to wet out against the port wall and it's going to form a fuel puddle or a fuel film. |
| 06:33 | Now that fuel film under steady state conditions makes no real difference to our operation. |
| 06:38 | Essentially for the reason that the fuel film is being topped up at exactly the same rate that the fuel is evaporating back off that hot port wall and making its way into the cylinder so if we need a specific mass of fuel for a given operating condition, despite the fact that we've got this puddle of fuel in the port wall, the correct amount of fuel is still making its way into the cylinder. |
| 07:04 | Under transient conditions though, things change. |
| 07:08 | The size or volume of this fuel puddle is going to be affected by these three parameters here. |
| 07:15 | And particularly when our air pressure changes rapidly, when we go from a low manifold pressure to a high manifold pressure, which is what happens when we mash the throttle open, what happens is that the volume of this puddle on the port wall is going to grow, it's going to be larger. |
| 07:35 | Now, this is only momentary, but the effect of this is that now the amount of fuel that's coming out of our injector is going to go, or a portion of this is, going to go to increasing the volume of fuel in that puddle. |
| 07:48 | And so what this means is that the ECU has calculated the mass of fuel required for the operating conditions to get our target air fuel ratio. |
| 07:57 | But not all of that fuel under these transient conditions is actually making it into the cylinder. |
| 08:02 | So, of course this means that we run momentarily a little bit lean. |
| 08:05 | So, that's why if we've got no acceleration enrichment or no transient enrichment enabled, we're going to find that our engine will run lean on tip in or when we mash the throttle to the floor. |
| 08:17 | Now, the other aspect of this which is even more overlooked is that we have exactly the same problem, or the inverse problem, occurring when we go from a high manifold pressure and we back off the throttle very sharply. |
| 08:30 | Under those conditions basically we get the reverse. |
| 08:33 | Now, that larger fuel film that we've had established under steady state conditions under wide open throttle, when we back off the throttle and the manifold pressure drops, so does the volume of that puddle of fuel on the cylinder wall. |
| 08:46 | But now as that shrinks, we've got more fuel actually being introduced into the cylinder from that puddle getting smaller and the injector's still delivering the fuel that is needed. |
| 08:59 | So, we actually end up with this rich condition as we basically back out of the throttle. |
| 09:03 | So, these are the conditions we're actually trying to correct with transient enrichment. |
| 09:08 | So, this is kind of the technical breakdown on what's happening inside the engine. |
| 09:14 | Traditionally most ECU manufacturers, including Haltech, have gone with a very simplified model where they've just looked at rate of change of throttle position and used that as the driver for the transient enrichment. |
| 09:28 | So, it's not really dealing with the key element there of that fuel film changing in volume, but it kind of got the job done. |
| 09:37 | If you want to do a really good job of modelling what's actually going on, which is what the OEs do, this fuel film model is what's required. |
| 09:45 | However, this becomes a bit of a balancing act because it can become very very complicated for the tuner to actually tune. |
| 09:53 | So, Haltech have sort of had to walk a bit of a tightrope here on deciding how technical to make this, how technically accurate to make it in order to give the tuner, us, something that works really really well but doesn't take a university degree in order to actually be able to tune. |
| 10:09 | And also, we don't want to spend a month on the dyno trying to calibrate this fuel film model. |
| 10:14 | Alright, so the other aspect that we do need to consider is our injection timing around our transient enrichment. |
| 10:24 | So, where this comes into play is if our injection timing is set so that the fuel is predominantly being delivered when the injector is closed, the problem we get here is that if we have a transient enrichment event or transient event, so basically we mash the throttle after the fuel has been delivered, when the intake valve opens next, we're going to have an inrush of additional air, but the ECU has delivered fuel for the previous condition so that's going to definitely result in a lean condition. |
| 10:59 | So, there's a couple of ways around this, we can use asynchronous fuel injection where we add additional fuel outside of the normal injection pulse. |
| 11:07 | The better option here, or at least to try is to time our injection event so that we're actually injecting when the intake valve is open which means that the ECU can then modify that injection pulse and it's going straight into the cylinder along with our additional air; so that's something you definitely want to play around with. |
| 11:26 | There are limitations to this though. |
| 11:28 | We've got essentially, for all intents and purposes, around about a 30-35% window where the intake valve is open on the complete engine cycle. |
| 11:40 | So, what this means is once we're above about 35% injected duty cycle, which most cases we're going to be at higher load and higher RPM, some amount of that fuel is going to be wetting out against that closed valve and we can't avoid that. |
| 11:54 | Fortunately though we do see that the sensitivity to transient or acceleration enrichment is much more prevalent at idle and low RPM. |
| 12:03 | The higher we get in the RPM and the higher we get in the load, the less relevant or the less important it is and we don't really need as much transient enrichment. |
| 12:12 | So, we're focusing on that low RPM mainly and that is where we can definitely get some benefits from adjusting our injection timing. |
| 12:22 | Alright so hopefully everyone's still with me here, I know there is a bit to take in here, and most people who have been tuning a traditional transient enrichment or acceleration enrichment model probably haven't really understood or given any thought to what's actually going on inside the ECU. |
| 12:42 | Alright, so let's now actually head into the Haltech software here and while I'm getting this set up, let's actually just get our engine up and running. |
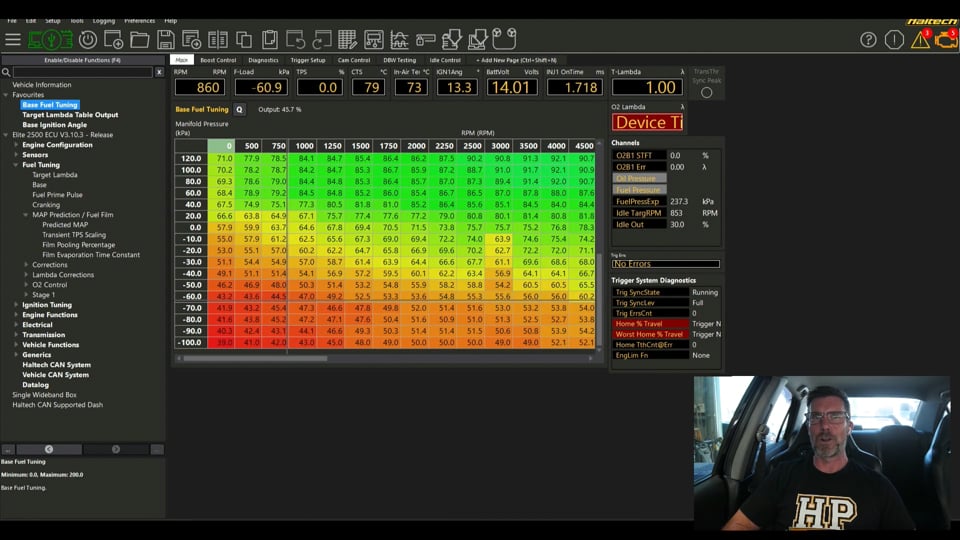
| 12:53 | So, what we want to do for a start is actually forget about all of our transient enrichment and come up to this guy here which is our main VE table. |
| 13:04 | What I'm going to do, just because I prefer to look at these with RPM on the X axis, I've never really been able to get my head around RPM on the Y axis, personal preference but don't beat me up over it. |
| 13:17 | So, what I see a very common mistake being made is where the correct amount of time and effort hasn't actually been applied to tuning this volumetric efficiency table. |
| 13:30 | And what this means is that if our VE table isn't correct, then we're going to be trying to add a band aid with our transient enrichment to sort of make up for the fact that the actual cells in our VE table aren't correct. |
| 13:44 | So, this is always the first place to get started and the better job we do here of tuning our volumetric efficiency table, the more seamless the rest of our tuning is going to go for our transient enrichment. |
| 13:57 | And on that note, this one, it's actually not very well tuned. |
| 14:01 | This car has never unfortunately undergone a full and comprehensive dyno tune so it's a little bit ropey, it's only really being used for webinars at this stage, bit of a waste of an Evo 9, but don't beat me up about it, do as I say, not necessarily as I do. |
| 14:18 | So, anyway, to reiterate, that is our first step, we always want to make sure that we've got our VE table tuned as accurately as we possibly can. |
| 14:27 | Now if we come into our fuel tuning over here in our menu structure and we click on that, this is the first place to get started. |
| 14:35 | We've got some of our setup here for our main fuel tuning parameters. |
| 14:40 | The one that we want to come down to here is under our functions and we can see that we've got map prediction slash fuel film enable. |
| 14:48 | Now, in most cases by default I think you're going to find that that is disabled and instead we'll have this one here, transient throttle, which is now called classic, that will be enabled. |
| 15:01 | So, I won't go over the transient throttle classic style of enrichment, I've already done a webinar on that so if you do want to learn about that system, which I'd strongly recommend, I don't see a lot of reason to be using that now, then check in our webinar archive and you will find that. |
| 15:20 | So, anyway we want to make sure that our map prediction is turned on. |
| 15:23 | That gives us access to these parameters here under our map prediction and fuel film. |
| 15:29 | So, let's just go through these in order. |
| 15:32 | So, we've got, actually they've done a really good job I think in simplifying what is quite complex. |
| 15:41 | So, first of all we've got enable long term predicted map learning. |
| 15:45 | So, this kind of does a bit of the heavy lifting for us. |
| 15:49 | I'll jump a little bit out of sequence here. |
| 15:51 | So, predicted map, this is the table that it's going to basically auto learn. |
| 15:56 | So this table, let's just again switch this around. |
| 16:01 | This table essentially is a table which the ECU will reference momentarily to fix that latency or lag problem that we see with our manifold pressure sensor. |
| 16:12 | So, what we've got is a table of throttle position on our y axis versus our engine speed and basically what we want to do is make sure that this table is filled in correctly, so that we want to know that when we are sitting in this particular area here and we are currently sort of interpolating between zones, we want to make sure that basically it matches the actual number that we're seeing under steady state conditions from our manifold pressure sensor. |
| 16:43 | So, we can go through and tune this particular table, again we want to do a good job of this and that's going to allow, under transient conditions, the ECU will momentarily reference back to this table and it's going to give it a better, more accurate number to base its fueling on than the number coming from our map sensor because again of that latency. |
| 17:03 | But obviously that latency is only momentary and it's going to again reach steady state conditions and give us a value that we can rely on. |
| 17:12 | So, that comes to this value here which is our predicted map time, 200 milliseconds is the default value. |
| 17:20 | I've actually found that that works pretty well on this particular vehicle. |
| 17:23 | So, the problem with that value is if we have it set too low, we're going to find that basically the ECU will only use that predicted map value for a too short a period of time, it's going to jump to the live map reading before it's actually caught up. |
| 17:41 | So, I would say starting with that default value, at least in my experience has been a pretty good place to start and then you can manipulate that based on what you're actually seeing the lambda do during a transient condition. |
| 17:54 | So, that's our first parameter there. |
| 17:57 | And again enabling this long term predicted map learning is just going to mean that the ECU is going to do a pretty good job of updating that predicted map table based on steady state conditions that it's actually reading from the map sensor. |
| 18:11 | So, again probably don't really need to dwell on this table anymore, this is our second table and one of the key elements to it, so we want to make sure that that is actually somewhat accurate and realistic. |
| 18:23 | Otherwise we're just basically building in problems that we're going to strike later on. |
| 18:29 | Next we've got our transient TPS scaling. |
| 18:33 | So, again this is a value here of 300% and basically this is the default value, again; I've found that this works pretty well. |
| 18:45 | Haltech do recommend if you're having problems with the predicted map not becoming active, what you want to do there is have a look at your TPS derivative channel, so rate of change of TPS, and basically look at the value from that and then multiply it by a factor of 10 so if you're getting say a TPS derivative value in the region of something like 20%, multiply that by 10, so 200% and we'll put that into this value here. |
| 19:18 | Then we have one of the key elements here which is our fuel film percentage. |
| 19:23 | So, this is essentially how much more fuel is going to be added. |
| 19:28 | So, we can see we've got this, as a three dimensional table, we've got a coolant temperature on our horizontal axis here and we've got manifold pressure. |
| 19:37 | So, essentially we are going to need additional transient enrichment when the engine is cold. |
| 19:44 | One of the reasons for this is when the engine is cold, the port wall is cold, we simply have more fuel wetting out on that port wall; so the effect of everything I talked about there is kind of exasperated or exaggerated, it's just going to need more fuel when the engine is cold. |
| 20:02 | Likewise as we obviously move from the left to the right of this table, we see that those numbers drop dramatically. |
| 20:09 | Again, Haltech's guide here is that the values that we're going to need are going to depend a lot on the engine combination, the injectors, the manifold design. |
| 20:19 | So, there's some really good targeting of the injector spray pattern by OE's, generally done around improving emissions and basically targeting the fuel so it's going to get straight onto the back of the injector or straight, sorry back of the intake valve, not the injector, or straight into the cylinder when those valves are open. |
| 20:38 | On the other hand, something we often do in the aftermarket of course is throw the factory injectors away and fit a single spray aftermarket injector which now targets all of that fuel generally onto the divider between the two ports. |
| 20:52 | So, again there's a lot here that's really dependent on the specifics of your engine combination and injectors, injector, how it's being directed et cetera. |
| 21:03 | Numbers that Haltech recommend there in the region of maybe 5-20% for a well designed manifold/injector combination, maybe up to 50% for something that's a little bit less ideal. |
| 21:20 | So, really that's just something we're going to have to play with. |
| 21:23 | Then the other element that sort of plays into this, so this is how much fuel we're going to be adding, the next one is our film evaporation time constant. |
| 21:33 | Quite a mouthful there. |
| 21:35 | And again this is three dimensional versus engine speed and coolant temperature. |
| 21:40 | So, this is simply how long the additional fuel is going to be provided for. |
| 21:47 | So, again by default I actually found that on the very small sample pool of cars that I've used this on, the default values actually got me pretty close to the mark. |
| 21:56 | But there are some sort of recommendations here for how this is going to, or how you should approach your tuning. |
| 22:06 | So, our predicted map time, let's come back up to that. |
| 22:09 | So, if this is too short, as I mentioned, the predicted map value is going to be over and it's going to revert to the live value before everything's actually settled down and reached equilibrium. |
| 22:21 | On the other hand though, if we go too large on this, we're going to be sitting on that predicted map value for too long and particularly with a turbocharged car, obviously if we go to 100% throttle, initially we're going to jump to atmospheric pressure, but the longer we're there we're going to build into positive pressure. |
| 22:37 | So, that would, if that map time, predicted map time value is too long, we're going to end up with a situation where we're going to falsely cause ourselves to go lean because our predicted map value is going to be 100 kPa but we're climbing into boost. |
| 22:54 | So, again that 200 millisecond value, that is default, really good place to start. |
| 22:59 | I would start by making changes that are reasonably dramatic to see and sense the magnitude that is required, maybe start by halving or doubling it, then we can start getting a little bit more granular in 50, 20, 10 millisecond jumps. |
| 23:15 | Then in terms of the, predicted map is pretty straightforward, we obviously know that we want to make this realistic with our film pooling percentage. |
| 23:28 | So, again if this number here is too large, we're going to have too much additional fuel delivered, if it's too small, we're going to go lean. |
| 23:37 | So, reasonably simple to get an understanding on that but it does work in conjunction with our film evaporation time constant. |
| 23:45 | A problem with our film evaporation time constant is if we have this too short, what we're likely to see is initially we'll track our target lambda pretty nicely and then what we might find is we'll momentarily go lean before we kind of reach steady state equilibrium again. |
| 24:03 | On the other hand if the time constant is too long, we may find that we go excessively rich for too long. |
| 24:12 | So, I know there's not really a very straightforward way of explaining how to tune these parameters, it's more about understanding what each of the parameters does, and then simply making a change and assessing the effect of that change. |
| 24:28 | Have you gone in the right direction? Yes, no, we can go back and reassess. |
| 24:32 | Again with all of these changes, I always recommend starting with a reasonably dramatic change. |
| 24:37 | Maybe double and then half, and then start getting a little bit more granular. |
| 24:41 | If you start by looking at this table here, we're under higher RPM conditions, we've got values of 200 milliseconds in there. |
| 24:48 | And we go from 200 to 210 milliseconds. |
| 24:52 | It's such a small change that we may not initially see the result of that. |
| 24:56 | So, I always recommend starting with reasonably large changes. |
| 25:00 | In this case maybe I might make a change of 100 milliseconds to start with and then start dialling it back down from there. |
| 25:07 | OK, so that's the principles behind it and a bit of a guide on what each of these parameters changes. |
| 25:14 | What we also need to know is what are we actually expecting to see? I'm gonna move into questions and answers really shortly so this is a good time to let you know if you do have any questions, please pop those into the chat now and Jordi will transfer those through to me. |
| 25:31 | So, again most tuners, particularly when they're getting started, are looking for this perfect flat lambda trace as we go through our transient conditions. |
| 25:43 | I've never really seen that pan out to give us the best possible results. |
| 25:50 | So, generally I'm more interested in how did the engine feel, how did it respond? Was it clean, was it crisp or was it doughy, did it bog or did it hesitate? That's my main feedback and then I'll look at the air fuel ratio trace. |
| 26:07 | Because generally what I find with a well tuned transient enrichment setup, irrespective of the ECU or how they're doing it, it's quite often that we'll actually see either a slight rich or slight lean blip on our lambda trace, before it actually reaches equilibrium and stabilises, and again as long as the engine's actually responding crisply and feels really good on that transient, I'm absolutely fine with that. |
| 26:35 | Another point, just coming back to our film pooling percentage, what we want to do with this really as well is try to calibrate this so we've got the smallest number, in other words we're introducing the least amount of additional transient fuel as we can whilst still getting good results. |
| 26:54 | So, you might find that there's a range of maybe 10 or even 20% that kind of still gets us a reasonably good result and you might not be able to pick the winner between the maximum and minimum of that range where you're still getting good transient control. |
| 27:10 | So, I always want to try and introduce as little fuel as possible, so try and tune to the lower side of that. |
| 27:17 | Now, hopefully this quick demonstration is going to work. |
| 27:20 | Let's just head across, what I'm going to do is just run this on the dyno under steady state conditions, we'll just get our fan going. |
| 27:29 | Hopefully we can get our fan going. |
| 27:32 | And what we'll do is we'll come to our laptop screen for a moment and we'll just make sure that we're running somewhere that makes a bit of sense. |
| 27:41 | So, we can see, hopefully, you can see the lambda trace sitting at the moment at lambda one. |
| 27:48 | So, we're only sitting at about 30 kPa. |
| 27:51 | Also on our tuning software we can see that our target lambda is one. |
| 27:56 | So, we're right on our target which is where we want to be. |
| 27:58 | Unfortunately, for this particular demonstration we don't yet have a built in wideband on board so that's why unfortunately I've got to show you in two different places. |
| 28:07 | So, what I'm going to do here is just bring myself back off the throttle to 40 kPa, we're still on lambda one, lambda 1.01, I'm pretty happy with that. |
| 28:19 | And what I'm going to do is just mash my foot to the floor, I want you to carefully watch that lambda trace and we'll just see what it does. |
| 28:28 | OK, so what we saw there was a momentary lean spike. |
| 28:32 | It's a little bit hard to pick up, we went from lambda one to 1.03. |
| 28:37 | So, this comes back to what I was mentioning, I'll just come back to our steady state conditions at 40 kPa and we'll try and do that again just to make sure that hopefully everyone did see it. |
| 28:47 | So, yeah sitting at lambda 1.01 right now, again I'll go to full throttle in 3, 2, 1, now. |
| 28:56 | That one actually didn't move at all. |
| 28:58 | But it's pretty much what I'd expect to see there. |
| 29:01 | No massive change either rich or lean, that first one gave a very small lean blip. |
| 29:07 | But most importantly there, and this is a little bit harder to see on video, that response was absolutely super crisp and super clean. |
| 29:16 | So, that's what I'm actually after there. |
| 29:19 | Let's just make a quick change to our film pooling percentage here and we'll see if we can really stuff this up. |
| 29:28 | So, let's take our 75 degree C and above and we'll make the percentage 50. |
| 29:35 | Again we'll go back to our fuel tuning. |
| 29:40 | And we'll come back to our same cell here. |
| 29:43 | Minus 40 kPa. |
| 29:45 | So this time we should end up with the lambda trace moving a little bit rich. |
| 29:50 | Hopefully it does, we'll just wait for everything to settle down here for some reason. |
| 29:56 | Now, we've just gone a little bit leaner than our target so I'll just add in a couple percent there so we're back on our target, lambda 1. |
| 30:01 | So, I'm going to go to wide open throttle in 3, 2, 1, now. |
| 30:05 | So, didn't actually really show the result that I was hoping for there, but that's not always going to be the case. |
| 30:15 | And again, this is what I've sort of also talking about there, trying to use the response of the engine and rely on that more than I'm going to be relying on the actual air fuel ratio. |
| 30:27 | I really use the air fuel ratio trace just to back up what I'm already feeling. |
| 30:32 | And more a case of if the engine is a little bit hesitant, did it go rich or did it go lean, because we can essentially get very similar results with too much or too little fuel when we are tuning our transient enrichment. |
| 30:46 | So, not the best demonstration unfortunately but hopefully that's enough to at least understand the principles behind transient enrichment and why we need it, and Haltech's newish predicted map and fuel film model and how to set it up. |
| 31:04 | So, if you haven't already used it, I highly recommend you give it a try, I've been certainly really impressed by it. |
| 31:10 | Alright, let's jump into the comments now and see if we do have any questions. |
| 31:14 | If you have got questions and you haven't put them in, please keep those coming. |
| 31:20 | Joel has asked: "I can't seem to find map prediction on the Haltech 1500, do you know if it's available on the 1500?". |
| 31:29 | I do not, so we're on an Elite 2500 for this particular vehicle. |
| 31:34 | But as I did mention, the firmware does have a big impact on this so make sure you are up to date. |
| 31:43 | I know that Haltech did strip out a little functionality on the 1500 just to give it hardware and software differentiation with the lower price point as well. |
| 31:51 | So, I can't tell you off the top of my head whether that's there but again make sure you're on the most recent firmware. |
| 32:00 | Tim has asked: "How does this interact with 1.fuel economy and 2. |
| 32:03 | decel fuel cut function?". |
| 32:05 | So, fuel economy, yeah OK well transient enrichment is going to have some impact on the fuel economy, potentially if you've got it set up excessively rich. |
| 32:18 | Obviously, every time you tip into the throttle, you're going to end up with additional fuel being delivered that you didn't want. |
| 32:25 | Actually, that comes back to another point as well, we do want to really make sure that the transient enrichment is only coming in when we actually want it to. |
| 32:35 | So, it's possible to set the sensitivity up to great, we're basically under steady conditions, obviously our throttle position is always moving around a little bit, can be quite a noisy signal, this can bring in transient enrichment that we don't want. |
| 32:49 | So, really important to make sure that that predicted map is only becoming active under actual transient conditions, so when we actually have increased our throttle position dramatically. |
| 33:00 | So, I should have mentioned that before. |
| 33:02 | So, this really also comes down to the fuel economy to make sure that we're using, we're at that leaner side or the lower side of our additional fueling while still getting good response. |
| 33:13 | But I would say that in the main instance there, fuel economy is going to be much more driven by making sure that our VE table is dialled in accurately and we're targeting lambda one in our cruise areas, that's going to have much more impact than a poorly set up transient enrichment. |
| 33:29 | D cell fuel cut, completely separate function. |
| 33:32 | So, transient enrichment and D cell enleanment, those are active on a change in throttle position, but you can still enable D cell fuel cut over and above that, two completely separate functions that can work hand in hand. |
| 33:48 | Typically if you look at how an OE does a D cell fuel cut, basically when we come completely off the throttle at high RPM, it will just disable injection completely, and then once we get down to maybe five or 600 RPM above idle speed, it'll bring that fueling back in so that we don't end up with the engine stalling. |
| 34:07 | Lot of personal preference there on whether or not you run that, but that's how the system works. |
| 34:12 | TheDude has asked: "Do I prefer tuning with drive by cable or drive by wire?". |
| 34:18 | I can't actually remember the last car, other than this one, that I tuned on cable throttle these days. |
| 34:25 | We pretty much convert everything to drive by wire. |
| 34:28 | There's a lot of arguments against drive by wire in terms of it's lag, it doesn't give the right feel. |
| 34:35 | And there was some truth to that with early drive by wire throttle systems. |
| 34:39 | The reality is most of that was in the factory calibrations as opposed to the actual technology. |
| 34:46 | It can be every bit as fast as a cable throttle and honestly you wouldn't tell the difference with a modern drive by wire system that's well set up. |
| 34:57 | The reason I prefer tuning in this way is that it gives so much more flexibility over the relationship between driver's pedal position and the actual throttle position. |
| 35:05 | You can do some stuff that's just very difficult, if not completely impossible to do, with a cable throttle. |
| 35:12 | A little off topic but just case in point on that, many years ago I was the parity manager for a local race series here in New Zealand. |
| 35:20 | There were three different engine types in a control chassis. |
| 35:23 | My job was to make sure that all of those engines produced exactly the same power and torque curves. |
| 35:29 | And this was a 6.2 litre LS3, a 5 litre Ford Coyote V8 and also a TRD built Grand Am 5 litre based 3UZ-FE. |
| 35:41 | So three completely different engines with different power curves and we achieved that by dynoing all of them, and then using a three dimensional throttle map so that we could basically remove torque by closing the throttle body in the areas where one engine was making more power than the other. |
| 35:58 | We got those all matched within 1% of each other, which was the aim for that series. |
| 36:03 | So, yeah really powerful system. |
| 36:06 | Right that brings us to the end of our questions, as usual if you're watching this at a later point in our archive, if you've got any further questions, please ask those in the forum and I'll be happy to answer them there. |
| 36:16 | Thanks for joining us and we'll see you all again next week. |
0:00 - Introduction
0:57 - What is transient fuelling/acceleration enrichment?
2:32 - Why more fuel under sharp throttle?
4:40 - What happens in the engine
08:21 - Backing of the throttle
09:14 - Traditional methods
10:59 - Avoiding lean condition
13:17 - Correct VE table
14:35 - Main fuel tuning parameters & predicted map learning
18:29 - TPS scaling
21:29 - Film evaporation time constant
24:12 - Reassessing parameters
27:17 - Dyno demonstration
30:15 - Summary
31:10 - Q&A