356 | Optimising Tyre Pressure and Camber
Summary
The tyre forms the critical connection between the car and the race track, so we want to ensure that we’re making the best use of the tyre tread. In this webinar we’ll look at tuning tools that you can use to help optimise your camber and your tyre pressures on track via data logging, or in the pits using simple handheld tools.
| 00:00 | Hey team, Andre from High Performance Academy, welcome to another one of our webinars. |
| 00:03 | And in this webinar we're going to be looking at our tyres and basically finding out what we can learn from the tyres that's going to help us optimise both our tyre pressure as well as our camber. |
| 00:16 | And these are two really really key parameters when it comes to car setup. |
| 00:21 | One of them's very very quick and free to change as well which of course is our tyre pressure, very very easy to change our tyre pressure from one session to another when we're out on the racetrack. |
| 00:31 | Why are we trying to optimise our tyre pressure and our camber? Well it's all about optimising this, the tyre contact patch. |
| 00:40 | Or in other words, how much of this contact patch is actually making contact with the racetrack. |
| 00:46 | Obviously, no matter how much power our car has or how much money we've spent on it, it still comes down to our four tyres to define essentially how much grip we're going to have and this is of course then going to influence how fast we can go around corners, how hard we can brake and how quickly we can accelerate in a straight line. |
| 01:05 | So, what we really want to do when we're on the track is make sure that as much of our tyre is contacting the track as possible, so that we're getting as much grip possible as we can out of the tyre. |
| 01:17 | Now, this is a deceptively tricky concept though because everything's changing as we go around the track. |
| 01:24 | As we turn the corner and the car rolls onto the tyre on the outside of the car, that's going to compress our suspension and we've got our camber curve of the suspension, the kinematics of the suspension will define how the tyre actually moves around as well. |
| 01:41 | So, there's a lot of things going on there but what we want to do is try and sort of bring this back in and make it a little simpler. |
| 01:47 | And once we've got our car out on the track, we can monitor what's happening with our tyre tread temperature across the width of the tyre and that's going to give us a lot of insight into how that tyre is actually working out on the racetrack and then just as importantly, what changes we may want to make to our camber or to our tyre pressure in order to actually optimise that tyre contact patch and get more grip from the tyre. |
| 02:14 | And at an entry level at least if we're using a tyre pyrometer, this is a relatively quick and cheap thing to be checking. |
| 02:23 | So, let's just talk for a start about what the camber is for those who maybe haven't heard that term, I'd like to think everyone tuning in probably already knows. |
| 02:33 | But if we look at our tyre, let's bring it just up onto the bench here. |
| 02:36 | We have our tyre at the moment absolutely vertical or perpendicular to the bench so let's call the bench our racetrack. |
| 02:44 | Now this on face value might seem like an ideal situation, we've got our tread nice and flat on the track. |
| 02:51 | The reality though is if we now go into a left hand corner, what's going to happen is if the tyre starts statically completely straight up and down or vertical which we'd call zero camber, as we turn the corner and the car rolls, what's going to happen is the tyre, I'm going to exaggerate this of course, the tyre is going to roll onto the outside edge, remembering we're turning this way. |
| 03:12 | So, now the whole inside edge of the tyre and the centre of the tyre is no longer on the track and we're only really running on a very narrow strip on the edge of the tyre. |
| 03:20 | So, understandably if we're not using 2 thirds of the width of the tyre, we're not getting the traction or grip out of that tyre that we possibly could. |
| 03:29 | So, instead what we do, and again I'm going to exaggerate this, is we run what's called negative camber which is where the inside edge or the top of the tyre I should say, is closer to the centre of the car than the bottom. |
| 03:43 | So, now what happens under the same situation is when we go into our left hand corner and the car rolls, now instead of rolling onto the outside edge, the tyre is going to end up relatively straight up and down while we're under maximum cornering force and that of course gives us the full width of the tread contacting the track. |
| 04:03 | So, that's kind of the aim with our camber setting. |
| 04:07 | This is a bit of a balancing act though, because in order to get that to occur, again it depends on the car, the tyre, the suspension design and kinematics, in order to get the tyre contact patch nice and flat on the ground under maximum cornering effort, we're reducing the tyre contact patch in a straight line. |
| 04:28 | So, this can have some negative effects under heavy braking or acceleration. |
| 04:34 | However, generally what we find is that it's less sensitive to camber in a straight line than it is in the corners and essentially what this means is there's more to be gained by optimising our tyre contact patch in the corner than there is to be lost by having that negative camber in a straight line. |
| 04:53 | But of course the million dollar question then is how much negative camber should we be running? And there is no black and white number here, it's going to depend on your car, tyre and suspension like I just mentioned, but really it's a case of finding out what your particular tyre and car actually needs in terms of camber. |
| 05:13 | This is also going to be a constantly moving target based on the conditions of the track. |
| 05:18 | So, for example if we're driving on a wet track, understandably there's going to be less grip laterally when we're going around a corner and what this means is that we're not going to end up with as much load transfer under cornering so the car won't compress as much, it won't body roll as much so therefore in wet conditions we won't need as much negative camber as we do in the dry. |
| 05:42 | And this is why race teams have wet and dry setups, so these are the sort of things that they will be changing if they know that a session is going to be wet. |
| 05:52 | Alright, so how do we go about measuring, actually before we get into that, well let's also talk about our tyre pressure. |
| 06:00 | So, we've talked about camber and that's trying to get the tread nice and flat on the ground under hard cornering but we also have our tyre pressure to consider. |
| 06:08 | And our tyre pressure of course is another constantly moving target, because as we roll out of the pits with cold tyres, low tyre pressure and we go around the track, we start generating heat in the tyre which also heats the air up inside the tyre and therefore what we see is our tyre pressures will climb as we do more and more laps. |
| 06:30 | Hopefully at some point they reach an equilibrium, but basically what we're going to do with our tyre pressures is set them cold in the pits so that after two or three laps when everything gets warm, the tyre pressures come up to our optimal hot running temp pressure. |
| 06:46 | How do we know what that is? Well again, this is where we're going to be looking at some data from the tyres to help figure that out. |
| 06:53 | But essentially you can think of the tyre a bit like a balloon and if we massively over inflate the tyre, so we put too much tyre pressure in it, what we're going to end up with is essentially it's going to be bulging in the centre and therefore we're going to be running more on the centre of the tread and less on the outside edges so again we're not optimising the contact patch between the tyre and the racetrack. |
| 07:15 | Flip side of that is if we have under inflated our tyre, we're going to end up with the tyre essentially contacting on the inside and outside edge and not so much through the middle. |
| 07:29 | So, again with our camber, we're trying to choose a tyre pressure where we've got basically a nice flat tread patch and again that's going to be optimising our contact and our grip. |
| 07:40 | So, now we know the two parameters, we're trying to optimise and a bit of an understanding of how they work, what we're trying to achieve, how do we actually go about measuring that? Well, there's two ways of doing so. |
| 07:53 | The first, let's just switch to our overhead camera here, is with a tyre pyrometer. |
| 07:59 | So, this is the actual tyre pyrometer, this is an Alfano Tyre Control PT. |
| 08:05 | So, this will do pressure as well as temperature and if you've ever been to a race meeting, you'll see engineers racing around the pits with these just about all day long. |
| 08:14 | So, the idea with this pyrometer is it's got a very sharp edge, I'll just get this up here where we can see it, basically like a little needle and we can use this to actually probe through the tread of the tyre and it will give us a reading of the tyre temperature. |
| 08:33 | And this particular unit, while it's quite nice and handy, I'll just try and get the screen so it's not all reflective. |
| 08:39 | What we can do with this is very quickly during a pit stop, we can grab the data without having to actually look at it. |
| 08:48 | So, basically the engineer will go around the car in a certain direction starting at a specific corner of the car and they'll take pressure readings from the tyre and then they'll also monitor the tyre tread temperature. |
| 09:02 | And what we're trying to do with that is we're monitoring in three places. |
| 09:04 | Let's say that this is the inside of the tyre and this is the outside so this is closest to the centreline of the car. |
| 09:11 | What we want to do is check the tyre tread temperature at three places. |
| 09:16 | So, we want to take it at the inside edge, the centre and then the outside edge. |
| 09:21 | It's important with these tyre pyrometers though how we actually use them because we're not really going to be too interested in the specific tread temperature when the car comes back to the pits. |
| 09:34 | And I'll talk a little bit more about that in a moment, that tread temperature will vary quite quickly. |
| 09:40 | However, what we can do with this is actually insert it under the surface and no it's not going to pop your tyre, it's pretty safe. |
| 09:47 | But by doing this, we're actually measuring inside that tread and at that position where I'm actually measuring it now, it's going to take a lot longer for the temperatures to change and reach equilibrium. |
| 09:59 | So, basically taking the tyre temperature through underneath the tread in those three different places. |
| 10:07 | So, the advantage of the Alfano Tyre Control PT, and obviously this is only one product in that market, is that we don't need to look at the numbers and think of the numbers and try and understand what it means while we're actually taking those readings. |
| 10:24 | And there is a bit of speed is of the essence here because everything is going to be cooling down quite quickly while the car's sitting stationary in the pits and we want to get this data as quickly as we can. |
| 10:37 | So, this unit just allows us to, or the engineer to race around the car and very quickly gather all of that relevant information, the tyre temperatures at those three places on each corner of the car, as well as the tyre pressure. |
| 10:50 | And then the car can be sent back out onto the track and we can sit down with a little bit less stress and actually figure out what the tyre temperatures were doing and what that tells us. |
| 11:04 | Before I get into what we're sort of looking for, it's really important with a unit like this to understand how the car has to be driven in order to get useful data. |
| 11:16 | So, what I mean by this is unless we're in a race and we're coming in for a pit stop, obviously under those conditions, speed again is of the essence, but normally in a practice session we would purposely, when we know we're coming into the pits, we would do a cool down lap at a lower speed to allow things like our brakes to cool down and basically take all of the stress off everything. |
| 11:37 | So, that when we come into the pits and come to a stop, we're not going to end up with damage to our braking system. |
| 11:44 | The problem with this though is the cool down lap also allows the tread temperature to equalise and reach an equilibrium, so we're not really going to get any useful data at all if we do a cool down lap and then come into the pits. |
| 11:58 | It's really important when we're gathering this data that the car is driven as hard as it possibly can right up to the entry of pit lane and then the driver will come up to wherever their crew is and straight away the crew will go around and gather that data immediately. |
| 12:15 | So, we're getting it as quickly as we can before those temperatures start to equalise. |
| 12:20 | Even here there's some problems with this, because if there's a very long straight leading up to our pit entry, then we're already allowing quite a lot of time for those temperatures to equalise so it is a little bit limiting what we are going to learn, but however as far as the technologies available to us go, this is the most affordable and it still is a very very useful technique. |
| 12:46 | So, in saying this, what we need to understand is what we're actually looking for on the tyre tread. |
| 12:53 | And you'd think probably that we'd be looking for the temperature to be even at all three points. |
| 12:59 | But we're actually not. |
| 13:01 | The reason for this is that while yes, and we'll talk about this more with the other technology of measuring tyre temperatures, while the car is heavily loaded through the corner and mid corner and corner exit, yes we ideally would like those three points across the tyre to be very close to each other in terms of temperature, that's not very realistic because we're still measuring the temperature once we're back in the pits. |
| 13:23 | And even if the car is being driven very hard on that in lap like I mentioned before, going down a straight or even as we roll into the pits, because we've got that negative camber, we're still going to end up with a situation where the inside edge of the tyre is hotter, the middle a little bit less so and the outer often won't actually even be touching the track at all in a straight line with the amount of negative camber you run, that's going to be less again. |
| 13:49 | So, what I generally tend to aim for here is not getting an even measurement across the three points, I'll actually look for a temperature gradient where the inside is hottest, the outside is coolest and the centre of the tread is exactly in between. |
| 14:05 | And that temperature gradient, I'm looking for somewhere around about 10 to 15°C. |
| 14:11 | Now, that is still only a starting point, because there are so many variables here. |
| 14:18 | But if we can get somewhere in that ballpark of 10 to 15°C, first of all if our centre temperature is exactly midway between our inside and our outside edge, this is what we're looking for that's going to give us a good indication that our tyre pressure is where it needs to be. |
| 14:35 | If our centre temperature is lower than the inside and the outside, that means we're under inflated and we need to add pressure. |
| 14:43 | On the other hand if our centre temperature is higher than our inside or our outside, or even if it's the same as our inside and then we get a drop away to our outside edge, this would suggest that we're over inflated. |
| 14:55 | So, we can actually get quite a lot of data here. |
| 14:58 | That centre point and its relation between the inside and outside, that will tell us about our pressure and then trying to get that even gradient from inside to outside, that's what we're looking for when we're choosing our camber. |
| 15:11 | So, once we've sort of got in that ballpark of 10 to 15°C, at that point we know that our pressure is correct, but also it's definitely worthwhile trying by adding maybe another half a degree of negative camber, check what our tyre temperatures end up doing, use the lap time to help us evaluate, was that faster or slower? And if it's slower, let's go the other way. |
| 15:36 | So, I still will actually test and measure by changing our camber in that way even once we've got into that ballpark, so that that way we're using the tyre pyrometer just as a guide and we're still going to do what I call bracketing with our camber in order to see what does the stopwatch actually tell us, what does the lap time tell us because ultimately that's the most important thing, not what a tyre pyrometer gives us. |
| 16:02 | Ok, so, that's our first technology there and as I've mentioned, the cheapest, most affordable basically for most home enthusiasts or track day enthusiasts. |
| 16:11 | However, there is another option which we'll look at in a moment. |
| 16:15 | Before I do this, this is a reasonably short webinar so I'm just going to go over this other technology, infrared tyre temperature measurement and then we'll move into questions and answers so if you've got any questions, please ask those now. |
| 16:28 | Before we actually move into infrared, I will just mention as well, I've seen a lot of people at track days where instead of using a tyre pyrometer like I've just shown you, they use one of the little laser infrared thermometers that you sort of point, pull a trigger and it'll give you a temperature reading. |
| 16:46 | Those are absolutely not useful for measuring our tyre temperature in the pits because it does kind of exactly the opposite of what I was talking about before, it is measuring the temperature on the tread. |
| 16:57 | We understand of course now that that temperature on the tread is going to change very quickly when we're sitting in the pits. |
| 17:04 | So, it's not giving us a good indication of what's actually going on under the surface, which is what we absolutely need to know. |
| 17:12 | So, yeah infrared tyre temperature gun, absolutely useless for our purposes of measuring the tyre temperature. |
| 17:19 | However, the same technology can be used, but it is used while the car is out on the track. |
| 17:25 | So, let's go to our overhead again. |
| 17:28 | This is a infrared tyre temperature sensor from Izze-Racing. |
| 17:34 | Simple enough looking little device and what it does is it actually will measure the tyre tread temperature at up to 16 points across the tyre. |
| 17:44 | So, basically it has a little sort of fan of laser comes out of here and contacts the tyre patch and allows us to measure without actually needing to touch the tyre tread. |
| 17:56 | Let's just jump across to my laptop screen for a moment. |
| 18:00 | And this is Izze-Racing's website, I'm not being sponsored, we actually purchased these from Caleb at Izze Racing, just so happens that I think they are a great product. |
| 18:10 | So, you can sort of see how this actually works. |
| 18:13 | The sensor is fitted a distance away from the tyre and it basically puts a laser array across the tyre. |
| 18:21 | These are available in 60 or 120 degree field of view. |
| 18:25 | And that's quite important, because you kind of need to have an understanding of how far away from the tyre you're actually able to mount this sensor in order to be able to measure the full width of the tyre. |
| 18:37 | Also, if we look at the data sheet here, this sort of gives you an understanding of the 60 degree field of view. |
| 18:43 | Basically, from how far, the standoff distance, the distance from the sensor to the tyre and then it'll show you if you've got the 16 channel, 8 channel or 4 channel option, where abouts those individual channels are actually going to be on the tyre tread. |
| 19:02 | We've got the 16 channel version and I actually instantly regretted it. |
| 19:06 | It's one of those situations where sometimes less is just better, or more as I like to say, and you can end up getting a little bit overwhelmed with too much data. |
| 19:17 | So, fortunately these are actually programmable so you can actually drop down the number of channels and we're actually only viewing three of them. |
| 19:24 | So, we're not replicating the way the Alfano Tyre Contact PT would be used. |
| 19:30 | Now, another thing with these particular sensors is they are available from a range of different manufacturers and they can work in different ways. |
| 19:41 | This one is CAN based, which is really nice and easy because we only have four wires to connect this to the CAN bus so it needs power, earth, ground, sorry power and earth, CAN high and CAN low. |
| 19:55 | And Izzy Racing also make a template for MoTeC dataloggers, which we use so it's very very easy to set this up and get it operating. |
| 20:03 | Alternatively, and we used to use an analogue voltage based infrared tyre temperature array on our 350z. |
| 20:12 | So, these are a little bit more complex, because now each of the points you want to look at on the tyre needs a separate sensor so we actually had three individual sensors looking at the tyre tread. |
| 20:25 | And each of those needs a regulated 5 volt, a sensor ground and then an analogue voltage output comes out of that to your datalogger. |
| 20:33 | This is more complicated with the wiring, it's more expensive, because now instead of one sensor we've got three. |
| 20:41 | And the other issue with this is that particularly with 12 points of data on all four corners of the car, we've got three points on each corner so 12 in total, we now need 12 spare analogue voltage inputs and it's pretty easy to use up all of your available analogue voltage inputs with other sensors so you're going to need quite a powerful or advanced logging system if you want to bring all of these in as an analogue voltage. |
| 21:08 | These days I really don't see why you would not go with a CAN based system though, it's much simpler and again compared to the system we ran on our 350z where we had 12 individual sensors, this actually ends up significantly cheaper. |
| 21:24 | Alright, so that's the sensors themselves and we've got a bit of an understanding now of how we need to mount them a distance away from the tyre so that we do actually get to view the entire tread width. |
| 21:37 | There's still a few complexities with this and particularly the front axle line is problematic because of course as we go through a corner, we actually turn the steering wheel. |
| 21:50 | And there's a couple of ways of dealing with this. |
| 21:52 | Jump across to my laptop screen, so this is just a solution that I found online which is a pretty easy way of getting this data irrespective of our steering angle. |
| 22:05 | So, basically you can see that there's this steel tubular structure that's been made once off the steering arm or at least the knuckle and that means that the sensors move in line with the wheel and you can see, this is kind of the first system, this one's hidden unfortunately, this is kind of like the first system I was talking about on our 350z where there are three or there might actually be a fourth one there, individual sensors which are looking at one particular spot on the tyre. |
| 22:34 | So, that's one solution. |
| 22:36 | It's definitely a little bit complex and particularly on a production car which isn't tube framed like this section here, you can also find it very difficult to physically have the room to do something like this. |
| 22:48 | Where this also sort of becomes problematic with the Izzy-Racing sensors is that the standoff distance would make this solution pretty much impossible. |
| 22:58 | We'd have to have it so far away from the tyre to get across the entire width that it'd be quite a large contraption that we've got turning with the wheel and that it'd almost inevitably be fouling on bodywork or the inner chassis. |
| 23:12 | So, the solution that I chose to use with our car is basically from data on the race track, we kind of could average what the steering angle was going to be in a right hand turn. |
| 23:26 | Obviously, it's going to depend on how tight the corner is, that's why I say average, it's not going to be perfect but we could do that and then while we were mounting these sensors, basically turn the wheel so that the wheel replicated that angle and then make sure that under those conditions we were in fact square to the tyre and at the right standoff distance. |
| 23:46 | And obviously that had to be done to the left and to the right. |
| 23:49 | So, yeah it's not perfect but it's a reasonable solution to that. |
| 23:54 | So, then you of course need a suitable data logger to actually bring these into. |
| 24:00 | As I already mentioned, I'm using a MoTeC C125 dash logger there and Izzy-Racing provide the template to make this really easy but it is a CAN product, Izzy-Racing do also provide the CAN protocol, you can look at how the data is structured and make your own template for products that Izzy Racing maybe don't support. |
| 24:20 | So, it's basically a universal product, you don't have to be using MoTeC data loggers to do this. |
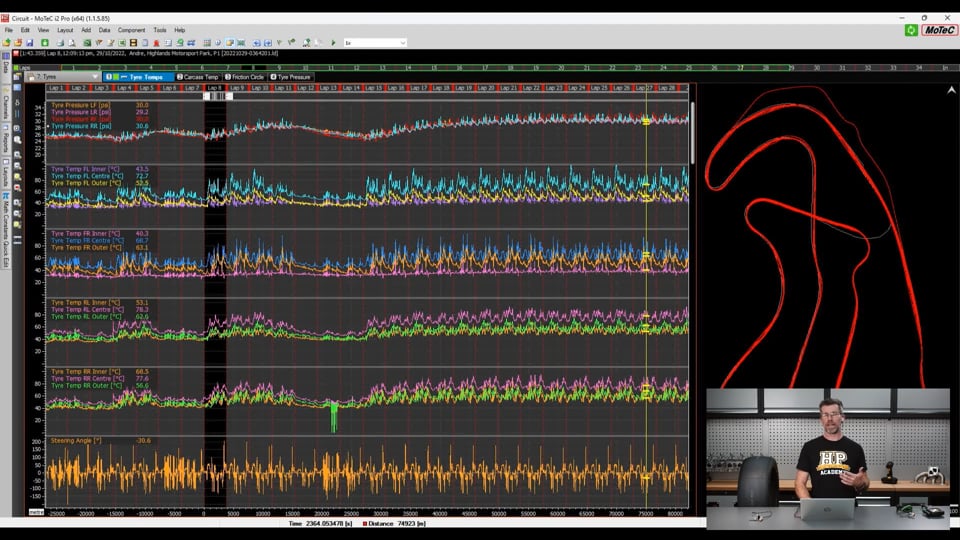
| 24:27 | What does the data actually look like? Well, let's jump into some data I've got here from i2 Pro. |
| 24:35 | And this one's actually not very optimised, which is actually great for our purposes. |
| 24:41 | So, what we've got here is a tyres workbook, which includes a whole bunch of worksheets pre laid out here, I've made some modifications to them to give us the information that we need. |
| 24:53 | So, up the top here we've got our tyre pressures. |
| 24:57 | So, I'm using a Izzy-Racing internal tyre pressure and temperature sensor as well. |
| 25:04 | So, that actually mounts to the rim and it has another array that measures the carcass temperature internally. |
| 25:11 | We'll talk about that data in a moment, but that's how I'm getting this tyre pressure data in real time. |
| 25:17 | Actually, if I just zoom out a bit, you can sort of see how much over the course of a race distance that tyre pressure does vary. |
| 25:25 | So, at this point here we're down at 24 psi, it spikes up here to about 28, almost 30. |
| 25:34 | And then towards the end of the race where the tyres are really starting to get pretty slippery, we're in the low 30s. |
| 25:41 | So, this is what you can expect your tyres to be doing. |
| 25:45 | And what we're really trying to do as well is optimise the starting pressure, so that once they reach this sort of equilibrium which you can see towards the end of, this is a one hour race, we've got sort of the tyres in their optimal window. |
| 25:59 | Which in this case they absolutely are not, they're a little bit over pressured under these conditions. |
| 26:06 | Quite often you'll find that race classes dictate a minimum cold pressure that teams can allow the car to leave the pits with, because if the tyre pressure's set too low, so that the hot running pressure doesn't end up higher than it should be, it can actually be quite dangerous for the first few laps while the tyre actually starts to build pressure and it's also quite easy to puncture the tyre under those conditions if you run a kerb. |
| 26:32 | So, a little care is required here and as with just about everything when it comes to motorsport, compromise unfortunately sort of ends up being the name of the game. |
| 26:40 | But let's just go to one lap of data here, I'll try and get something that's not quite at the start of the lap. |
| 26:46 | So, we've got our tyre pressures, then following that we've got four lots of data which is our tyre temperature on the tread. |
| 26:54 | So, we've got our inner, our centre and our outer. |
| 26:57 | So, that's for our front left, our front right, our rear left and our rear right. |
| 27:02 | And I've also got our steering angle down the bottom, but we've got our track map over here so we can sort of have an idea of whereabouts we are. |
| 27:10 | So, looking at this, we can see, actually let's go a little bit later in this race. |
| 27:15 | Looking at this here, the direction of travel is this way, it is a clockwise circuit and we're now at the exit of a corner called the Southern Loop, which is a very long, medium to high speed turn, we're probably coming through here at maybe about 130, 140 kmh, somewhere around about there. |
| 27:37 | So, yeah medium speed but the car, what is important here is the car is loaded up for a long period of time. |
| 27:43 | So, under these conditions we want to make sure that we understand that we can only really make any sense of the data on the left hand side of the car. |
| 27:52 | The right hand side of the car, that's not really where our grip is predominantly coming from and the camber etc that we run is going to definitely mean that our tyre temperatures are not going to be optimal on that side of the car. |
| 28:05 | So, we're optimising, we're looking to optimise the data for the left hand side of the car. |
| 28:09 | So, in that case the data that we want here is our front left and our rear left. |
| 28:14 | So, what we can see, in both situations, let's have a look at our front left for a start. |
| 28:20 | We can see that our inner temperature's sitting at 51°, our outer temperature at 62° and our centre temperature at a whopping 91°. |
| 28:31 | So, things that we can take away from this, really it's no different to what we're trying to achieve with the tyre pyrometer, only this time we're actually seeing live data of what the tyre is doing while it's on track. |
| 28:44 | So, we're not waiting for half a lap to get back to the pits. |
| 28:47 | In both situations we are really trying to equalise these temperatures. |
| 28:52 | And we can see that the inner and outer, they're not too bad, we've got about an 11° split across them and because the outer is hotter than the inner, what that suggests is that we need more negative camber. |
| 29:08 | Basically, the tyre is still rolling over too much onto the outside edge of the tyre. |
| 29:13 | But more importantly, when we've got such a massive gain in the centre temperature, at this case 91°, so we're 30 odd degrees higher in the centre, this would suggest that we could benefit from reducing the tyre pressure probably quite substantially at this point. |
| 29:29 | Now, let's have a look at our rear left. |
| 29:32 | Under these conditions, oops I've just managed to go over the top of the data. |
| 29:36 | Under these conditions the rear left is looking actually pretty good in terms of the inner and outer temperatures. |
| 29:45 | So, if I just move around, it's a bit of a moving target, but I mean at that point there, 59.8 on the inner, 58.8 on the outer so pretty good there but again our centre temperature is massively elevated there at 86° which would again suggest that we would benefit from reducing the tyre pressure there. |
| 30:05 | It looks at a glance there like our camber in the rear is probably pretty good. |
| 30:10 | We could definitely do with a little bit more camber in the front, but both are over pressured so that's how we can use that data. |
| 30:18 | Now I've also, as I mentioned, got the internal tyre temperature and pressure sensors so we've got another worksheet here called carcass temperature. |
| 30:26 | And we can sort of have a look at that data as well. |
| 30:29 | Now, this is a little bit harder to sort of analyse I guess compared to the external tyre temperatures. |
| 30:38 | It's much much slower to change so it's less influenced by what's actually happening whether we're corner entry, mid corner or corner exit, but it does still give you some worthwhile data about what's actually going on here. |
| 30:52 | If you can only choose one, I'd definitely be choosing the external tyre temperature though you're going to get much more realistic data from this but if we come back to that data, we can sort of see that it is quite noisy data depending where abouts we are on the track. |
| 31:07 | So, I'm always trying to look for the data sort of towards the end of the corner where we've actually allowed the tyre tread temperature enough time to equalise. |
| 31:16 | Obviously, if we look at this data, the instant that we've turned into a corner, then the outside edge of the tyre is still going to take some time to come up to temperature, so we always really want to be looking at that data towards corner exit where everything's sort of reached our equilibrium. |
| 31:32 | Right, we will jump into our questions at the moment, so again if you've got any more questions, please keep those coming. |
| 31:40 | Mealing Racing's asked, "I run tyre warmers, will this affect the data or should it come into its own after a few laps? Obviously I don't set cold temperatures with my blankets however.". |
| 31:59 | No, it really makes no difference, we run tyre warmers as well and yeah I think you've already picked up the most important thing is you don't set cold temperatures as the tyres come out of the blankets. |
| 32:10 | So, it's another layer of complexity, it's about sort of learning what your cold pressures should be versus your ideal hot running pressure out on the track and we'll basically take that measurement once the car comes back in from a session, everything has been allowed to cool down and we are taking true cold pressures. |
| 32:31 | And then I'll set those before the tyres go into the blankets. |
| 32:35 | However, if the blankets are doing their job as they should, they should come out pretty much at our desired hot running pressures. |
| 32:45 | So, what this will mean is that for the first couple of laps, your tyres are already going to be at a higher tread temperature than if you didn't have tyre blankets, obviously that's the whole benefit and point of them. |
| 33:00 | But you're still going to be waiting for the tyres to reach their normal operating pressure and temperature before you're starting to look at that data anyway. |
| 33:08 | You're not really going to get a lot of useful data if you're starting to look at the tyre tread temperature on your out lap for example. |
| 33:17 | It's obviously got to allow the tyres enough time to actually be worked and brought up to their normal temperature before we see what's actually happening on the track. |
| 33:26 | Timothy's asked,"If you wanted to increase tyre temp overall on the tyre, what's the most effective way? Softer springs?". That's an interesting question actually. |
| 33:37 | So, a lot of this is going to come down to the tread or the tyre manufacturers, whether they're a medium, a hard or a soft. |
| 33:48 | So, if you're running a hard tyre, moving to a medium or alternatively to a soft, that's going to allow the tread to work harder and that will bring up the tyre temperature and vice versa of course. |
| 34:00 | By softening your springs or softening your roll bars, that will also have the same effect to a degree but less pronounced than changing the actual type of tyre that you're running. |
| 34:15 | Another question from Mealing Racing, "Assuming the laser reading temp on track works for live data[...]", yeah exactly, you nailed it there, I think I probably explained it while it was going through, but yeah we're actually looking at the data at the corner exit, getting live data before the tyre temperature is actually allowed to come back down to colder running temperatures. |
| 34:34 | Vertigo has asked, "Any suggestions for using tyre chalk to check rollover on the edge of the tyre, is there a suggestion for how much rollover you should be targeting to optimise the tyre pressure and sidewall?". |
| 34:45 | Now, this is probably getting a little bit beyond the scope of our specific topic. |
| 34:51 | And as I mentioned, this is a very complicated topic, because a lot of this is going to come down to the tread compound like I just mentioned, the width of the tyre versus the width of the rim. |
| 35:03 | But basically, how well the tyre is matched to the rim. |
| 35:07 | And that's going to also come down to your tyre pressures and how much the tyre is going to roll around. |
| 35:14 | So, basically I'd like to see right out to the edge of the tyre being worn. |
| 35:19 | If it's a fresh tyre then you're going to be able to see this pretty quickly when the car comes back into the pits. |
| 35:25 | I've never bothered using chalk myself, but yeah I guess there's no harm in doing that and you'll be able to see where that chalk mark is worn away and that's obviously also going to indicate how much of the tread you're using. |
| 35:39 | But yeah when you start sort of rolling around and you're actually starting to go into the sidewall, that's generally, you've gone a little bit too far there. |
| 35:49 | Billy has asked, "Do you look at derivative of temp time to approximate load? I assume it can be approximated for camber thrust as well.". |
| 35:58 | That is a great point, but I absolutely do not. |
| 36:01 | That's again probably getting a little bit beyond the scope of our webinar topic today. |
| 36:08 | I would probably need to put some thought into how we'd actually incorporate that and how much use it could be, but I think on face value, you're probably onto something there, there's probably no reason why we couldn't do something along that line with some math channels in and gain some other data. |
| 36:24 | I would also caution here that, it comes back to what I was saying before, often when it comes to data, less is more. |
| 36:32 | You can get a huge amount of progress with just a very simple set of data. |
| 36:39 | And unless you are sort of at the professional level of engineering, you've been doing this for a while, confusing yourself with more and more data can actually make your job more difficult, so I would definitely try and keep it simple. |
| 36:53 | Alright, that's all the questions we've got so we'll leave it there and as usual, our HPA members can review this in the archive and if you've got any further questions, please ask those in the forum and I'll be happy to answer them there. |
| 37:05 | Thanks for joining us and we'll see you all next time. |


