372 | Engine Protection Strategies - Haltech Elite/NSP
Summary
Monitoring all of your engine parameters while driving your car can be difficult or impossible to do. Fortunately you don’t need to! In this webinar we’ll take a look at some of the basic and more advanced safety features you should be taking advantage of with your Haltech ECU.
| 00:00 | Hey team, Andre from High Performance Academy here, welcome to another one of our webinars. |
| 00:03 | This time we're going to be having a look at the engine protection strategies available on the Haltech NSP software. |
| 00:11 | And these engine protection strategies are something that I know a lot of tuners and enthusiasts tuning their own cars don't tend to bother setting up, even when they've got the sensors in place to allow them to do this and it really doesn't take much effort. |
| 00:25 | The advantage of doing this is you've got an ECU that is always there constantly monitoring all of the inputs, all of the sensor inputs and comparing them to your engine protection strategy limits. |
| 00:38 | And essentially if anything goes outside of those bounds it can instantly bring in some control strategies to help safeguard and protect your engine. |
| 00:45 | And this is almost impossible for you to do as a driver when you're out on the road or the racetrack driving your car hard and oil pressure for example, it's something that's impossible for you to monitor while you're going around a corner accurately and get off the throttle or clutch in if you see that oil pressure drop, but the ECU can protect your engine by essentially doing all of the above. |
| 01:07 | Maybe not putting the clutch in, but you'll see how that works as we get into it. |
| 01:10 | As usual we will have questions and answers at the end of the lesson. |
| 01:14 | This is going to be a relatively brief one, so if you've got any questions, please bring them into the chat as quickly as you can so I don't miss them. |
| 01:21 | Ok, I will mention we are doing this offline, we are sitting here in our Mitsubishi Evo 9 and I will be looking at the calibration for our Evo 9, but it's pretty difficult for me to demonstrate most of these functions when I'm sitting here in the car stationary anyway, so it's not going to be a live demonstration. |
| 01:40 | Let's jump into our NSP software anyway and what we're going to do for a start is just have a look at some of the very basics. |
| 01:48 | And if we come down to our engine functions, we will find that we do have here engine protection. |
| 01:56 | So, what we'll do is we'll expand that and we'll click on it. |
| 01:58 | And this is I think relatively unique to Haltech, it's not that they've just brought this in, but I don't see other standalone ECUs doing this sort of levels of engine protection, but it is a nice way of giving you a lot of control over what exactly is going to be done if something goes out of bounds. |
| 02:20 | So, basically we've got three levels of protection and you can enable or disable these as you see fit and it's pretty self explanatory here if I don't draw right through what I'm trying to read out. |
| 02:31 | So, we've got severity level one, least severe and obviously if we come down to the bottom we've got severity level three is the most severe. |
| 02:38 | So, easy enough to enable or disable using our little radio button here and basically we've got the ability in this case to first of all enrich our lambda, so obviously a bit of a safety protocol here. |
| 02:52 | If something's maybe not quite right, we may choose to target a richer air fuel ratio, adding a little bit of fuel to safe up our calibration. |
| 03:00 | Likewise, we can also remove some boost and of course the other lever we've got to pull there is to retard the ignition timing. |
| 03:09 | So, essentially basically just making the tune a little bit more safe and bringing the engine a little bit further away from the edge. |
| 03:15 | Then we've also got the ability to have a rev limiter come in and we can choose how we're going to do that, we can choose the type of limiter that we're going to use, I'm going to change that to fuel and also the RPM limit that we want to bring in. |
| 03:30 | So, again for our first level, not that severe, maybe even 4000 RPM might be a little bit sort of too low, maybe we want to bring that into 5 or 5500 RPM, but essentially you can control this as you see fit, there's no real right or wrong here. |
| 03:49 | But it is important when we go through setting up the functions as we'll get into, to just understand , which of these severity levels we are choosing and then understanding what goes along with that. |
| 04:01 | So, let's just jump to our severity level three, which as we've already said is our most severe. |
| 04:07 | So, this is one that I'm going to utilise during this demonstration and we're not really going to be worrying so much here about our safing up the tune so to speak. |
| 04:17 | Even though we're richening our target lambda by one air fuel ratio point, we're removing 100% of our boost and retarding our timing by five degrees, but more importantly we're actually setting a rev limiter here at 2000 RPM, so essentially just above idle, basically the engine's going to cut out. |
| 04:35 | We are also going to enable an auto reset. |
| 04:39 | So, basically this is only going to be active when the system that we're monitoring, let's say it's oil pressure, says that we are below our minimum oil pressure. |
| 04:50 | Once the oil pressure comes back within bounds, it's going to reset. |
| 04:54 | So, basically our cut will go away. |
| 04:57 | And we can control the reset time. |
| 05:00 | Again really depends what you're trying to achieve. |
| 05:03 | For the likes of an oil pressure cut, we do need to be a little bit mindful, if it's in a competition car, yes we're protecting the engine, that's important. |
| 05:12 | We also need to understand that under certain circumstances, the engine completely losing power can actually be quite dangerous. |
| 05:19 | On one hand, maybe the driver is on a corner exit and is relying on that power to accelerate away from a car that's following them closely and if you essentially turn the ignition off, which is what this will do, good chance that the car behind you is going to run into the back of you, which is not pleasant. |
| 05:35 | Likewise we can also be relying on power to actually essentially be able to control the car in a slide or steer the car with the throttle. |
| 05:43 | So, do need to be a little bit mindful of exactly how we set this up and basically some potentially unintended consequences. |
| 05:52 | Now, I've skipped past level two, but at this stage you're kind of probably getting the picture, again we can just set this up to do what we want and how we want, so that then later on we can choose that severity level and how that's going to work. |
| 06:07 | Ok so, that's an important place to get started and we're going to come into some of these a little bit later. |
| 06:14 | The two primary engine protection strategies that we always want to be setting up, and these do not require any additional sensors, is to start with our engine RPM limiter and also our overboost cut if we're running a turbocharged or supercharged car. |
| 06:32 | So, let's get into those, we'll come down to our main limiter here. |
| 06:35 | And we also can expand that out and we've got for a start our cut method. |
| 06:42 | So, this needs to be treated really carefully, I've sort of done this to death, but essentially the cut style, the way the ECU is going to control the engine RPM cut is really important because with a lot of engines, we can get ourselves into trouble if we are using an ignition cut because a lot of engines, the valve train is going to be very sensitive to the exhaust back pressure pulses that we'll get with an ignition cut. |
| 07:09 | The reason we get these is that when we ignition cut only, what we're doing is we're sending unburned fuel and air out through the cylinder so it's not going to combust inside the cylinder. |
| 07:19 | That will quite likely ignite in the exhaust system itself and that creates a pressure spike, which can pop an exhaust valve back off its seat and depending on our valve train, that can really cause some serious issues. |
| 07:33 | SR20DE DET for an example, very easy to end up losing control of the valve and pop the big heavy rocker off its perch and then it kind of does a whole lot of damage inside the cylinder head. |
| 07:47 | Not just limited to SR20 though, there's a lot of engines where, particularly if we've got hydraulic lifters, these can pump up, but there's no issues with ignition cut limiters so essentially what I'm saying here, if in doubt, we always want to use a fuel cut. |
| 08:05 | Now, we've also got our cut type here. |
| 08:07 | So, the options are a soft cut, a hard cut or a cut off, which isn't actually what it sounds like. |
| 08:16 | I would recommend setting this up as a soft cut and essentially what this does is gives us a little bit of margin between the limiter beginning and the limiter ending. |
| 08:26 | So, we're not just turning off all of the injectors the second we get to our cut level. |
| 08:31 | That is what a hard cut is, basically we've got a full cut as soon as we get to the RPM limit. |
| 08:36 | It can be very harsh though, so I wouldn't recommend that unless you're running in a control class where there is a rev limit and you want to be able to use all of that rev limit, then a hard cut could make sense. |
| 08:48 | Cut off does give you access to these two parameters here, cut off RPM range and also our cut off adder, which in itself isn't particularly self explanatory. |
| 09:00 | Essentially this gives you the ability to change the cut limiting style or randomising of which cylinder is being cut and allows you to control sort of the sound and smoothness of the RPM limit. |
| 09:16 | So, if you want to do that, you absolutely can. |
| 09:18 | I think from memory the recommendation in the instructions here is to start with a number of 50 in our cut adder and as we reduce that number, that will make the cut more aggressive, as we increase it, we'll make the cut smoother. |
| 09:32 | So, you can play around with that to suit yourself. |
| 09:35 | But as I said, I'd probably recommend trying the soft cut to start with unless you've got a very specific reason to not use that. |
| 09:44 | That's the setup, pretty easy there. |
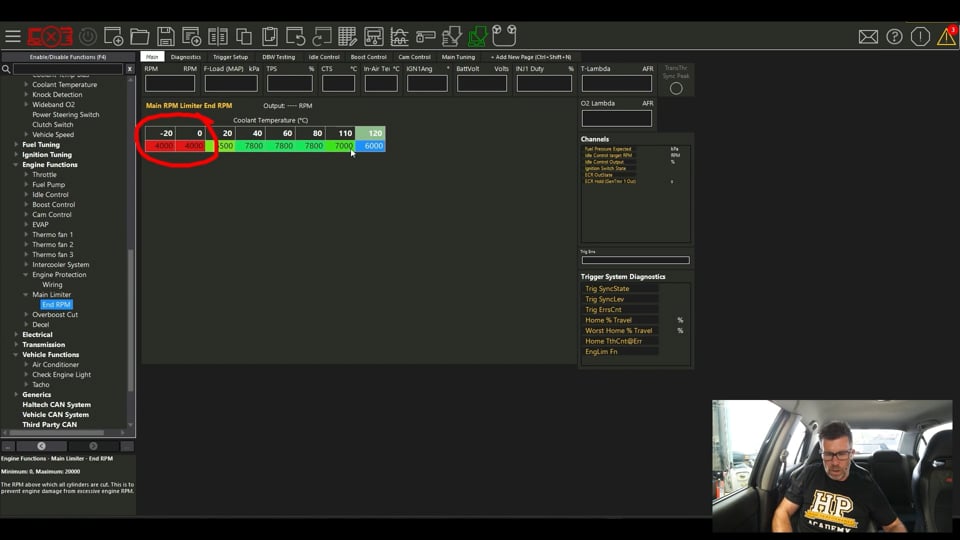
| 09:47 | Next, we come to our end RPM, which is our actual rev limit itself. |
| 09:52 | I don't quite know why, but for some reason this is set up as a three dimensional table with vehicle speed on the vertical axis. |
| 10:01 | I don't really see that we're going to need that so we'll just disable that. |
| 10:06 | Just shows you kind of how easy it is to manipulate the settings and tables in the NSP software as well. |
| 10:13 | So, now we've simply got our rev limiter table here and as you can see, it's a two dimensional table setup relative to coolant temperature. |
| 10:22 | You can have this as a single value without a two dimensional table at all if you want. |
| 10:28 | It is pretty typical to have this three two dimensional table though using coolant temperature, because we can then control our limit at lower RPM. |
| 10:38 | So, maybe we want to only use a maximum of 4000 RPM when the engine is stone cold. |
| 10:44 | And then it builds up, so by the time we're at 40° and above, maybe in this case we want to actually take that out to 7800 RPM. |
| 10:54 | And then once we get up to 110, maybe we want to bring this back down a little bit because we're starting to get a little bit hot. |
| 11:00 | So, maybe if we get up to 120°, well we really don't want to be driving the engine hard anymore so we can bring that down even further. |
| 11:09 | Now, you might be thinking to yourself, well why is this necessary, I'm going to know if the engine is hot and I'm going to be able to manually do this. |
| 11:16 | Well, fair play, but maybe you are a little bit too busy controlling the car to actually be monitoring the engine coolant temperature. |
| 11:24 | Even most OE cars, if we're looking at the factory gauge cluster, the engine coolant temperature gauge is notoriously inaccurate. |
| 11:32 | They generally will sit about in the middle of their range from about 40° through to about 110° and once you go over 110° they jump up really quickly and below 40° they'll be on cold. |
| 11:45 | So, it's not giving you very much information of what the coolant temperature actually is. |
| 11:50 | Obviously, slightly different story if you've got a aftermarket digital dash and then you can set warnings in the dash as well. |
| 11:57 | The other point I'd make here, I utilised this when I was running my tuning workshop, we built a lot of engines for customers and this gives us the ability to provide a little bit more protection for the engine that we've just built. |
| 12:10 | So, if we're giving that to, or selling that I should say, to a customer who's maybe lacking a little bit of mechanical sympathy and has a habit of starting the engine when there's snow on the ground and immediately bouncing off the rev limiter, that's not great for an engine, we can sort of safeguard the engine a little bit using the RPM limit controls versus engine coolant temperature. |
| 12:34 | So, the other thing I'd say about setting up a rev limiter is if you are just starting out with a freshly installed ECU, fresh engine and you don't quite know what you're going to be dealing with here, it's a really good idea just to start when we're first getting the engine running and across the board let's just put in a 3500 RPM limit. |
| 12:56 | What this means is if we've got some problem with the throttle body or there's a massive vacuum leak that we're not aware of, we're not going to start the engine and instantly have it hanging off the 8000 RPM rev limiter while it's still trying to build oil pressure. |
| 13:09 | So, that's just a good way of giving you a little bit of extra peace of mind while you're first getting the engine running. |
| 13:16 | Flip side of that coin though is it's really important to remember that you've done that, because it can be quite frustrating trying to figure out why the engine is misfiring on the dyno at 3500 RPM and I've probably wasted a fair bit of my own time trying to diagnose that in the past, so learn from my mistakes. |
| 13:34 | Alright, so the other one , which I mentioned here is our overboost cut. |
| 13:38 | Very, very similar in most respects here. |
| 13:41 | So, we've got the ability to control our cut method , which again I'm using fuel. |
| 13:46 | A delay, so how long are we going to allow the overboost to be in place for before we cut the fuel? Personal preference on how you do this. |
| 13:58 | You can leave a margin, which we'll talk about in a little bit more detail, a margin above your boost target, which would be pretty typical anyway, let's say we're maybe targeting 150 kPa, well maybe I'm going to set my boost cut at 160 or 170. |
| 14:15 | Even with that though, depending how well dialled in you've got your boost control system, you may find that on a gear shift there might be an instantaneous spike up to maybe 160, 165. |
| 14:27 | So, there's two ways of dealing with that. |
| 14:29 | The first would obviously be to bump up our overboost cut even further, so that we're always clear of any slight overboosts. |
| 14:36 | The preference I guess would be to get your boost control dialled in, so there is no overboost , but that's often easier said than done. |
| 14:43 | Or alternatively what we can do is put in this delay here, maybe we give it maybe 100 milliseconds or something of overboost before we actually cut. |
| 14:54 | So, again personal preference, no right or wrong. |
| 14:56 | And then we've got finally our hysteresis. |
| 14:59 | So, essentially when the cut is active, how much does the boost pressure need to drop before fuel injection is reinstated? 10 kPa should be plenty for that. |
| 15:09 | And then finally we've got our cut pressure here. |
| 15:12 | Again, we can set this up as a two or three dimensional table, I've just got a single value and again everything I just mentioned there goes without saying about just giving yourself enough margin so that you're not constantly banging that cut. |
| 15:24 | This is another area where I often see changes are necessary. |
| 15:29 | Once we've got the car off the dyno, quite often the way the car is loaded on the dyno will not be completely representative of what we see on the road. |
| 15:38 | And we might get a boost curve on the dyno that we can run a ruler through, absolutely perfect, no sign of overboost. |
| 15:44 | But once we get it out on the road, we might actually find that our boost comes up a little bit, that seems to be more common. |
| 15:50 | So, that will require some retrimming to our boost control strategy. |
| 15:55 | But again that might be enough to have us bouncing into our overboost cut. |
| 16:00 | And likewise it's always important to test the vehicle under real world conditions where we're sort of in and out of the throttle, like we'd be maybe through a corner, and see if that results in any overboost. |
| 16:12 | There's nothing more frustrating than a customer getting their car back after a tune and basically taking it for a drive around the block, coming back and complaining that the car is constantly cutting out on them. |
| 16:22 | So, really important to make sure that you've got that dialled in properly. |
| 16:25 | Alright, so that covers the more basics, which like I say, I mean every engine, obviously as long as it's turbocharged or supercharged, should have, you're going to have the ability to instigate those two safety strategies. |
| 16:39 | We'll now get into some of the more advanced strategies. |
| 16:42 | And some of that's going to require us to add some sensors here. |
| 16:46 | So, I don't have these sensors, but we'll go through the process. |
| 16:49 | So, we can click here or press F4 to enable or disable functions. |
| 16:53 | And what we're going to do for a start is we'll bring in an oil pressure sensor. |
| 16:58 | So, if we just type oil pressure we can see, oh yep, oil pressure sensor is now available so we can click on that. |
| 17:03 | And it comes up in red showing us we've got a few errors, that's simply because we haven't allocated or assigned an output for an input I should say for our oil pressure sensor. |
| 17:14 | So, we click on wiring and we can click assign and doesn't really matter here, I'm just going to choose one of the available analogue voltage inputs. |
| 17:20 | Important with a zero to five volt sensor like an oil pressure sensor, we don't need a pull up resistor, so we want to make sure that is disabled. |
| 17:30 | Now, what we can do is go to our oil pressure sensor itself and we can load a calibration from file, let's just say for example here we're going to be using a Bosch 150 psi sensor and the calibrations on most of these now are pretty standardised, 4.5 volts is going to be zero psi or kPa and in this case 4.5 volts is 150 psi or 1034.5 kPa if we want to be really accurate. |
| 18:00 | So, that should have our sensor up and running. |
| 18:02 | Little bit more work ahead of us though, we're now going to come down to our diagnostics. |
| 18:08 | Alright, so we've got three options here. |
| 18:11 | The first of these is we can have a raw minimum diagnostic error. |
| 18:16 | So, basically we could enable this and set this to let's say 0.1 volts. |
| 18:24 | So, again the calibration or linearisation of these sensors is typically 0.5 to 4.5 volts. |
| 18:31 | So, we shouldn't see anything below about 0.5 or maybe 0.4 volts and we shouldn't see anything above 4.55, 4.6 volts. |
| 18:41 | If we get to 0.1 volts, that's probably because the sensor's dead or it's unplugged. |
| 18:47 | And then we can choose what to do here, if we want to bring in a DTC severity, as already explained, and likewise maybe we want to bring in a high voltage warning at 4.9 volts, that would typically mean that the sensor, the analogue voltage input in the 5 volt supply have been connected directly to each other. |
| 19:09 | More interesting though is what we can do to actually control or monitor the oil pressure while the engine is running and that is under this operating minimum option, which we're going to enable. |
| 19:23 | So, first of all minimum RPM, so we're going to set this to something, typically unless there's a big hole in the sump or the oil pump has departed the chat, we're probably still going to have oil pressure when the engine is sitting stationary at idle. |
| 19:38 | It's probably, this is really here to mainly circumvent problems with oil surge when we're under a high G situation such as on a racetrack. |
| 19:48 | Now, obviously there are a range of other options, but that's generally how I sort of expect to use this. |
| 19:53 | So, this will allow the engine at 1500 RPM to obviously still come down to an idle. |
| 19:58 | DTC delay, with oil pressure I don't want any delays and I've been caught out by this in the past so we're going to set that to zero. |
| 20:06 | We can also set the conditions that need to be met before this will come in. |
| 20:11 | In this case we can set MAP, TPS or both, which is the current situation. |
| 20:16 | Yeah, I'm not too sure on this really, I'd probably for this, really want this active the whole time once I'm above 1500 RPM. |
| 20:26 | However, the danger is obviously where we're really under moderate to high load levels, that's where we're going to damage a bearing quickly if we do have a low oil pressure situation. |
| 20:37 | The other thing we may want to bring in here is a post start delay. |
| 20:40 | Generally it's going to take maybe a second or so for the engine to build oil pressure after startup, so let's just put in a three second delay there and then we're going to choose our level three severity, because this is one that I am really worried about here. |
| 20:55 | Ok so, that's all well and good, but now we actually have to set our oil pressure minimum. |
| 21:01 | And when we enable this little tick box here, we get this other option here in our menu on the left hand side, which is our oil pressure minimum. |
| 21:09 | We'll click on that. |
| 21:11 | And at the moment we've got a single value, which isn't particularly great. |
| 21:14 | We can press F3 and allow our table axis to be set up. |
| 21:19 | So, what I'm going to do here is just make this relatively simple, we'll choose engine RPM for our axis and then make this again easy, we'll just choose our wizard, we'll use 1000 RPM as our minimum, 8000 as our maximum and 1000 as our break points and our table's done. |
| 21:40 | You could add another axis here if you want as well for something like engine oil temperature. |
| 21:46 | The reality with this is that the oil pressure for a given RPM is going to drop as the oil heats up. |
| 21:54 | You can do this, it depends how fussy you want to get. |
| 21:56 | Generally, what I'm going to do is use a two dimensional table like I've just set up and basically I want to enter values for a hot running condition, that's what I'm really worried about. |
| 22:08 | Alright, so now we've got our table. |
| 22:10 | The values in here are kPa. |
| 22:13 | So, 100 kPa, basically about 15 psi, actually probably pretty sufficient for our idle condition. |
| 22:21 | Maybe we want to set that up to 125, maybe 150, 200 and then probably about 5000 RPM and above, I'm going to set that at 300, which is about 45 psi. |
| 22:33 | Ok, every car's going to be different, every engine's going to be different, your own personal preferences come into this as well. |
| 22:40 | A general rule of thumb that has always worked pretty well for me is we want about 10 psi of oil pressure per 1000 RPM. |
| 22:49 | So, obviously that means at 6000 RPM we'd really like to see somewhere around about 60 psi. |
| 22:55 | Bit of leniency in there , but that's always a good place to target. |
| 22:58 | The trick with this though is that we want to really gather some data because what we see on the dyno, we're not going to get the same oil temperatures that we would get when we're out on the racetrack and we've done five or six hard laps. |
| 23:12 | We just don't get that sustained high load on the dyno and in turn we don't get the higher oil temperatures. |
| 23:20 | Where I'm going with this is I've already mentioned that as the oil temperature increases, we tend to see a drop off in our oil pressure. |
| 23:27 | And the danger here, just like I said with our previous, our boost cut tuning, if we're tuning for a customer, we do a really good job of logging our oil pressure versus RPM on the dyno and set up a nice tight threshold to that with this table, we quite likely find that we send the customer out the door, they go to a track day and then after the third lap the car is just constantly hitting this oil pressure cut. |
| 23:51 | So, we want to make sure that the oil pressure cut is at a point where it's going to save the engine, but we don't want to be too close to the actual oil pressure we're running and constantly bumping into that cut. |
| 24:03 | So, a little bit of logging and a little bit of testing needs to be done, but basically that's how that's going to work. |
| 24:09 | Alright, we'll go ahead and do essentially the same here for our fuel pressure sensor. |
| 24:14 | Let me just set that up. |
| 24:20 | Alright, fuel pressure sensor, we'll enable that and basically it's just like you've seen already. |
| 24:25 | We're going to go to our wiring, choose another analogue voltage input, then we can come back to our fuel pressure. |
| 24:31 | Same as we've already looked at so I won't bother going through that process. |
| 24:35 | And then we come to our diagnostics. |
| 24:37 | Again, we've got our minimum and maximum voltage and then our operating level, which is what we're going to basically focus on here. |
| 24:46 | Alright, so what we want to know with this one, fuel pressure obviously is going to be predominantly dangerous if we're under high load, high boost. |
| 24:56 | That's going to result in a lean condition. |
| 24:58 | It depends how this works out, because if we've got fuel surge where our fuel pressure instantly drops from our target of let's say 300 kPa differential pressure and it drops all the way down to 50, that's actually pretty unlikely to damage the engine, because we'll instantaneously not have enough fuel for the engine to maintain combustion, so we just have a misfire. |
| 25:21 | Relatively safe, not desirable, but relatively safe. |
| 25:24 | The more dangerous situation is if we've got a fuel pump that's maybe on its last legs and it's dying and it can't pump the required fuel and we're just getting the fuel pressure start to drop away and maybe instead of 300 kPa, now we've got 250 or maybe 200 kPa. |
| 25:41 | Now, the Haltech does have the ability to adapt the fuel pulse width if the fuel pressure is lower than what is calculated, but there's limits to that anyway, maybe we're already near the injected duty cycle maximum. |
| 25:54 | So, that's the sort of condition that we're trying to prevent here. |
| 25:57 | Under these conditions we may want to choose to add a delay to this to provide the fuel pressure, if you've ever looked at the differential fuel pressure signal and logging, it's quite messy, it's never a perfect straight line or very seldom a perfect straight line. |
| 26:14 | As we lift off the throttle and we see sharp changes in manifold pressure, we do tend to see the differential pressure move around a little bit. |
| 26:21 | So, a delay is not a bad idea in my opinion here , but again personal preference. |
| 26:26 | So, we've got 250 milliseconds there, which hopefully should be enough. |
| 26:30 | Minimum RPM, again I'm really most interested in this coming into play under high load, high RPM conditions. |
| 26:38 | If we're cruising down the road at 2500 RPM part throttle and the fuel pressure drops away, it's not going to be ideal , but it's almost certainly not going to damage our engine. |
| 26:49 | So, for the same reason here we can precondition this on TPS, MAP or both. |
| 26:54 | I'm just going to leave this to TPS and essentially if we're over half throttle, it should be a pretty good situation there to deal with. |
| 27:03 | And we can then bring in our level three warning, level three DTC severity. |
| 27:09 | And then we need to come down to our differential fuel pressure minimum. |
| 27:15 | Again single value for the moment, it depends how you want to set this up. |
| 27:20 | Our differential fuel pressure should be consistent relative to RPM and manifold pressure, because that is exactly what it's supposed to do. |
| 27:28 | So, if we're running 300 kPa, maybe 270 kPa might be a little bit tight. |
| 27:34 | Again, just like our oil pressure logging, our oil pressure warning, we really need to do a little bit of logging, just see exactly how much our differential fuel pressure is moving around and make sure that we're not going to inadvertently hit this cart when we really don't worry, we're not worried about it, we don't want the cart coming in. |
| 27:54 | So, maybe something closer to 250 kPa, 50 kPa drop might be where I want that. |
| 28:00 | But again testing is going to be essential. |
| 28:03 | With this as well we do have the option of a filter on the input. |
| 28:08 | If you're seeing a lot of noise on this input then a filter can be beneficial. |
| 28:13 | Alright, we're going to move into questions in a moment, I've got two more warnings that I want to show you, just a reminder if you do have any questions, please ask those now. |
| 28:23 | Next, we're going to have a look at our lambda warning. |
| 28:28 | So, if we come down here, we do have our wideband O2 setup and we'll just have a look at that. |
| 28:38 | We've got our wideband O2, just what exactly it is. |
| 28:41 | So, we've got one sensor and this is a CAN based wideband controller. |
| 28:44 | So, that just defines essentially what it is and how it's being brought in and also our engine condition, so this isn't a bank to bank, it's not a cylinder, it's an overall sensor. |
| 28:56 | Then we'll come down to our engine protection. |
| 28:59 | And obviously, if it is not enabled already, we're going to want to enable this. |
| 29:04 | Pretty much exactly the same as what we've already seen. |
| 29:07 | So, for a start, our minimum RPM. |
| 29:10 | So, again with air fuel ratio, we're mainly worried about this under high load, high RPM conditions. |
| 29:17 | In lean conditions, under cruise or idle it's not going to damage the engine, it's just going to make the engine misfire and probably end up stalling. |
| 29:23 | So, we want to bring this in when we know it can be dangerous for the engine, which is high load, high RPM. |
| 29:29 | So, likewise here, minimum MAP, in this case 100 kPa and minimum TPS, let's bring that down to 50%. |
| 29:38 | Also, delay time, so we do want to be a little bit mindful of this, because our air fuel ratio is going to move around a little bit on transients or gear shifts. |
| 29:48 | So, we want to make sure that we're not inadvertently clipping this. |
| 29:51 | So, we've got 700 milliseconds here, almost a full second. |
| 29:55 | Again a little bit of logging to actually see how long these transient lean spikes actually are and making sure that we're staying out of their way is prudent, so we don't end up inadvertently bringing this warning system in or engine protection strategy in when it's not really necessary. |
| 30:14 | Then if we come down, just like we've seen essentially so far with our oil pressure and fuel pressure, we've got our maximum wideband. |
| 30:22 | So, I've set this at 13 to one. |
| 30:25 | Again, at the moment single value, very easy to set this up as a table versus RPM and manifold pressure or maybe just manifold pressure and that way if you're running at three bar of boost, your target air fuel ratio is probably going to be quite different than what you're going to be happy with at half a bar of boost. |
| 30:44 | So, that just gives you the flexibility to be a little bit more granular with that engine protection strategy, but the rest kind of goes without saying, just like everything else we've looked at. |
| 30:56 | The last one I'm going to look at here is exhaust gas temperature. |
| 31:01 | So, I think I've turned that off for the moment. |
| 31:04 | We do have exhaust gas temperature. |
| 31:07 | And what we want to do is basically use this as another protection strategy if our engine is getting, if one of our cylinders is getting a little bit hot. |
| 31:21 | And I can't actually remember where I've got this now. |
| 31:26 | Which is why we've got this nice little strategy of finding it up here. |
| 31:32 | Exhaust gas temperature is enabled, cylinder one, we'll just enable it here. |
| 31:38 | Now, we've got it going, that's going to be great. |
| 31:41 | This is going to be just a walkthrough of it, because I haven't actually got a CAN based EGT module or something on this vehicle so it doesn't really matter, but the process is going to be the same. |
| 31:53 | We can have multiple sensors, ideally we'd like to have one per cylinder. |
| 31:57 | In which case we can also have our cylinder shutdown enabled, which we'll go into in a little bit more detail. |
| 32:04 | Or we can have a collector EGT. |
| 32:07 | Right so let's come down to our exhaust gas temperature diagnostics. |
| 32:12 | So, we've got a enable maximum here. |
| 32:17 | Which in this case is probably pretty optimistic at 1500°. |
| 32:23 | So, what we might want to do is bring this down to maybe 950°C, we're running on pump gas and we don't really want to destroy our turbocharger, so we'll set that at 950° and again we can bring in level three warning there so we know that's already going to bring in a fuel cut rev limiter. |
| 32:43 | We've also got cylinder shutdown here. |
| 32:46 | So, this allows us, if we've got an individual cylinder EGT, we can shut down individual cylinders. |
| 32:54 | This allows us here, there's an option to ignore the EGT while a limiter is active. |
| 33:00 | And then we can set our max EGT. |
| 33:03 | So, in this case 1000°, if each individual cylinder goes over that, just that cylinder is going to be shut down. |
| 33:10 | If you really want to get fussy with this, you can also enable max EGT per cylinder. |
| 33:15 | I don't really know why I'd want to use that, but again if you want to get super familiar with this, you've got the ability to. |
| 33:24 | So, there you go, we've covered off the basics , which is our engine rev limiter and our boost cut and then we've looked at some of the more advanced oil pressure and fuel pressure, we've looked at lambda and we've looked at EGT. |
| 33:36 | And I do strongly advise you to use these functions where possible. |
| 33:42 | For the sake of a couple of sensors now, fuel pressure and oil pressure in particular gives you a lot more ability to safeguard your engine. |
| 33:52 | For now we'll get into our questions and see what we've got. |
| 33:56 | If you've got more, please keep them coming. |
| 34:01 | First question, "on my 8th gen Gallant, when I had the V6 twin turbo engine, it didn't like a hard cut, after the cut it would sound like a misfire and then clean up, is there a fix for this?". |
| 34:12 | That sounds very much like you were getting the lifters pump up. |
| 34:19 | Pretty common with any Mitsubishi that uses a hydraulic lifter. |
| 34:25 | We found this with the Evos when we were drag racing, if you start trying to use an aggressive two step limiter with ignition retard, which is kind of essential to build boost with a larger turbo, the popping and banging in the exhaust system would pump up the lifter, so I would pick that that's probably what you're doing. |
| 34:41 | A soft cut using fuel cut only instead of a hard cut with fuel and ignition, or ignition, I'm not quite sure how your hard cut was set up, I'm guessing it was probably ignition, would fix that. |
| 34:52 | Next, question from Dave, "Is there a way to make it so the engine won't fire until oil pressure is built on startup?". |
| 34:59 | Good question. |
| 35:02 | I don't know off the top of my head how I'd do that with the NSP. |
| 35:07 | It's not something I've really needed to think about for a long time. |
| 35:12 | Most modern engines are going to build oil pressure as we're cranking and really it's not an issue. |
| 35:20 | Sure, you might start the engine with only three to five psi, but obviously there is still oil sitting between the bearings and the crankshaft journals anyway and at idle and cranking there's not a lot of load, so that's not normally an issue. |
| 35:35 | Yeah, I'd have to think about that, there'll be a way of doing it with some user table or something of that nature, but nothing that springs to mind. |
| 35:44 | The old fashioned way of doing that was to disable the power to the coil via a relay that was run off the oil pressure switch. |
| 35:54 | I mean that's an old school way of doing it, but I'm sure that if I put my mind to it, it would come up with a way of doing that inside of the ECU. |
| 36:02 | Oh yeah, we've got another one , which is actually valid, I probably should have considered this. |
| 36:09 | HerneyGTis ask, "How about using water pressure or coolant pressure more specifically, limits for turbo and NA, which limits would I use?". |
| 36:16 | So, yeah if you've got a coolant pressure sensor, on a turbocharged car, particularly a high boost one, head gasket integrity is a real issue. |
| 36:25 | So, when the head gasket fails or basically what we normally say is the head has lifted off the block, what that results in is combustion pressure escaping into the coolant jacket, the cooling system and that can then end up spraying water out of your overflow, sometimes in extreme circumstances it's going to actually explode your radiator and you can also end up with water underneath your tyres, which is never great. |
| 36:50 | So, yeah adding a coolant pressure sensor, I won't go through the process, but you could set up some limits based on the coolant pressure. |
| 36:58 | I normally actually do this with a driver warning on a dash, but of course if you don't have a dash, that's going to be a little bit difficult. |
| 37:06 | You do also want to monitor your coolant pressure and see what is normal. |
| 37:13 | Because coolant pressure actually moves around a hell of a lot more than most people would think. |
| 37:19 | Generally though it's safe to say that if you're exceeding the pressure that the radiator cap is rated to by more than about 5 psi, probably that's indicative that you've got an issue there and it's normally going to be at the end of a pull on the dyno where you've been at high boost and you'll see the coolant pressure sort of ramp up towards the end and sort of go vertical, that's an indication that you're probably lifting the head and getting that combustion pressure into the water jacket. |
| 37:51 | Last question, "Could you map the main limiter against oil pressure?". |
| 37:56 | Yeah, you absolutely could. |
| 37:59 | The engine speed limiter, engine RPM limiter is able to be mapped against two parameters, so we looked at coolant temperature, but you could have oil pressure. |
| 38:09 | Probably not the easiest way of bringing in an oil pressure warning though so yeah I don't think that that would be necessary. |
| 38:18 | Unless you are referring to Dave's previous question about making sure the engine won't fire until oil pressure is built, that might actually work. |
| 38:26 | I think that's probably what you were getting to so yeah there we go, someone else answered while I couldn't come up with it myself. |
| 38:32 | Alright, that's brought us to the end of our questions, remember if you are watching this in our archive at a later point, if you've got any questions, please ask those in the forum and I'll be happy to answer them there. |
| 38:42 | Thanks for joining us and hopefully we can see you next time. |