373 | Turbo Ignition Tuning - Haltech Elite/NSP
Summary
In this webinar we’ll look at some techniques you can use to optimise the ignition timing on a turbocharged engine quickly and easily without putting undue stress on your engine.
| 00:00 | Hey team, Andre from High Performance Academy here, welcome to another one of our webinars and this is our first webinar for 2025. |
| 00:07 | Just getting back into the swing of things so hopefully everything goes nice and smoothly. |
| 00:12 | Today we're going to be talking about the techniques we can use when tuning the ignition timing specifically on turbocharged engines. |
| 00:20 | And this can be a little bit trickier, particularly on more highly strung turbocharged engines running higher boost levels. |
| 00:27 | It's a bit of a trade off between sort of getting the ignition timing dialed in accurately and perfecting it and not ending up putting too much undue stress and strain on the engine. |
| 00:38 | So, as we go through the webinar, we'll show you a few of the techniques that I've developed and used myself over the past 20 plus years tuning all manner of engines from factory turbocharged street car engines through to 1500, 1800 horsepower turbocharged drag engines. |
| 00:54 | So, with our ignition timing, let's have a look at that. |
| 00:58 | And this is again another three dimensional table with exactly the same axes. |
| 01:01 | And we've got two trends that occur with our ignition table irrespective of whether the engine is naturally aspirated or turbocharged. |
| 01:11 | And first of all we need to understand what we're trying to do when we start the combustion event with our spark. |
| 01:19 | So, what we're trying to do is time the start of the combustion event when the ignition event actually happens. |
| 01:26 | So, that peak cylinder pressure occurs at a point in the engine cycle where we can take maximum mechanical advantage from it. |
| 01:33 | Typically that's going to be somewhere around about 16 to 18 degrees after TDC, so after the piston has gone past top dead centre and it's coming back down the bore. |
| 01:43 | And that's when the pressure can force down on the piston, we've got a little bit of a correlation with our connecting rod, so when we force down on the piston it actually rotates the crankshaft. |
| 01:52 | You can imagine that if we applied maximum pressure to that piston, when the piston's at top dead centre, so at the very top of the stroke, at that point the conrod is vertical, so is the crankshaft journal, and if we had the engine stationary on an engine stand, you could put all the force you like on that piston, it is not going to rotate the crankshaft and in fact at some point you're going to end up bending a connecting rod. |
| 02:15 | So, we're going to get that peak cylinder pressure point around 16 to 18 degrees after TDC. |
| 02:21 | The combustion process however takes a finite amount of time, it takes a little bit of time to occur. |
| 02:27 | So, we need to start the spark event earlier in the engine cycle to get peak cylinder pressure occurring where it should. |
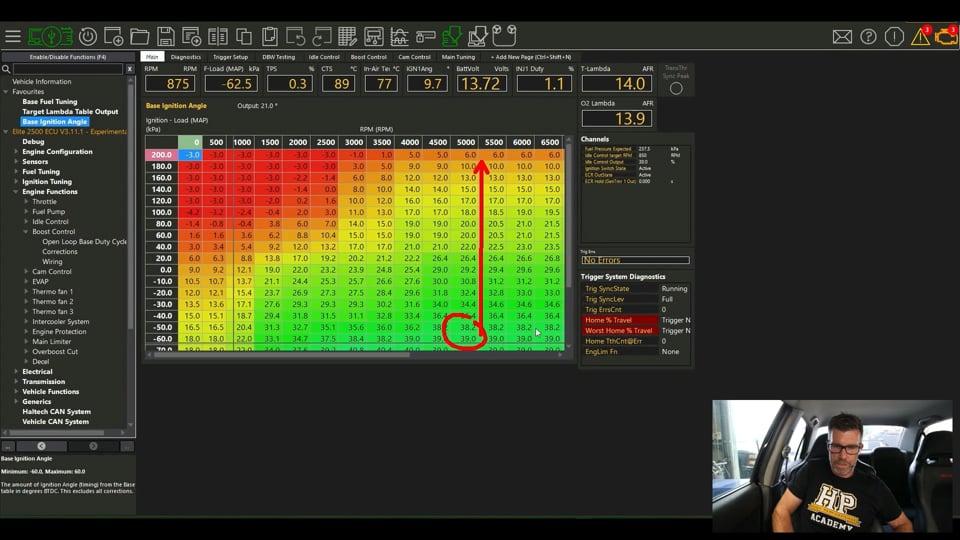
| 02:33 | Now, if we look at this table here, we can see that, let's just pick a random spot here, minus 40 kPa, 3500 RPM. |
| 02:42 | So, if I've done my job properly here, this means that we need to start the ignition event 32.8 degrees before the piston has reached top dead centre in order to get peak cylinder pressure occurring at the correct spot. |
| 02:57 | Now, that's not to say that it is absolutely correct, but that's the principle we're working on. |
| 03:02 | Ok, but as you can see from the fact we've got a three dimensional table of numbers here and they're all over the place in terms of the values, this is not a set and forget value. |
| 03:14 | What we need to do is vary the ignition timing based on two parameters. |
| 03:19 | The first of those which we'll cover is our engine RPM or engine speed. |
| 03:23 | So, that's as we essentially go from the left to the right of this table. |
| 03:29 | And if we just look at what we've got in terms of numbers here, down here at idle, we've got values around about 18 degrees and at 6500 RPM we've got values of about 35, 36 degrees. |
| 03:43 | So, the first trend we've got here in our ignition timing is that as the engine speed increases, we need to advance the timing, or in other words start the spark event earlier in the engine cycle. |
| 03:54 | And the reason for this is that within reason here under the same load, the ignition event, the combustion event I should say is going to take approximately the same amount of time. |
| 04:06 | So, if we are trying to still achieve peak cylinder pressure at that 16 to 18 degrees after TDC point, at higher RPM, we've got less time for each of the engine cycles to occur, they're happening faster, so of course if our combustion event takes approximately the same amount of time, we need to start it earlier in the engine cycle. |
| 04:27 | So, that's our very first trend. |
| 04:30 | As engine RPM increases, we tend to advance the ignition timing. |
| 04:35 | The second one, which is really most relevant to us here is what happens as we increase load on the engine. |
| 04:43 | So, it's as we go from the bottom of our table here to the top. |
| 04:47 | And again this trend is exactly the same irrespective of whether we're naturally aspirated or forced induction, it's just that obviously with forced induction, we go further into that positive boost pressure area of the table. |
| 05:00 | So, let's again look at our trend here. |
| 05:03 | So, at low load we've basically got the throttle essentially closed. |
| 05:06 | At that point that I've just highlighted, 5000 RPM, we've got about 38, 39 degrees of ignition advance. |
| 05:13 | And if we come up here to let's say sort of the 160, 140 kPa area, we've got 15 to 13 degrees. |
| 05:21 | So, this is our second trend. |
| 05:24 | As we add load or mass airflow into the combustion chamber, we tend to retard the ignition timing or start the spark event later in the engine cycle. |
| 05:33 | Now, the reason for this is if we consider first of all when the engine's operating and we've almost got the throttle completely closed, that's heavily limiting the amount of oxygen molecules that are making its way into the cylinder. |
| 05:48 | So, we've only got a few molecules sparsely spread out in the combustion chamber. |
| 05:52 | We're obviously mixing those with fuel as well. |
| 05:55 | But there's not a lot of them there. |
| 05:57 | What this means is that when the spark event occurs and ignites the fuel and air charge, it kind of takes a little bit of time to jump from one fuel and air molecule to another to another to another and that flame front to propagate out and consume all of the available fuel and oxygen inside of the cylinder. |
| 06:14 | What this means is that at light load, with not that many air molecules in the cylinder, the combustion speed is physically quite slow. |
| 06:24 | Well, relative to combustion speed anyway. |
| 06:26 | So, it takes longer for combustion to occur. |
| 06:30 | So, again because it's taking longer, we need to start that spark event earlier in the engine cycle. |
| 06:36 | Ok now, let's look at what happens when we're at wide open throttle on a naturally aspirated engine or we're running one bar of boost in a turbocharged engine. |
| 06:44 | Now, we've got the throttle wide open, we've got a lot of fuel and air molecules tightly packed together inside the combustion chamber and of course when we start the spark event, that flame front can now propagate much much more quickly. |
| 06:57 | So, our combustion speed is faster, the combustion event takes less time. |
| 07:01 | So, again we're always trying to get our peak cylinder pressure to occur at that correct point in the engine cycle, 16 to 18 degrees after TDC; of course if the combustion speed is slower, sorry faster, all things being equal, we need to retard our time or start it later in the engine cycle. |
| 07:20 | So, these are the two trends that are going on as we're optimising our ignition timing table and again irrespective of whether we're naturally aspirated or forced induction, that is what's going on, we're just going out into those positive boost pressure areas. |
| 07:34 | Now, there's a couple of things I'll add to this. |
| 07:37 | I've been mentioning the point that we want to reach peak cylinder pressure is around 16 to 18 degrees after TDC. |
| 07:46 | And you're probably thinking to yourself - well how do we know when it's at that point? Well, the answer is unless you have the benefit of insulin depression monitoring, which unless you're working for a well funded race team or an OE manufacturer, chances are you won't because the equipment is incredibly expensive and the process of installing it is also quite time consuming and expensive. |
| 08:11 | So, we're not going to know exactly where our peak cylinder pressure is occurring. |
| 08:15 | But the reality is if we're on a quality load bearing dyno, that doesn't actually matter and you'll see a demonstration of this shortly. |
| 08:23 | Because when our peak cylinder pressure is occurring at the correct point, and our ignition timing therefore is optimal, our engine is going to produce maximum torque on the dyno. |
| 08:34 | So, we're going to be using the torque output from the dyno to help guide us with this. |
| 08:38 | And let's just get us up and running now and we'll have a quick look at a demonstration of this. |
| 08:44 | And we'll do this in a low load area just to make it nice and easy. |
| 08:47 | Let's come up to 3000 RPM. |
| 08:51 | So, what we'll do, 3500 RPM, I lied. |
| 08:57 | We'll come up, let's first of all just look at our ignition table. |
| 09:01 | And what we are going to do here is keep this running right in the middle of this, 3500 RPM minus 30 kPa cell. |
| 09:10 | Now, before we jump over to our dyno and have a look there, what I'm going to do is I'll just jump to that cell and let's just retard it all the way to 10 degrees. |
| 09:17 | Very retarded for that operating point. |
| 09:20 | Now, let's have a look at the dyno. |
| 09:22 | And what we're going to be doing is using this red graph here, which is logging or monitoring the torque that the dyno is measuring. |
| 09:31 | At the moment we're at about 200 foot pound of torque. |
| 09:34 | So, let's move around a little bit and I just jumped out of the cell so I'll just get myself back into that so that we aren't influencing the results. |
| 09:42 | So, let's just make a real quick change here, we're back to about 200 foot pound. |
| 09:46 | So, I'm going to go from 10 degrees here to 20 so a really big step. |
| 09:50 | Watch what happens to the red graph, just press enter, you see it jump up. |
| 09:54 | OK we'll just wait for it to stabilise, I'll just get back into the centre here. |
| 09:58 | It's a massive increase, we can really see that that was a very obvious jump in our torque as a result of that additional timing. |
| 10:05 | Let's add another 10 degrees, I'm just going to go from 20 to 30, I'll just make sure we're again central in that cell, wait for our red graph to stabilise here. |
| 10:13 | And I'll press enter now. |
| 10:17 | And again we see the graph jump up, not as dramatic as our first time. |
| 10:22 | I'll come back to idle and we'll just talk about that result. |
| 10:25 | So, what we'll find is that when we start from a very retarded ignition timing, we did there 10 degrees, as we step up from 10 degrees, we're going to see a very quick increase, large increase per degree of timing in our torque. |
| 10:41 | As we get closer to the optimal timing, , which I should have mentioned is referred to as MBT timing, stands for maximum brake torque timing or also some people refer to it as minimum timing for best torque. |
| 10:54 | As we get closer to that optimal point, we're going to see that per degree of timing we add, we're going to see the increase in torque sort of drop away, it's not going to be as significant. |
| 11:06 | So, once we sort of start seeing everything plateau and we're adding a couple of degrees of timing, not really seeing much of a result on that, that indicates that we're sort of there or thereabouts for our optimal timing. |
| 11:19 | Particularly, if you are running on a fuel that is maybe a little bit marginal for octane , which I'm going to talk about in a moment, or you just want to be a little bit conservative, I'd probably sort of trim the timing so that we're just at the start of that plateau, there's no point needing to push the timing to the absolute edge. |
| 11:38 | Alright, so that's the process of our timing optimisation, we're just using the torque feedback from the dyno to optimise the timing and see when we have reached peak torque. |
| 11:49 | Now, we do need to also talk about the downsides of tuning our ignition timing, optimising our ignition timing on fuels that maybe don't have enough octane for what we are trying to do and that is where we can run into an abnormal type of combustion known as knock or detonation. |
| 12:10 | Two interchangeable words for the same thing. |
| 12:12 | Now, what happens under normal combustion is that the spark will ignite the fuel and air charge right by the spark plug end gap. |
| 12:21 | And this results in a flame front that propagates out through the combustion chamber and as it moves, it's igniting the unburned fuel and air ahead of it. |
| 12:28 | This is why the combustion process actually takes a reasonable amount of time to occur and while this is occurring, we're seeing an increase in pressure and heat inside the combustion chamber. |
| 12:40 | Now, under, I think it's also worth mentioning here that most people who haven't really sort of dived into this tend to think that the combustion process is a bit like a stick of dynamite exploding and the spark event occurs and all of the fuel and air instantly explodes and that's not the case, I've just explained how it actually works. |
| 13:00 | However, if we're dealing with a fuel with a low octane rating or octane that's not sufficient for what we're trying to do, we can get to a point where the heat inside the combustion chamber is so great that it will spontaneously ignite or auto ignite unburned pockets of fuel and air around the outside of the combustion chamber. |
| 13:22 | And when that occurs, these pockets of unburned fuel and air basically do act a little bit like a stick of dynamite. |
| 13:29 | They release all of their energy very very quickly and this creates sharp spikes in pressure inside the combustion chamber and this can be very damaging to our engine components. |
| 13:40 | So, it can damage and break our pistons, it can damage the cylinder head and it can also bend connecting rods and damage rod bearings so this is probably in my opinion the number one killer of any performance engine and it's something that we absolutely need to stay away from. |
| 13:58 | Now, admittedly these days most people are tuning turbocharged engines for performance applications on good quality fuel such as E85 or race gas and this has sort of bred a generation of tuners that have never really had to worry too much about knock. |
| 14:16 | Yes, it's still possible to create knock on E85 or a race gas , but it's much much less likely to occur and you'd really need to be pushing things to the edge in order to get there. |
| 14:29 | So, a lot of tuners have never really had the problem of monitoring knock and staying away from it. |
| 14:35 | On pump fuels though, particularly if you've only got access to relatively low amounts of pump fuel, knock is a very real problem and you are going to need to monitor it. |
| 14:45 | So, how do we do this? And this is a little bit off our topic, but sort of worth mentioning anyway. |
| 14:50 | Have I actually picked it up? Yes, I have. |
| 14:54 | I'm a huge advocate of audio knock detection equipment. |
| 14:57 | There's a variety of products on the market, this is one of my go tos because it's so quick and easy to install, very portable as well, this is the Link G4 Plus knock block. |
| 15:08 | And basically, it connects to a factory style donor knock sensor, which is a piezoelectric sensor and all that means is we bolt this to the block and it converts vibration, which is the result of knock or detonation occurring, it converts the vibration in the block into an electrical signal. |
| 15:29 | And then the electrical signal is fed into the knock block, which is essentially a digital signal processor. |
| 15:36 | So, we do a little bit of work on amplifying the signal so that we can hear it and also depending on the product you're dealing with, it can also do some work in terms of filtering the signal, basically improving the signal to noise ratio, so that we have a better chance of being able to separate knock sounds from the general mechanical noise of an engine running. |
| 15:57 | We then listen to that audio output from the knock block using a set of earbuds and I usually put these under a set of air defenders and it gives me a really good chance to just listen to what the engine's doing. |
| 16:09 | And I use that whenever I'm tuning, obviously today's an exception, I'm presenting a webinar and I also have a really good familiarity with this engine. |
| 16:16 | And that will allow us to notice when the engine is knocking and we can immediately stop, remove some timing and make sure that the engine is safe. |
| 16:26 | So, absolutely vital part of our engine tuning. |
| 16:30 | Alright, now that we've got that out of the way, let's go through some of the practical considerations of tuning a turbocharged engine and where they vary from a naturally aspirated engine. |
| 16:42 | Really, what we're trying to do is monitor and control our temperatures, which are going to get a lot hotter a lot quicker with turbocharged engines than with naturally aspirated engines. |
| 16:55 | So, that's our main consideration really is managing heat. |
| 16:58 | Now, these are in three areas, the first of these is our engine coolant temperature, the second is our intake air temperature and the third is our combustion temperature, which sort of goes hand in hand with just also general engine bay heat. |
| 17:12 | We don't get the opportunity when we're driving down the highway at high speed with our turbocharged engines to see what's going on inside the engine bay. |
| 17:21 | But if you're hard on the throttle for a period of time, you are absolutely going to find that the exhaust manifold, the turbocharger exhaust housing and probably the downpipe will be glowing a nice cherry red. |
| 17:34 | Remembering that the exhaust gas temperature into the turbocharger may be 900 to 1000°C, so the temperature is definitely high enough to make these items glow. |
| 17:45 | This comes as a bit of a shock to people when they watch their cars being tuned on a dyno, typically with the bonnet up and they can actually see all these items glowing, which actually usually causes a bit of concern, but of course as I mentioned, that's absolutely normal. |
| 18:00 | What isn't normal though is that on the dyno, there's no way that we're going to replicate the sort of airflow and cooling effect that we're going to have through the engine bay if driving our car at sort of 100, 120 km an hour on the open road. |
| 18:13 | So, we need to be mindful of that so we don't start melting components. |
| 18:18 | Alright, I want to come back to the first two though, engine coolant temperature and intake air temperature. |
| 18:23 | So, let's head back across to our tuning software. |
| 18:26 | And we've got the two sensors up here. |
| 18:31 | What we want to do really during our tuning is make sure that these parameters stay kind of as close to what we'd expect to see out on the road at normal road going speed as possible. |
| 18:45 | The reason for this, particularly with our intake air temperature is as our intake air temperature changes, we need to trim the fuelling because the air temperature affects air density, which by default then changes the amount of fuel that's required in order to maintain a consistent air fuel ratio. |
| 19:02 | Now, depending on the ECU, this can be done with a compensation table that's manually tuned or it can be done automatically in the case of a volumetric efficiency based ECU. |
| 19:12 | However, that all being said, we still really want to be tuning under normal operating conditions. |
| 19:20 | So, if for example we would expect on the road after a quarter mile run at full boost, full power, to see our intake air temperature sitting around let's say 30°C, we're not going to get realistic tuning outcomes if on the dyno our intake air temperature's at 60 or 70°C. |
| 19:40 | Now, on that note we can see that that's kind of exactly where we are at the moment. |
| 19:44 | This is a bit of an outlier, because the Evo 9 that we're in today has an intake manifold temperature sensor, which is basically inserted into the cast aluminium intake manifold. |
| 19:57 | That is very prone to heat soak, particularly while I've been sitting here for the last 40 odd minutes talking. |
| 20:02 | So, it's not really the best way of monitoring intake air temperature. |
| 20:07 | Generally I like to have the air temperature sensor mounted in the intercooler plumbing pre throttle body. |
| 20:12 | It's going to give us a better result, but there's always compromises here. |
| 20:15 | However, basically long story short, we want to try and make sure that our air temperature remains pretty close to what we'd expect to see on the open road. |
| 20:24 | And if we're tuning under steady state conditions, under boost, we're going to find that that intake air temperature's going to climb quite quickly, so we need to manage that. |
| 20:32 | Coolant temperature as well, this is less of an effect on our engine performance as it is on engine reliability and longevity. |
| 20:41 | I probably wouldn't like to be tuning this engine much over about 100°C. |
| 20:47 | So, we need to be pretty mindful of these two parameters, watch them pretty carefully while we're tuning and if something's getting a little bit too hot, we can always just come back to idle, allow everything to cool down and then go again. |
| 21:01 | So, while this is still a consideration with a naturally aspirated engine, obviously we have the ability to make a lot more temperature a lot quicker with a turbocharged engine so that's our consideration there. |
| 21:13 | Alright, so let's look at the actual tuning process here and what we do in the HP18 step process is we break this down into two parts. |
| 21:24 | What we're going to do for a start is we are going to map our ignition timing out to around about 2.3 of the rev limit. |
| 21:33 | So, let's say in this instance we might go out to maybe 4500 RPM. |
| 21:37 | And we'll start at the lowest RPM we can, 1500 RPM maybe, lowest load, we're going to be using that technique that I just showed you, watching the torque output from the dyno, optimising the cell and then what we'll do is add a little bit of throttle, move up to the next load site and go again. |
| 21:54 | So, let's just have a quick look again at 3500 RPM, how that looks, I'm not going to tune each cell because we'll be here for a fair while. |
| 22:02 | We started here on our laptop screen at 30 kPa. |
| 22:07 | So, the dyno's obviously holding our engine speed consistent at 3500. |
| 22:11 | Once I'm happy with our ignition timing and our torques optimised there, we'll just add a little bit of throttle and we'll come up to our next site at minus 20 kPa, optimise that cell there and we'll come up again, we'll do our minus 20 kPa and then come up to our zero kPa site. |
| 22:32 | Now, a few things to keep in mind here. |
| 22:35 | If you're following the HPA 10 step process, I generally recommend starting by setting our whole ignition table to 15 degrees. |
| 22:42 | Maybe a little bit less if we're dealing with a turbocharged engine in the higher boost areas, but 15 degrees should be a pretty safe starting point and more importantly it should be retarded from MBT. |
| 22:54 | Which means, as we advance the timing, we'll see an increase in torque. |
| 22:58 | And it's always safest to start from a retarded ignition timing point, add timing until we either reach the knock threshold, in which case we'll want to knock our timing back a few degrees to give us a safety margin, or alternatively we reach MBT. |
| 23:13 | But while we're doing this, if we look at our map again, what we can see is that trend that we've already talked about. |
| 23:21 | And what we can do to sort of speed up the process a little bit is we can kind of extrapolate the results that we're seeing out ahead. |
| 23:29 | So, for example, let's just spitball here that we've just tuned this particular site and we've found that 24 degrees is optimal and we've done what I've said here, we've set the rest of our table to 15 degrees. |
| 23:43 | Now, if we look at what the results we've got here, this particular cell, let's assume this is optimal, 26.6 degrees, then drop to 24 degrees. |
| 23:50 | So, we've dropped about 2.5 degrees for 10 kPa. |
| 23:55 | We're now jumping up from zero to 20 kPa, so that's actually a bigger jump, it's 20 kPa, but on that basis we could expect to need to retard the timing maybe five degrees, , which would take us to 19. |
| 24:09 | So, we know that we're probably pretty conservative at 15 degrees. |
| 24:13 | It'd be worse, I probably wouldn't actually change that, but it'd be worse if we'd gone to 10 degrees. |
| 24:20 | We can totally start at 10 degrees and bring it up from there, but it's going to take a while. |
| 24:25 | So, what we could do is sort of extrapolate our results and go hey you know what, I'm probably going to need to be starting around 16 degrees, I'm expecting I'll probably end up around maybe 19 to 21, 22 degrees, that's going to get us closest to the ballpark. |
| 24:39 | More importantly though, if we'd gone into this site here and let's say we'd had 20 degrees in there, we move into that site, we add a little bit of throttle and instantly we start hearing some knock. |
| 24:50 | Two things, first of all I'm going to back off the throttle, clutch in, come back to idle, never do we wanna leave the engine sitting in a knock situation. |
| 24:58 | But also what I'll do is as I back out of that, alright well that was no good, let's just safe that up by pulling five degrees out and we can go quite aggressive here. |
| 25:07 | So, these are the things we can do, the levers we've essentially got available to us, we can pull these levers really quickly to basically speed up the process and make sure that we're keeping our engine tuning safe. |
| 25:19 | Alright, so the next part of this process is how we deal, because at this stage, everything that I've talked about is the same process we'd use for a naturally aspirated engine. |
| 25:31 | I should mention that once we've tuned this 3500 RPM column, what we would do is press Control C here, come over to 4000 RPM, Control V and basically copy that across. |
| 25:43 | And the reason for this is as we've already discussed with our trends, we'd have started probably with this 4000 RPM and everything above set to 15 degrees like I've explained. |
| 25:54 | We know that as we go from 3500 to 4000 RPM, chances are we're probably going to need at least as much ignition time as we had at 3500 RPM because of that trend. |
| 26:04 | Probably more. |
| 26:05 | So, we can speed the process up by copying it across, pasting it into 4000 RPM and then we know that we should be pretty close, maybe we might be the same, maybe we might need two to four degrees more, but it's not going to be chasing our tail from 15 degrees, which is going to take a lot longer, so I'll just Control Z and get rid of that change. |
| 26:22 | Ok so, the process here, with a naturally aspirated engine, obviously we can only get up to wide open throttle or 100 kPa, now we've got the ability to move into boost. |
| 26:34 | And how we deal with this is going to depend a little bit on how highly strong our engine is and also what our wastegate or minimum boost pressure is. |
| 26:44 | So, on this engine it's completely stock, stock turbocharger, stock wastegate and the benefit of this is that I can bring my boost down to I think it's around about 8-10 psi, which isn't a lot, it's not putting a lot of stress on the engine, so that's actually not too scary to tune in steady state conditions. |
| 27:05 | So, let's have a look at this, what we'll do here is first of all we'll go to our open loop boost duty cycle and I've already done this, I've just set it to zero. |
| 27:13 | With this particular engine we don't actually have enough wastegate spring pressure to get the boost I want so normally this is actually set to 100%, but we always want to start with our minimum boost pressure we can achieve, it's the safest place to get started. |
| 27:29 | Alright, so we've done that, we'll come back to our ignition timing here and for the sake of our test here, what we'll do is we'll just take our, again we'll do our 3500 RPM column and we, actually no first of all what we're going to do is we're going to bring our RPM back down to 2000 because again we're starting from low RPM and moving our way up. |
| 27:50 | So, let's see what happens at 2000 RPM, we'll just get ourselves set up here at 2000. |
| 27:58 | Ok so, at the moment you can see we're down at minus 40 kPa so again we'll just be working on optimising our ignition timing at each of these cells. |
| 28:06 | We'll get up here to zero kPa so our atmospheric pressure and this is the point that we would be at wide open throttle with a naturally aspirated engine. |
| 28:17 | However, you can see in our case we're actually only at about 24% throttle opening. |
| 28:23 | Alright, so let's increase our throttle opening, we'll get up to the centre of our minus 20 kPa cell, again we can optimise that. |
| 28:31 | Now, if I go through to wide open throttle we can see I'm at wide open throttle now and we're not quite in the middle of our 40 kPa cell. |
| 28:40 | And this is simply because at 2000 RPM we really don't have enough exhaust gas or energy to create any more boost than 40 kPa. |
| 28:50 | As I've been talking, because I'm still at wide open throttle, what we're doing is creating more heat and it's heat in the exhaust flow that actually drives the turbocharger so I actually have come up in boost very slightly, but only by about three or four kPa. |
| 29:03 | So, at that point we don't have a lot of boost, we're not making a lot of power, there's no real concern there in staying at wide open throttle and what we could see is two things here. |
| 29:15 | Our coolant temp, 90 degrees, no big problem. |
| 29:17 | As I backed off there, because we were actually getting airflow through the intake manifold and it was less heat soaked, our intake air temperature actually dropped down to 58 degrees, now you can see under heat soaked conditions, it's starting to come back up. |
| 29:29 | Ok so, let's go back, now we know obviously at lower RPM we're not going to be able to get to our wastegate spring pressure , but let's come up to about 3500 RPM where we probably should be able to get that. |
| 29:44 | Just get our dyno set up and we'll get up and running again. |
| 29:50 | Ok so, 3500 RPM and if I go to wide open throttle here, you can see yeah we can get up to almost 80 kPa, around about 12 psi, give or take. |
| 30:03 | Ok so, that's pretty natural, most people would understand that we're not going to get a maximum boost when we're at very low RPM. |
| 30:11 | So, what we need to think about here is how far we want to go under steady state tuning. |
| 30:17 | Obviously, we want to optimise our ignition timing and get our torque optimised. |
| 30:22 | However, the way the engine operates under steady state conditions and the way the engine operates under ramp run conditions are not quite the same. |
| 30:30 | What I mean by this is if we went through and we optimised every cell at 80 kPa or whatever the boost pressure we're running is, under those steady state conditions and we got our timing absolutely perfect and our fuelling absolutely perfect, the chances are that when we actually did a ramp run through those same sites, we'll actually find that our fuelling is a little different and maybe our ignition timing requirements are a little bit different. |
| 30:56 | Still down to the way the engine's operating. |
| 30:58 | And of course what we want to do is tune the engine the way it's going to operate. |
| 31:02 | And clearly if we're at wide open throttle, the engine is not necessarily going up a very very steep hill, it is not going to be operating under steady state conditions, it is going to be accelerating. |
| 31:13 | So, that's why we want to use the dyno in the correct way to get the best results. |
| 31:17 | So, what I'm getting at here is there's no necessity, no real advantage even, in optimising every single cell of the boosted area using the technique of steady state ignition tuning, because it's not really going to give us the right result. |
| 31:34 | However, what we do need to do is set ourselves up for success and basically get our ignition timing under boosted conditions, at least in the ballpark, so that then we can optimise it using ramp runs, which is the way the engine's going to operate. |
| 31:48 | Ok so, how do we do that? Well what I would probably do here is let's come back up to 3500 RPM. |
| 31:54 | And we'll just tune one of these cells, let's go, we wanted, I think we had about 20 degrees in here, 21 degrees, that'll be OK, I don't need to be perfect here. |
| 32:09 | Let's go up to 40 kPa and again just looking at our intake temperature and our coolant temperature, everything's looking OK, been in this cell for a little while here. |
| 32:20 | Let's head over to our dyno and we can see that we're sitting around 800 pound foot of torque here, our line's nice and flat. |
| 32:27 | Let's go from 15 to 17 degrees so I'm steady state now, I'll press enter. |
| 32:31 | Ok, we see our torque has increased, that's good, we've gone in the right direction. |
| 32:36 | I'll enter a value of 19, again we're looking at our graph, it's nice and steady, I'll press enter. |
| 32:42 | Ok, we've gone up again, we're still making more torque. |
| 32:45 | That indicates we want to go further. |
| 32:47 | Let's go to 21 degrees, again I haven't pressed enter yet. |
| 32:50 | Press enter now. |
| 32:53 | Ok, we've seen absolutely no change so we'll come back to 19. |
| 32:57 | Alright, let's go back to our laptop screen here and we can see that our coolant temperature's sitting now at 94, our intake temperature's actually quite stable at 57 degrees, but our coolant temperature has come up a little bit, it's come up to 95 now and we do obviously want to monitor that. |
| 33:15 | That's taken us to 40 kPa. |
| 33:18 | I'd probably quite happily here also tune our 60 kPa site, let's have a look at one more of those and then we'll look at what we can do next. |
| 33:29 | Again, we just need to be a little bit mindful of our coolant temperature. |
| 33:32 | So, we'll come up into our 60 kPa site, nice and central, 15 degrees in there at the moment. |
| 33:37 | Probably going to be pretty close to the ballpark I'd say. |
| 33:40 | Let's add two degrees, so we're looking at our graph on our dyno again, flat, 980 pound foot, let's press enter. |
| 33:48 | Ok, we've gone up, we've gone up, but nothing great. |
| 33:52 | That suggests we're pretty close to MBT. |
| 33:55 | Because our trend has 19 degrees, or our table has 19 degrees at 40 kPa, I don't think we're going to see anything more by adding two, but let's see. |
| 34:04 | So, again we'll look at our graph here, nice and stable, I'm in the centre of the cell, I press enter. |
| 34:11 | Nothing at all, ok so, we go back to 17 degrees. |
| 34:14 | Ok so, we've got a reasonably typical example here where give or take we're sort of going about every 20 kPa, we're retarding the timing about two degrees. |
| 34:26 | So, I don't really necessarily need to tune all of these sites in steady state. |
| 34:32 | What I'd simply do here is go, well from 60 to 80 kPa, 20 kPa, we already know that our trend is around about two degrees, chances are we're probably going to be wanting somewhere around about 15 degrees. |
| 34:45 | Ok and again we go from 80 kPa up to 100 kPa, again 20 kPa jump, 13 degrees. |
| 34:52 | Now, at some point though, particularly once we start pumping more hot air into the engine, irrespective of the efficiency of the turbocharger compressor, as we compress air physics dictates that we are adding heat. |
| 35:05 | We've got an intercooler to remove some of that heat , but still it's not going to necessarily be able to get rid of all of it so as we add boost, our combustion charge temperature will tend to increase. |
| 35:17 | The combustion charge temperature itself, because we're combusting more fuel in the air is also increasing so we'll get to a point where the engine's going to start to become more and more knock prone if we're running on a pump fuel. |
| 35:29 | So, what I mean by this is that this two degree per 20 kPa increment isn't necessarily going to hold through to eternity. |
| 35:38 | At some point maybe up around about 140 kPa, what we might find is that we go from 10 degrees here, now instead of going from 10 to 8, as we go from 140 to 160, we might need to go down to seven degrees, so we might have to take three out. |
| 35:54 | Then as we go from 160 to 180, we might find that we actually start falling off and we might need to go down to two degrees. |
| 36:00 | These are also things that we want to keep in mind in terms of figuring out where the happy place for a particular engine is in terms of the boost we run. |
| 36:10 | What I mean by this is if we're again running on a pump fuel, particularly if we've got a smaller turbocharger that's going to be limited, we'll find that as we increase the boost pressure, initially we get a nice increase in power and torque, we'll add more boost, again a nice increase in power and torque, we'll get to a point where we start to see the increase in power and torque per psi start to drop away a little bit. |
| 36:34 | And then if we keep going, we'll find that it plateaus so we'll add another two psi of boost , but we'll have to pull out more ignition timing to prevent knock occurring, so we sort of go around in circles adding boost pressure, putting more heat, stress and strain on the engine, meaning to pull timing out and essentially making no more power as a result. |
| 36:53 | So, we'll try and sort of be mindful of this and kind of when I start seeing that declining gain in power and torque per psi, I know that we're getting pretty close to that optimal point and I don't tend to push my luck too far. |
| 37:08 | It's all about sort of tuning for the particular application, particularly if it's a road car, most people aren't probably going to notice the difference of five or 10 horsepower and most people would happily trade that off for an engine that's going to be safely tuned and nice and reliable. |
| 37:24 | Maybe a slightly different thing if you're drag racing and you're trying to beat world records, under those conditions, yeah you're probably going to want to make every horsepower you can and you're probably also going to understand the implications of what you're doing. |
| 37:38 | Alright, so that's why we don't need to necessarily optimise every single cell under steady state conditions and instead we can just move out a little way into positive boost and we can then extrapolate the trends we're seeing into the higher boost areas that we're likely to actually run in. |
| 37:57 | So, what we're going to do now is assume that that's what we've done and we're going to, I'm just going to pull a couple of degrees of timing out here for a bit of safety as well. |
| 38:07 | What we're going to do is assume that we've now finished our steady state tuning and we're going to move into our ramp run or full power tuning. |
| 38:15 | Again, starting with our wastegate spring pressure, which we've already looked at. |
| 38:20 | And I always recommend here, while we've extrapolated those numbers out, doesn't necessarily mean that we're right, remembering we always want to start from a position where we are safely retarded with our ignition timing and also while we're not focused on it today, safely rich. |
| 38:38 | As I mentioned, as we move from steady state to ramp run tuning, we do often see subtle differences in the fuel and ignition requirements. |
| 38:45 | So, generally I would add a little bit of fuel, maybe 2% or 3% fuel and at the same time I would also take out a little bit of ignition timing. |
| 38:54 | So, let's just highlight the area that we're going to run in. |
| 38:58 | I'm only going to do a partial ramp run here. |
| 39:00 | We'll pull out two degrees. |
| 39:02 | So, now what we can do is some ramp runs. |
| 39:06 | I'm going to do a couple of these just because otherwise we'll be here again all day. |
| 39:10 | So, we'll get a base run here underway. |
| 39:14 | And see what exactly we've got and I'm going to run this out to about 5500 RPM again just to save time, it's not about how much power the engine makes for our demonstration. |
| 39:24 | Alright, so we'll just let our temperatures stabilise a little bit and we'll get our first run underway. |
| 39:31 | Alright, ramp run complete there and we can see that we made 212 horsepower, 158 kilowatts. |
| 39:46 | So, what we want to do now, and first of all we're going to assume that we've monitored knock during that run and we know that we've got no knock occurring. |
| 39:56 | So, we're in a safe place, also obviously fuelling if required will need to be tweaked and adjusted to get that onto our target. |
| 40:04 | I watched the air fuel ratio during that run and it's spot on what the Haltech was asking for. |
| 40:09 | So, what we're going to do now, simply start by increasing the timing. |
| 40:13 | So, let's say we're running through our 80 kPa zone, I'm just going to do everything here for simplicity. |
| 40:21 | Just let me get rid of that. |
| 40:24 | Where are we, 2500, so we'll go from 60 kPa to 120. |
| 40:30 | So, I'm just going to hit page up twice and that's going to add two degrees. |
| 40:34 | Right so, what we'll do is we'll just save that run so we can overlay on top of it. |
| 40:40 | And we'll call that run one. |
| 40:48 | Not very creative with my naming, but that run will now stay up there in purple. |
| 40:52 | So, again we'll just get our engine up and running and we'll give it a few seconds here just to let our temperature stabilise, particularly when we're doing these back to back ramp runs, it's very easy to end up with our intake air temperature sort of climbing from one run to another and again that's not going to give us consistent results, so we're pretty good now, let's get our second run underway and we'll see what that's done for our power and torque. |
| 41:22 | Ok, we'll let the engine come back to idle here. |
| 41:27 | So, what we could see during that run is we picked up a little bit of power, little bit of power and torque, obviously they do go hand in hand, wasn't massive, but it was also only two degrees so what we can then do is use the results of that to help us guide our tuning. |
| 41:43 | So, let's save that and we'll compare the two runs, one over the top of the other. |
| 41:47 | So, what we can see here, it's probably not really a massive increase , but basically the two runs sort of overlaid one on top of the other up to around about this point here, maybe 2900 RPM. |
| 42:04 | So, if I'd added timing below that point, the additional timing gave us no benefit. |
| 42:09 | So, when we see that, I'd straight away remove that timing, doesn't need it, it was no help to us. |
| 42:14 | So, if we go to 300 RPM and above, we've got an area here where we sort of come back to the same, might be some run to run variations and particularly above 30, sort of 800 RPM, we can see that we're getting, it's about three or four horsepower, but of course we only added two degrees of timing. |
| 42:31 | So, when we see a gain like that, we've picked up maybe three or four horsepower, as long as we again still have no knock, then we'd simply go again and add another two degrees. |
| 42:41 | So, we'll just do that just for the sake of this demonstration. |
| 42:44 | I'll add two degrees there, we will go back to our ramp run. |
| 42:48 | And now we're going to be overlaying with that last run. |
| 42:52 | Let's get ourselves up and running again. |
| 42:58 | And we'll just again let our temperature stabilise. |
| 43:01 | If we jump across to my laptop screen just briefly, what we're looking for here is the air temperature at the start of the run. |
| 43:08 | So, we're around about 59 degrees so a degree's probably not too big of a deal, but I like to try and keep it as consistent as possible. |
| 43:15 | Alright, let's get our run underway, we'll get back to our dyno. |
| 43:23 | Ok so, on that run there we saw a small gain, but really pretty minor. |
| 43:30 | I imagine we're talking sort of one to two horsepower here. |
| 43:34 | So, again depending on your application and what sort of your appetite for risk is, if you've got an engine on a really good quality fuel and particularly this sort of power level, even a stock Evo engine is going to have no problem supporting this, we can simply keep increasing our timing until we do actually plateau and see no gains and then we can knock it off and call our ignition timing optimised. |
| 44:03 | Alright, so once we've done that, we're going to end up having our engine tuned all the way through under our wastegate spring pressure conditions. |
| 44:13 | And essentially then we're going to be doing much the same. |
| 44:16 | So, let's just say, back into our laptop software here, we say that we've tuned our engine through here at 80 kPa. |
| 44:24 | And what we'll be doing again, obviously because of the changes I've just made here, our map is looking a little bit unlikely. |
| 44:33 | But again what we will be doing is obviously wanting to now increase our boost pressure and just extrapolate that trend that we're seeing. |
| 44:40 | So, again if we're seeing sort of a two degree per 20 kPa drop off in our timing, as we go from 80 to 100 kPa, maybe I might want to start with that being four degrees. |
| 44:51 | Again, just a little bit safer. |
| 44:53 | What we then want to do, let's go back into our open loop boost control GTCycle table, what we want to do here is basically boost pressure and try and get a small increase in our boost. |
| 45:04 | Now, there's no sort of rock solid science, I can't say here that to get 20 kPa increase, I need to take this from 0% duty cycle to 25% for example, it is a bit of a trial and error process, but basically I would suggest starting with sort of a 10% to 15% increase, do a run and just assess what it's doing to your boost. |
| 45:26 | Remember, you can always back out of it if you don't like what you see. |
| 45:31 | So, if you add 15% and instead of 20 kPa gain, you get 50 obviously a bit too much, probably unlikely with such a small change in duty cycle. |
| 45:40 | I'd be just watching the boost pressure on my first run after making a change like that. |
| 45:44 | And if I don't like what's happening, just back off the throttle, clutch in, come back to idle and make a smaller change. |
| 45:52 | Now, we're going to move into our questions and answers really shortly so if you've got anything about the topic we've been talking about, please ask those in the chat and we'll get into those in a moment. |
| 46:01 | So, I'll explain the last part of this really, which is simply an iterative process. |
| 46:05 | Basically, we want to extrapolate the trends out that we're seeing in our ignition table into the boosted areas that we haven't got to. |
| 46:14 | And then we'll increase our boost pressure, we'll also make that a little bit safer than what the trend would suggest. |
| 46:20 | Then we'll increase our boost pressure, get into that new area that we haven't tuned and then we can optimise that particular row of our ignition table and then simply go again. |
| 46:34 | I've already given you some guidelines on sort of how you can know what sort of maximum boost pressure you can run safely in terms of where the engine and the turbocharger are operating efficiently for the particular octane of fuel that you're running on. |
| 46:50 | The other element that I should also quickly discuss is at this point we've talked about steady state tuning out to about 2.3 of our engine rev limiter. |
| 47:01 | So, obviously what do we do in the areas beyond that? Well, the simple answer is again we're extrapolating the shape of our ignition timing table out, we've got to 4500 RPM. |
| 47:12 | We know that above 4500 RPM probably the engine's going to want a little bit of additional timing because of the trends we've already talked about, but again to start safe I would simply extrapolate the 4500 RPM column all the way out and that should mean that at higher RPM we're safe. |
| 47:30 | Likewise, we can extrapolate our fuel curve out, but we can add a little bit of shape to that, sort of expecting above 4500 RPM we may still need a little bit of additional fuel as we move out towards the rev limiter we will probably find that we need to reduce the fueling. |
| 47:47 | This again, we don't have to be pinpoint accurate, what we'd do as we start moving towards ramp runs is we're never going to do our first ramp run out to 7500, 8000 RPM. |
| 47:59 | We know that we should be pretty safe and well tuned out to 4500 so for my first run I'd probably just go there, just to 4500. |
| 48:07 | And make any changes we need and then we'd creep out to maybe 4500 or 5000, 5500, 6000 so this can be done over the course of five or six different ramp runs, just creeping up on our tune and making appropriate changes. |
| 48:21 | Right, we'll have a look at our questions now. |
| 48:24 | Briggs Motorsports has asked, "We have a problem with lifting a cylinder head on a K24 turbo setup with a 68mm EFR making 640 wheel torque at 5400 RPM and 38 psi, is it too much for the engine to handle, is the cylinder pressure too high? I'm trying to sort this problem out on our Time Attack car, I may need to taper the boost up later and get rid of cylinder pressure low down.". |
| 48:48 | Yeah, Ok so, this is pretty much the problem that we get to once we start making serious power with turbocharged engines. |
| 48:57 | Head gasket integrity is kind of the limiting fuse. |
| 49:01 | And given my love of import drag racing, I've lifted more heads than I care to remember. |
| 49:10 | So, there's two aspects to this. |
| 49:13 | First of all, is the mechanical side of the head gasket and clamping system. |
| 49:18 | There's a variety of different head gasket designs. |
| 49:21 | The factory gaskets are normally only good to a certain point, after that we may find benefit from using an aftermarket MLS head gasket. |
| 49:30 | I had really good results with the HKS stopper type head gaskets on our 4G63 engine program, but even then there was a limit. |
| 49:39 | These days with very high boost, very high specific power level import turbocharged drag engines, or turbocharged drag engines for that matter, an aluminium bronze sealing ring with a copper gasket tends to be the go to solution. |
| 49:55 | So, that's something you could look at, essentially better head gasket sealing technology. |
| 50:02 | If you're not going to go down that path then your only option is to artificially limit your peak cylinder pressure because it is that peak cylinder pressure forcing the head off the block and basically making the head gasket fail. |
| 50:15 | Two ways of doing that, you kind of already cottoned onto this by the sound of it in terms of basically limiting your boost pressure through the peak torque area. |
| 50:22 | Torque is cylinder pressure, so peak torque is where our cylinder pressure is highest. |
| 50:28 | So, that's the area we need to worry about. |
| 50:30 | So, two ways of doing that, one is to reduce the boost pressure through peak torque. |
| 50:34 | The other is to reduce our ignition timing, which has the effect of reducing cylinder pressure as well. |
| 50:40 | Generally, depends how much you have to taper this away. |
| 50:44 | Generally, I would try to use as much boost as you can get away with, so that it's easier to ramp it back in once you're past peak torque. |
| 50:53 | So, if you can do it just retarding the timing by maybe five to eight degrees through that peak torque region and leave the boost mostly where it is, that would be a good preference, because it's much quicker to ramp the timing back in than it is to actually change the boost pressure. |
| 51:08 | Next, question comes from Crez FPVs asks, "What are your thoughts on watching the boost pressure and slowly increasing the timing until the boost no longer decreases? Would this account for detonation or just the distance from MBT or EGT?". |
| 51:20 | Yeah, not a technique that I could recommend. |
| 51:24 | While you may find that there is some very very subtle relationship between boost pressure and your timing, depending on your wastegate control system and your turbocharger, these things are just so good at making boost pressure that that's not really going to give you a good indication of what's going on. |
| 51:43 | And really in order to optimise your timing for a given boost pressure and RPM, you are going to need a load bearing dyno that can actually give you a torque output. |
| 51:55 | Alright, that's all the questions we've got so we'll leave it there, thanks for watching and as usual if you're watching this in our archive at a later point, if you've got further questions, please ask those in the forum and I'll be happy to answer them there. |
| 52:07 | Thanks for watching and we'll see you next time. |
| 52:10 | Now, for those who are watching on our social media, this is just some insight into what we put on every week for our HPA gold members. |
| 52:16 | Our gold members get to review these webinars in our archive where we've currently got over 350 hours of existing webinar content. |
| 52:23 | This is an absolute gold mine and one of the fastest ways to expand your knowledge on a huge range of performance automotive topics, everything from engine tuning and engine building to wiring, 3D modelling, CAD, 3D printing and scanning. |
| 52:37 | The list is long. |
| 52:40 | On top of this, our gold members also get access to our private members only forum, which is the best place to get trustworthy answers to your specific questions. |
| 52:47 | You can purchase gold membership for just $19 USD a month, however the purchase of any of our courses, you'll get three months of free gold membership and if you want to get a fuller idea of the courses we have available, you can head to hpacademy.com forward slash courses. |
| 53:03 | Thanks to everyone who has joined us today and hopefully we can see you online again in the future. |
0:00 - Introduction
0:54 - Two ignition timing trends
7:34 - Peak cylinder pressure
11:49 - Knock or detonation under low octane fuels
16:30 - Monitor and control temperatures
21:13 - Map ingition timing
26:22 - Minimum boost pressure / waste gate spring pressure
37:38 - Ramp run full power tuning
44:16 - Extrapolating tuning to higher rpm
48:21 - Q&A


