359 | How to Choose the Best Brake Calipers
Summary
Everyone loves a big brake kit, but unfortunately bigger isn't always better. In this webinar we'll discuss the important differences between brake calipers and the considerations when need to keep in mind when making changes.
| 00:00 | Hey team, Connor here from HPA and welcome to another one of our webinars. |
| 00:04 | So, this week we're gonna be talking about brake caliper upgrades. |
| 00:08 | So, we'll talk about why we'd want to upgrade our brake calipers, the difference between the different types of brake calipers and also what we need to consider when we're doing an upgrade like this before we go out and spend a bunch of money on brake calipers or blindly put something on our car that's not gonna work. |
| 00:27 | So, brakes are one of the first things to give us issues when we go out on track with our vehicle or just with spirited driving for street cars as well. |
| 00:36 | Basically, the factory brakes are just generally not designed for performance applications in most cases and there's a lot of compromises there around comfort and cost and things like that. |
| 00:50 | And oftentimes a lot of off the shelf big brake kits are not always the best and that's absolutely not a blanket statement. |
| 01:00 | There's many companies providing really great off the shelf big brake kits but there's some that aren't that great as well. |
| 01:07 | So, it's just good to understand what you're purchasing and be able to dive in a little bit more armed with some knowledge to know that you're getting something that's quality. |
| 01:15 | Also in a lot of cases if we're working on dedicated race cars that have been modified substantially from the stock configuration, these off the shelf big brake kits that were designed for a factory vehicle are no longer really ideal for our purposes. |
| 01:31 | So, it's good to be able to kind of spec something ourself in those cases to make sure it's gonna do the job we want. |
| 01:39 | So, first of all let's just cover what brake calipers do. |
| 01:43 | Because it seems pretty simple and really it is. |
| 01:46 | They're basically converting hydraulic pressure in our brake lines and that is the displacement of the brake fluid to clamping force and also movement of our brake pads to clamp the pads against the disc, resulting in friction and brake torque and therefore slowing the vehicle. |
| 02:05 | So, it's a fairly basic job that the calipers do but there's a lot of features of the brake caliper that have quite a big impact on their ability to do this job. |
| 02:14 | So, what we end up with is maybe two calipers that on the surface might seem quite similar doing a completely different job in terms of efficiency of this. |
| 02:26 | So, first of all, well next, what is good brakes, what makes good braking performance? And for one we want our brakes to be balanced. |
| 02:36 | So, by this I'm talking about the brake bias, the distribution of braking force from the front axle to the rear axle. |
| 02:43 | We want this to be balanced for our vehicle so we don't end up with far too much rear brakes, which is going to basically make the rear wheels lock first and make the car unstable and tend towards oversteer or on corner entry. |
| 02:58 | But we don't want to also have massively oversized front brakes that also lock too easy and leave a lot of braking performance on the table. |
| 03:09 | Another thing that we want with good brakes is for them to be controllable. |
| 03:12 | So, that really comes down to our modulation. |
| 03:15 | We don't want brakes, again that if we just with a light touch of the pedal, that's going to lock the wheels because we're way overbraked on the vehicle. |
| 03:23 | And at the same time we don't want to be able to apply so much pressure that we can't get the car to slow at all. |
| 03:30 | There's kind of a balance there with the pedal feel as well. |
| 03:35 | But the modulation and being able to control and trust those brakes is a key thing to braking performance. |
| 03:43 | And on that same note, reliability. |
| 03:45 | This is one of the key things with our brakes is being able to rely on them lap after lap as we progress through the race. |
| 03:53 | Obviously, we don't want any reliability issues with our brakes because that's going to probably result in a serious accident. |
| 04:00 | Again we want to be able to rely on them lap after lap and that's going to do the most for driver confidence and be able to get the most out of the vehicle. |
| 04:09 | After all of that then I think it comes down to having powerful brakes. |
| 04:14 | Once we've ticked all those boxes then having powerful brakes is obviously going to be an advantage to us, being able to brake later. |
| 04:25 | But a lot of that actually comes down to the grip of the vehicle and generally isn't actually a result of the braking system. |
| 04:35 | It's very rare for modern cars to actually need more brake power. |
| 04:39 | Especially we know this if we can go out and we can slam on the brakes and lock up the wheels, then power probably isn't going to be our issue. |
| 04:48 | That's not always the case of course, in a lot of older vehicles that we've modified, increased the power. |
| 04:56 | If those vehicles had really small wheels and tyres from factory and we've changed all that and it has a lot more grip, then the brakes generally are something that might need more power there. |
| 05:08 | And yeah if we have bigger wheels and room for bigger brakes then sure bigger brakes, more powerful brakes is going to be the answer in that case. |
| 05:18 | But like I say, power by itself is generally not the problem. |
| 05:23 | The problem really comes down to heat and if we think about what our brakes do, it's essentially converting kinetic energy into heat energy and then we need to dissipate that heat or get rid of that heat out of the system. |
| 05:36 | So, the factory brakes in the vehicle, they'll be able to stop the car, great, maybe once, maybe twice, but repeated stops is really where it becomes an issue for most braking systems, especially for non performance cars that are being used for performance applications. |
| 05:56 | So, in regards to our calipers, what can we do to increase the heat capacity I guess? Changing calipers can allow us to use bigger brake discs. |
| 06:08 | The brake discs are really the thermal sink for the heat, so that is one of the main areas where we can get an advantage in thermal capacity. |
| 06:19 | Motorsport calipers also have different seals and different pistons and internal components that are designed to hold up to the higher temperatures. |
| 06:30 | So, if we think about a basic factory caliper on a non performance orientated car, the seals in that for the brake fluid are generally not going to be designed to handle the heat of motorsport, but in a motorsport caliper, they'll be made generally of a slightly different type of rubber and also be a lot thicker as well so they have more thermal mass in themselves to be able to hold up to that heat. |
| 06:56 | Another thing with calipers as well is the coatings. |
| 07:00 | So, I've got an example here and this here is a Brembo caliper, we'll look under the overhead here. |
| 07:09 | This is a pretty massive four piston caliper and I think this is off a Range Rover in this case. |
| 07:16 | So, obviously not a motorsport vehicle but kind of a higher end and they've wanted to kind of put a nice looking performance caliper on here. |
| 07:25 | But you'll see that in this case this is painted or powder coated. |
| 07:29 | But if we look at a dedicated motorsport caliper, which we have kind of two examples of here. |
| 07:39 | We have, we'll look at this one here, this is an AP Racing and in this case this is actually hard anodised and that is probably, it might seem kind of silly, but the finish of the powder coated or painted caliper basically will generally not handle the abuse of a track day or racing, but in a lot of cases this hard anodised finish will be able to handle, these cars have been through multiple race, these brakes have been through multiple race seasons and you can see that the surface finish is holding up pretty good. |
| 08:17 | So, even down to the appearance or the surface finish of the caliper designed for motorsport use is designed to handle more heat as well. |
| 08:29 | Outside of heat there are a lot of other reasons we'd want to upgrade our calipers. |
| 08:34 | One of the main ones being the stiffness of the caliper. |
| 08:38 | So, this is something that gets thrown around a lot and when I first heard this years ago, I was kind of like well how much would the caliper stiffness really be felt by someone who wasn't a top tier driver? And I've since learnt that it is probably one of the most important things. |
| 08:56 | So, if we lack stiffness in the brake caliper, then what we're going to end up with is compliance issues. |
| 09:03 | So, basically what that means is as we press on the brake pedal, as that force is, or pressure is converted through the brake fluid to force at the caliper, the caliper itself can flex, the upright can flex, the whole system can flex and basically what that does is it takes away from that force that we're trying to transfer. |
| 09:22 | We end up with less feedback through the brakes and we also require force above and beyond what would be required with a perfectly stiff caliper to be able to transfer that into clamping force. |
| 09:37 | So, stiffness is a key one and then moving on, unsprung weight is a word that you hear so commonly in motorsport and basically if we have more unsprung weight, that's going to be detrimental to our grip. |
| 09:54 | Basically, our suspension's ability to maintain the contact patch of the tyre and the road, which is kind of the be all end all of our grip. |
| 10:03 | So, being able to reduce the unsprung weight with certain calipers is also an advantage as well. |
| 10:11 | And on that note, well generally we want to increase the size of our braking system, especially the brake discs. |
| 10:18 | In this case the thermal capacity and the ability to manage heat of increasing our brake discs is generally worth it in the trade off to the more unsprung weight and rotating inertia as well. |
| 10:32 | So, that can kind of go a bit in both directions on the weight thing. |
| 10:36 | More thermal mass is good, but when we're not talking about braking for grip, cornering, acceleration, things like that, it can also be beneficial to have less weight. |
| 10:49 | The other thing, another reason we might want to upgrade our calipers is for the pads. |
| 10:55 | So, that's just as simple as what pads we're able to run in upgraded calipers. |
| 11:01 | So, generally we can run larger pads and there's just a comment I wanted to make about this. |
| 11:12 | If we jump over to here, in this case I have two brake , which were used on the same car. |
| 11:23 | So, this was our GT86. |
| 11:26 | And you should be able to see here the distance between the piston, which is just in here, the surface of that where the pad would lay, and then the side of where the brake pads would sit here, the gap here running through the middle of the brake pad is very small. |
| 11:44 | And in this case on the Endless unit, the motorsport caliper, we can actually run a much thicker pad there as well. |
| 11:51 | So, that there is also great for thermal capacity of the pad and also the wear. |
| 11:59 | And something, another thing to consider here if we look, the size of the pad here is naturally, or you can see that it's a lot larger than that of the factory unit. |
| 12:09 | So, what that does is it's commonly misunderstood that a larger pad, a more surface area on that pad increases the friction, but if you think about the friction equation, the friction force is a function of the normal force between the surfaces and also the coefficient of friction between the brake pad and the disc. |
| 12:36 | The area actually doesn't factor into that at all so it doesn't actually, increasing the area of the friction surfaces doesn't increase the friction force but what it does is it basically reduces the pressure across the surface and that does a lot of good things for the thermals and also the pad wear, reducing the pad wear. |
| 13:03 | Another thing that we're gonna get into a little bit more is just reducing pad taper but we're gonna come back to that in a moment. |
| 13:12 | And then finally on the topic of pads and the reason we'd want to upgrade our calipers is basically just for more pad selection, different compounds and stuff. |
| 13:23 | Sometimes again, if we're using a vehicle and the factory calipers, it's not a performance kind of focused vehicle, oftentimes there's not very good pad offerings for that factory caliper so it can be worth moving to a commonly used motorsport caliper and that'll open the door to a lot of new pad options as well. |
| 13:46 | So, moving on from there, the number of pistons and that's another kind of area that has some common misconceptions around it. |
| 13:57 | So, the piston area, which is kind of related to the number of pistons in some ways, dictates the clamping force so the pressure equation, or force equals pressure times by area so for a certain brake line pressure, if we have a larger piston area, that means we're gonna get more force and basically that means more clamping force and that in the end translates to more brake torque. |
| 14:29 | But that doesn't actually depend on the number of pistons, because you can have a case where for example if I compare to other calipers here, we have this AP Racing unit here and that is a six piston and in this case the Endless unit is a four piston. |
| 14:50 | And we won't measure the sizes here, but in a lot of cases basically you can have six pistons and the total surface area of these, actually that will be a better example is if I use this Brembo here. |
| 15:06 | Again four piston Brembo, the surface area of the pistons, the two pistons in the Brembo is actually, will actually be more than the six or three pistons on the side of the AP Racing caliper here. |
| 15:23 | So, the number of pistons doesn't necessarily mean that it is gonna have more clamping force, it is the area that determines that. |
| 15:34 | But in saying that, generally if you're gonna have more pistons, that does kinda add up and that does tend towards having more piston area as well. |
| 15:47 | But the point of having more pistons is really to distribute the pressure on the pad. |
| 15:53 | And I have a little bit of a video here, which I've just kinda taken as a screen recording out of our brake system course, which I'll talk about at the end of the webinar. |
| 16:05 | And you can see here that we have a single piston on the pad here and this is just trying to kinda highlight that the pad, when pressure is applied or force is applied through that piston, will actually flex on the surface. |
| 16:20 | And basically what that means is if we have the disc running down here, we get an uneven pressure between the pad and the disc. |
| 16:28 | And that can lead to uneven wear on the pad surface. |
| 16:34 | And basically that leads to issues with pad taper, the pad will wear out faster and it'll also result in compliance like we talked about before with the stiffness of the caliper. |
| 16:46 | So, basically what we do is we use staggered pistons, sorry we use multiple pistons in this case and that will distribute the force or the pressure more evenly over the pad surface. |
| 17:00 | And then in addition to this, what we'll actually have is staggered pistons. |
| 17:05 | So, we'll jump back to our overhead here. |
| 17:08 | And we can see here that this piston here is smaller than this one , which is smaller than this one. |
| 17:16 | So, these kinda decrease in size and the smallest one here is at the leading edge of the pad. |
| 17:23 | So, as the disc is spinning it comes through this way here. |
| 17:27 | And the reason for this is the smaller piston here will result in less force on the pad and as they get larger that's more force on the pad. |
| 17:37 | Because the leading edge of the pad will basically wear faster, if we reduce the force on it that can counteract some of that and what we end up with is more even wear on the pad. |
| 17:51 | If we just progress through this video a little bit more, we can see that there as well, the leading edge of the pad and the trailing edge and how that size changes there. |
| 18:04 | And we'll see in this next one here, the pad taper as well. |
| 18:09 | So, that pad taper basically what it means here is that this surface here, if this surface here is sitting flush against the disc, then this surface here that the pistons are acting on is no longer straight and basically we end up with issues again with compliance in the system. |
| 18:31 | So, that's basically what the point of multiple pistons and the stagger of the pistons is as well. |
| 18:38 | And then finally another reason we want to upgrade our brake calipers again is for more power and in that case that might actually not be a function of the actual force from the pistons themselves, but that might just be a stiffer caliper for less compliance, that's gonna result in more power being transferred or more force being transferred to the friction surface. |
| 19:04 | And then finally of course increasing the size of the pistons is gonna give us more power if that's what we're after. |
| 19:13 | So, at this point I'll just make a quick call for questions. |
| 19:17 | If you have any questions come up relevant to today's topic, feel free to ask them in the chat and then at the end of the webinar I'll do my best to answer them. |
| 19:28 | But yeah we'll just move on from there. |
| 19:33 | So, let's get into, just move these out of the way for a moment, talking about the different types of brake calipers because this has quite an impact on their operation. |
| 19:47 | So, the first one here we'll look at is the factory one of our Toyota, or our Toyota 86, but see it's got Subaru on there because it's off a, also used on the Subaru BRZ. |
| 20:03 | So, in this case here we have the mounts here and that's the mounting part of the caliper and that mounts to the upright. |
| 20:12 | And then what this is called is a sliding caliper. |
| 20:16 | So, we can see that the actual body of the caliper is able to slide on its mounts with the pins here and then there's just a single piston in here but even though there's a single piston, basically we'll have, as the piston pushes out, the caliper will slide back on its mount and the other pad will also be pulled against the other disc surface and we'll end up having equal clamping force on both sides of the disc even though we have a single piston in there. |
| 20:51 | So, generally speaking compared to the other calipers that we're gonna be discussing, these will often lack stiffness but we could also have issues if they're not properly maintained with basically the pins not sliding properly and that basically ends up causing misalignment and issues with pad wear. |
| 21:15 | They can also be heavy because generally they are designed with compromises in mind around cost and manufacturing and that often results in increased weight, which is basically unnecessary, unsprung weight and also if you look at them, in most cases they generally just don't look very nice and that's something to consider as well. |
| 21:44 | We'll just leave this here for a moment and we'll move on back to our AP Racing caliper. |
| 21:51 | So, this is the next type that we're going to discuss. |
| 21:55 | And this is what's called, we have quite a few examples of this here, a fixed caliper. |
| 22:02 | So, in this case the entire body of the caliper is fixed to basically effectively become one piece. |
| 22:10 | So, this mounts through these here to the upright and the whole body is fixed in one position and then we have pistons on each side of the caliper that oppose each other. |
| 22:23 | Generally speaking this is a lot stiffer than the sliding option and it's not as prone to the kind of issues with the pins sticking as well. |
| 22:32 | One of the common misconceptions here is that when you move from, let's compare these two calipers for example, we have this Wilwood two piston and we have the original sliding caliper here. |
| 22:48 | So, one misconception here is that when you move to the two pistons, then straight away that must be better than one and that's not always the case because when we're comparing these two calipers, we want to, the effective piston area is basically, if we're comparing them, just taken from one side of the caliper. |
| 23:08 | Because as this moves out, this piston and the body slides back on the pins here, basically the piston ends up moving twice the distance and we still get the same force on each side of the disc or on each pad in that case. |
| 23:26 | And in this case the pistons will only move half the distance and of course we get the same force because each of the pistons is the same diameter in this case. |
| 23:37 | So, that's just a misconception that this must give more force, it really again just comes down to comparing the piston area on one side of the caliper to the other, or between the two calipers essentially. |
| 23:54 | You can either half the piston area here and just calculate it on one side, or you could take this and double that piston area and compare it to the entire, or the sum of both pistons on that side. |
| 24:06 | So, that's just something to consider when comparing the hydraulic or the force that you'd get, the clamping force that you'd get out of the calipers. |
| 24:17 | So, moving on, we'll just compare, we've got our AP Racing one here. |
| 24:22 | So, this is actually a fixed caliper, but it is a multi piece caliper and we'll just ignore the bridge here for a moment and you'll see that there's a split line kind of down the middle here between the two halves and then they are fixed with this hardware through here. |
| 24:41 | So, the alternative to that is what we've got here with our endless caliper. |
| 24:48 | So, this is the AP Racing Pro 5000 R series and this is an Endless Mono Four in this case, four obviously being for four pistons, and mono being for the mono block. |
| 25:02 | So, in this case the caliper is made from a single piece of material. |
| 25:07 | And generally speaking what that means is that, well it's hard to apply a blanket statement here, but essentially a mono block caliper is going to be stiffer than a multi piece caliper if they're the same weight but if they are the same stiffness then you can also say that the mono block caliper will be lighter. |
| 25:34 | And of course there's a lot of factors that compare into that as well. |
| 25:38 | Like the actual, the company producing it, the quality of their work and their design and things like that. |
| 25:46 | But generally as a kind of rule of thumb here, you can say that a mono block caliper is going to be stiffer and or lighter than a multi piece caliper. |
| 25:56 | But again there's a lot more that goes into that so that's just kind of a rough kind of rule that you can follow for that. |
| 26:05 | So, we'll just move on now to, I just wanted to compare one last thing here. |
| 26:15 | I have this quite dated Willwood caliper here. |
| 26:21 | And of course all of this comparison is not between the actual brands, these are just calipers that we had and these don't fit into the same market as each other and there's lots of models and offerings from each of these brands that are more competitive with each other. |
| 26:36 | This is just what we've got to show. |
| 26:38 | So, this is actually a very old Willwood caliper, I think it's from about the 90s. |
| 26:42 | Four piston fixed caliper. |
| 26:45 | And as you can see if you compare this to this much newer AP Racing caliper here, they're both fixed multi piece calipers but you can kind of see the area between where the two halves is fixed together on the Willwood is just fixed with these kind of spaces here whereas the AP Racing unit has a solid kind of piece where it bolts together and generally you could understand that the AP Racing unit is gonna be significantly stiffer than this one here, but if I pick them both up, in this case I think the Willwood is slightly lighter. |
| 27:24 | So, it really just depends on what application you're gonna be using them for. |
| 27:29 | So, that moves us onto our next topic of discussion being the application. |
| 27:35 | So, we need to consider when we're purchasing or looking at changing or upgrading our calipers what we really need and this is going to depend on what we're using the car for, is it a street car, is it endurance racing, time attack, rally for example and then also we need to consider what our budget is gonna be, because something like the Endless Monoblock caliper over there, that's a very expensive caliper and we might not benefit from the extra stiffness or unsprung weight or reduction in unsprung weight that we get from that if we really don't need it, it might not be worth spending that extra money on. |
| 28:17 | But in some cases if we're using, if it's an endurance car for example, at top tier then we might benefit from that, it really depends on the vehicle. |
| 28:28 | Another thing to consider is the wheel clearance. |
| 28:32 | So, the big Brembo off the Range Rover over there isn't gonna fit on something like a Honda CRX. |
| 28:40 | This is the AP Racing caliper off our Honda CRX in this case, but this wouldn't fit under a 15 inch wheel, we're actually running 17 inch wheels on the Honda CRX. |
| 28:52 | So, another thing to consider is what size wheels you're running. |
| 28:56 | And the disc diameter will play a big part in that as well. |
| 29:01 | We also need to consider the features of the caliper as well. |
| 29:07 | So, again I'll get the Endless one up here and we can compare these two calipers, because they're kind of the most similar in this case. |
| 29:17 | So, one of the features of the AP Racing caliper here is the removable bridge. |
| 29:22 | So, basically we can undo this hardware here, pull the bridge out and then we can pull the pads straight out the back of the caliper , which makes changing the pads very easy. |
| 29:33 | But you'll notice on the Endless monoblock here, and not all monoblocks are like this, some will still have a removable bridge, but we have this fixed bridge across the middle. |
| 29:44 | And that's been done in this case for extra stiffness and weight as well, keeping that in mind. |
| 29:51 | And that basically just means to change the pads in this caliper, we need to remove this off the vehicle, then change the pads and put it back on. |
| 30:02 | And that might not be an issue depending on what you're using the caliper for. |
| 30:06 | In our case we use it for endurance racing but the longest races that this car sees with this caliper on is three hours. |
| 30:15 | And in that time we don't need to, actually one hour sorry, in that time we actually don't need to do any pad changes, we can change between sessions or rounds if we need to. |
| 30:27 | But in some longer endurance racing series that run for 24 hours, it's common for them to have to change pads during the race. |
| 30:38 | So, in that case, a removable bridge would be a big advantage. |
| 30:44 | But also at the very top tier endurance racing, they will completely remove the caliper and bolt on another one that has new pads in it and they'll have dry brakes on the brake lines and things like that to allow for that as well. |
| 30:59 | So, again these aren't blanket statements that apply to everything. |
| 31:05 | The other thing to consider here is the mounting method. |
| 31:10 | So, I'll remove the endless for a moment and we'll just look at this small Wilwood two piston in this case. |
| 31:20 | And this is what we'd typically see on a factory caliper as well. |
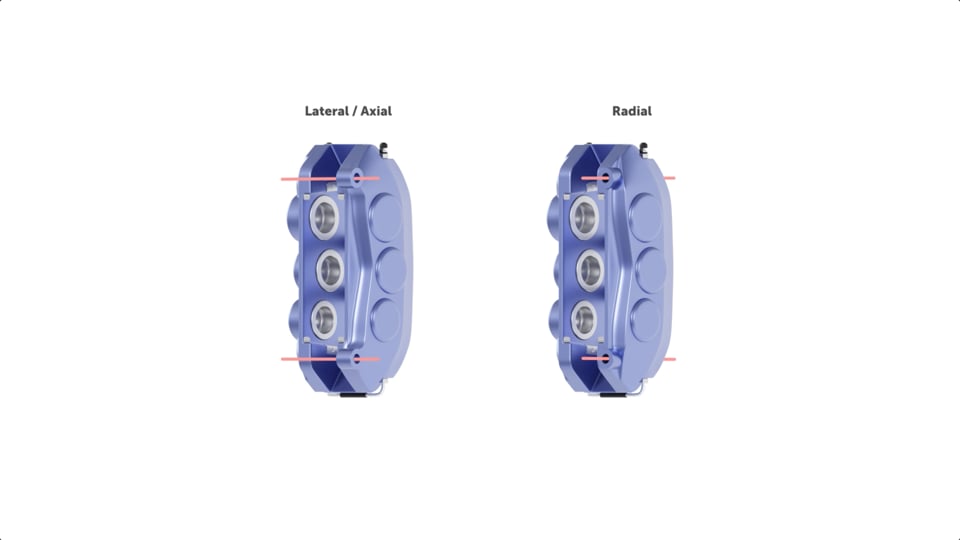
| 31:25 | The mounting method there is the mounting lugs are in the same direction. |
| 31:31 | So, that is what we would probably refer to as axial mounting in this case, because the hardware here would follow the same direction as the axle. |
| 31:44 | The alternative to that is what we often see more so on a motorsport caliper. |
| 31:50 | And we can see that these are the mounting holes here. |
| 31:53 | And in this case, these are often called lug mounted, but we could also call this radial mount as well, because the hardware basically follows the direction, or the radius of the wheel in this case. |
| 32:08 | So, in this case like the AP Racing caliper here and the endless both have the radial or lug mount style and you can see the endless there has been adapted with this bracket to mount onto the factory upright , which is designed for that axial mount. |
| 32:34 | And our older Wilwood caliper here has those more factory style axial mounts and the Brembo back there as well has the axial mounts as well. |
| 32:45 | And there's really not too much of a difference between them, one's not necessarily better than the other. |
| 32:51 | It comes down to a lot of things like the vehicle it's designed to work with. |
| 32:56 | It's just good to understand what you're buying and have a plan in mind if you're going to have to make that adapter bracket that you'll actually be able to achieve that depending on what mounting style that you buy. |
| 33:15 | Because yeah you don't want to buy something and then realise that you're not going to have room or be able to create the right shape bracket basically. |
| 33:22 | But it's not necessarily to say that one way is better than the other, that's not really the case. |
| 33:28 | I think these are probably done like this because using these on a motorsport upright, this is usually the kind of preferred method, makes the bracket a little bit easier to design and then also in terms of manufacturing, you could probably understand why this reduces the amount of material used compared to something like that. |
| 33:50 | So, just something worth keeping in mind when you're purchasing calipers. |
| 33:54 | Other features that we might consider is the likes of anti knockback springs. |
| 33:59 | So, these are little springs behind the pistons and they basically just prevent the pistons being knocked back by run out issues in the disc. |
| 34:12 | So, some calipers will have them and some will not. |
| 34:16 | Just another feature, depending on the application if you need them. |
| 34:20 | Some calipers will also have extra dust seals in them. |
| 34:24 | Again if you're using the vehicle for rally applications or street applications where you're not servicing them very often, then extra dust seals can be good in that case but maybe not so necessary on a road racing application or something like time attack. |
| 34:43 | Another thing is the piston material itself. |
| 34:47 | So, generally these will be stainless steel but some offerings come, sometimes there's the option to have titanium pistons. |
| 34:57 | And while a lot of people would generally kind of think that this is for the weight advantage, it does result in a slight reduction in weight, but it's actually mostly for insulation of the heat generated to the brake fluid, which is obviously on the other side of the piston there. |
| 35:15 | And in extreme cases there are other features of the caliper like the water cooling for example, that's a feature that Elkon had in their rally calipers but generally speaking you're not really gonna see that unless you're looking for that. |
| 35:34 | And I think that was gonna be used or was used very slightly in WRC and then it was banned after that but it is still an option to buy calipers with water cooling in them as well. |
| 35:48 | And then next what we're gonna move onto is just talking again about the number of pistons and the area of the pistons as well and the effect that that has on our bias and our pedal feel. |
| 36:00 | So, we'll get into that in just a moment, but first I just wanted to make a call again for any questions that you might have, I'll get onto answering those in a moment so if you've got anything, come up, just drop that in the chat and I'll do my best to answer it. |
| 36:17 | I'll have a quick drink of water, one moment. |
| 36:31 | So, let's just talk about if we were going to upgrade the calipers on a car and we'll use a bit of an example for this. |
| 36:38 | So, let's just consider something like a Honda CRX or Civic. |
| 36:42 | This is a front engine front wheel drive vehicle with an overly forward weight bias and let's also assume, just to keep things simple, that there's no considerable aero on the vehicle that's changing our braking targets I guess. |
| 37:04 | And let's say that these factory, these vehicles I think come on 14 inch wheels and maybe we've increased the size of the wheels to 15 or 16 inches so we have more space to use a larger disc there or larger brakes if we want to. |
| 37:22 | And we're also using grippier tyres than the factory setup and basically what that means is if we have more grip available, we can brake harder and we can shift more weight onto the front of the vehicle, the more weight we transfer to the front of the vehicle, the more we want our bias to be forward on the vehicle so the front brakes are doing more of the work compared to the rear basically. |
| 37:48 | So, in this case let's say we want to retain the current bias or maybe make a shift forward slightly and we want to make the change to a better caliper that's stiffer and has, yes just a generally better caliper with maybe some more features around the motorsport like increased thermal capacity and maybe at the same time we're moving to a larger disc as well to allow for more thermal capacity. |
| 38:21 | So, if we took the route of just blindly using larger calipers with more piston area and a bigger disc, then what we could end up with is an overly front bias. |
| 38:32 | And this is generally safe because this means that our front wheels will lock first rather than our rears so it'll promote understeer, which is a lot more stable than oversteer. |
| 38:45 | But we're leaving a lot of performance on the table. |
| 38:48 | Also if we massively oversize our brakes and keep our master cylinders the same, then it's very easy to lock the brakes quickly. |
| 38:57 | And at the same time if we have more piston area, but again we keep our master cylinders the same, we need to displace more fluid so we end up with more movement of the master cylinders and therefore the pedal, we get a long pedal. |
| 39:13 | If we're using a motorsport style pedal box here with dual master cylinders and now all of a sudden the front master cylinder moves through a lot more travel than the rear, this can lead to issues with bias migration as well. |
| 39:26 | And basically none of this is what we talked about as our idea of good brakes at the start of the webinar. |
| 39:32 | So, what we should be thinking about instead is first understanding the brake torque of our current setup for example. |
| 39:42 | And I'll just move this out of the way and just get a piece of paper here. |
| 39:47 | So, we can kind of draw a little bit of a picture. |
| 40:00 | So, let's just consider our brake disc here. |
| 40:04 | So, that's the centre of the wheel and then we have the hat and then our friction surface here. |
| 40:15 | And then we have our pad on the surface there. |
| 40:21 | And the caliper is naturally over top of that. |
| 40:26 | And let's just say for example's sake we just have a single piston there. |
| 40:32 | So, basically there's a few equations that we need to understand here and the maths is all very simple. |
| 40:40 | So, if we just think about the brake torque for example. |
| 40:45 | So, the torque is basically like the rotational force that the brakes provide to slow the vehicle. |
| 40:52 | And in this case our torque, sorry it's not a great pen, equals the force here that we get, friction force from the pad and then this distance multiplied by this distance. |
| 41:12 | So, friction force multiplied by this distance here , which is the effective radius to the centre of the pad basically. |
| 41:22 | So, that's our torque equals our force multiplied by this distance. |
| 41:26 | And we want to essentially maintain this on the front axle for our example or maybe we want to increase it slightly. |
| 41:35 | So, there's a few ways that we could do this. |
| 41:38 | Let's basically first consider, well we can increase the friction force or we can increase the radius here. |
| 41:47 | So, if we move to a bigger diameter disc then the radius here will increase and if we keep the friction force the same, which is governed by the caliper and the pad, then that torque will increase. |
| 42:02 | If we wanted to keep the torque the same in that case, what we could do is use a smaller piston with a smaller caliper or maybe we could use a pad with less friction, because the friction force equals the normal force between the pad and the disc, which is we'll call force normal, multiplied by mu. |
| 42:32 | And mu is the coefficient of friction between the brake pad and the disc. |
| 42:37 | So, that's controlled by whatever compound of brake pad we're using. |
| 42:42 | So, if we increased the size of the disc here to get more thermal capacity out of the brake disc, because that's probably the best way to increase the thermal capacity, then if we increased that to keep the torque value the same, we could actually decrease the friction force and this is because we'd be decreasing the normal force here and that normal force basically is the force from the piston and in that case that would be the brake pressure multiplied by the area of the piston. |
| 43:21 | So, if we used a smaller piston, that would mean the area would be smaller so for the same brake pressure, the normal force would be less, makes the friction force less and that makes the torque less but if this decreases and this increases we can keep that the same. |
| 43:38 | Or we could basically, you can understand now how this equation can be used. |
| 43:43 | We increase the area of the piston, that will increase the normal force that we get if we use the same pads, that increases the friction force and that increases our brake torque. |
| 43:58 | So, that's just the basics of how that's all calculated. |
| 44:01 | So, we could go that route and use a caliper with more piston area and we could get our increase in thermal mass rather than using a larger diameter rotor or disc, we could use a thicker disc as well or just a disc with better ventilation design that's more efficient at cooling. |
| 44:26 | What we need to consider if we're increasing the area of our caliper though, if we're using more, yeah pistons, bigger pistons essentially, then we are going to be displacing more fluid for the same movement of those. |
| 44:45 | So, we need to consider changing the master cylinders and if we increase the size of the master cylinders, then for the same pedal force, it all kind of goes in the opposite way, we will get less pressure in the brake fluid and, so yeah basically, if you increase the caliper piston area and then you want to keep the displacement of the pedal, so the pedal moves about the same amount when you press it, then you increase the size of the master cylinder, then you're basically going to decrease the pressure, which takes away from that increase in force at the other end. |
| 45:24 | So, there's a little bit of a trade off happening there and you can use the pedal ratio as well to counteract some of that by increasing the pedal ratio, so you can get more force or pressure or force transferred to the master cylinders for the same pedal force as well. |
| 45:41 | And you can see how this all starts to kind of spiral. |
| 45:44 | We won't go further into any of these calculations here, but hopefully it gives you a little bit of an insight on what you need to consider there. |
| 45:53 | If I just think of an example for Honed [Developments] in Australia, who do a lot of great work on the Honda platforms, they have a kit for the Honda Civic, which is basically using a front fixed caliper off a Porsche. |
| 46:11 | And that caliper I think actually has a smaller piston area than the factory Civic caliper, but it allows you to use a bigger disc while retaining the same brake torque front to rear so the bias of the vehicle stays the same. |
| 46:27 | But you get increased thermal capacity, you get more compliance and you get better pad options and so on. |
| 46:34 | So, it's just different ways to look at upgrading your calipers that don't necessarily mean just getting calipers with the biggest piston area on there to make the most clamping force you can, because generally speaking that isn't actually what you're gonna be after. |
| 46:51 | More often than not what we see is vehicles with massively overbraked rear axles so an example would be one of the first setups that was on our own, SR86 I think it had 350 millimetre front discs and I think 320 millimetre rear discs had the Endless Mono Four R on the rear and the Mono Four on the front, which are a little bit smaller piston area on the rear but basically since then we've kept the same rear brake package and we've moved up to, I think we're at a 370 mil front disc now or maybe even bigger and we've got the mono six caliper on the front and even still the bias is probably more rearward than it needs to be in that case. |
| 47:44 | I was gonna show some photos but I don't actually have them here, but when I was in Japan last at Scuba Circuit looking at the Scuba Attack series, especially looking at their time attack Honda Civics in that case, which are seriously fast cars doing a 54 second lap around scuba is crazy really. |
| 48:07 | And they have factory Honda rear brakes on them. |
| 48:11 | They've upgraded front calipers to endless or spoon calipers or whatever it is but they're just keeping the factory rear brakes on them and also looking at the likes of the ASM, I think, Honda S2000 in that case that's got a single piston rear caliper on it so you can see in a lot of examples that most vehicles don't need anywhere near as much rear brakes as people tend to think. |
| 48:37 | If you look at the likes of a GT3 Porsche for example with a big rear wing and a lot of rear weight bias anyway, you'll notice that the rear brakes in those cases are quite a lot bigger. |
| 48:49 | But again it's just considering the application of the vehicle and that specific vehicle as well. |
| 48:56 | So, on that note I'm just going to, I'll get Jordy to drop a link to our brake system design and optimisation course into the chat and if you're more interested in learning more about this and actually doing these calculations, and as part of that course we also have a brake system calculator spreadsheet that we've developed to do a lot of this hard work for you, I'd recommend checking that course out. |
| 49:23 | But with that I'll just get into some of the questions that we have here. |
| 49:34 | So, Osger, "After calculating pedal box, dual brake master cylinders and caliper piston retraction distances, disc heat expansion, sorry disc heat expansion pad to rotor gap, are those calculatable?". |
| 49:53 | Disc heat expansion to rotor gap. |
| 49:56 | Yeah, that's a little bit tricky calculating the actual how much the disc is going to grow I guess you're saying. |
| 50:07 | Disc heat expansion pad to rotor gap, are those calculatable? So, generally when we're calculating the amount of distance that the pistons need to move, or therefore the pads need to move to take up any distance to the disc and engage against the disc, we'll generally apply kind of a rough rule of something like half a millimetre or so for that gap. |
| 50:40 | To understand if we have knockback or something like that, how much we'll need to move the pedal to actually take up that gap. |
| 50:50 | In this case in terms of the disc heat expansion pad to rotor gap, that's quite a difficult one to calculate, I'm sure you could calculate it, I can't comment on that one. |
| 51:04 | Same one, Osger, "What is the ideal master cylinder to piston area ratio with and without a booster?:. |
| 51:13 | Again, that's just going to depend on the vehicle and the pedal box that you have. |
| 51:19 | Generally, speaking if you don't have a booster you're going to want to increase the master cylinder to the piston area ratio so you increase the leverage over the system and the leverage is, you basically want to match that leverage to whatever bias you're targeting once you've transferred that weight. |
| 51:38 | So, let's say you are braking at 1.2 Gs or something and you have a distribution of, front weight distribution of 55% in your vehicle and then after you've transferred that weight, depending on your centre of gravity, height, your wheelbase, things like that, you've transferred and you now have 70% of the weight on the front axle compared to the rear axle, then you can target having something like a 70% of the hydraulic leverage on the front circuit compared to the rear and that will basically help you keep your master cylinder to piston area size in check and be a decent starting point anyway. |
| 52:25 | But again it just depends on the vehicle. |
| 52:28 | What I'd recommend is checking out our brake system course for that and using our calculator in that case will help you with a lot of these calculations. |
| 52:39 | Clayton, "Can I add more rear bias to a C706 Corvette time attack car with pads only on the OEM iron brake system?". |
| 52:52 | Yeah, definitely you can add more rear bias with the pads only, just increasing the coefficient of friction of the rear pad is going to do exactly what you're talking about, if we just look back over the overhead here, then increasing that value there , which is mu will increase the friction force and then you're increasing the torque and if you're just doing that on your rear axle relative to your front axle then that is going to increase the rear bias just like you said. |
| 53:22 | Another thing that you might wanna consider there is the coefficient of friction of the brake pad actually changes with heat. |
| 53:32 | So, generally what people, this is a technique that's being used is using a rear pad as a high initial bite, so the heat, sorry, as the heat rises, well as the heat is cold, sorry, as you first hit the brake pedal, the friction of the rear brake pad is basically higher relative to the front, this is all relative of course, and then as you progress through the stop and heat comes into it, the friction will basically taper off and that can change the characteristics of the vehicle so change the bias actually through the braking application. |
| 54:18 | So, if you think about, as you first hit the brakes, the car hasn't pitched forward yet so the rear tyres are still loaded so you can make more use of having more rear bias in that case. |
| 54:31 | So, it's just something else, another kind of layer to consider is how the brake bias or the, controlled by the pad coefficient of friction in the pad compound changes throughout the stop. |
| 54:45 | Prath and Mesh, "How to check if your sliding caliper pins are faulty. |
| 54:51 | So, really it might be an issue there of just having the car on axle stands and unbolting or taking the front wheel off the car and having someone else just apply the brakes and looking at the actuation of them. |
| 55:07 | Past that you can obviously take them off, pull them apart and use some grease, and specifically I think you want to use brake caliper grease, that's not gonna, and keep that away from your pad and your disc surfaces obviously. |
| 55:22 | But that is how they're maintained, just to make sure that there's no issues there with them sliding. |
| 55:28 | So, that would be a good place to start. |
| 55:32 | Levolvo, "Are there any other differences I assume, are there any other differences between an internally and externally connected caliper sides besides just how they're connected?". |
| 55:49 | So, I think what you mean here, in this case if we look at this Whirlwood one, we have this external bridge here going across the part, and this one here, our AP Racing one, in this case we'll have internal plumbing, basically where I think there'll be a passage through here and there'll be O ring seals between the clamping surfaces. |
| 56:16 | In this case, basically it comes down to manufacturability for the manufacturer of the caliper, if they do it like this then you can have, it kinda depends on the orientation that the caliper will be mounted in. |
| 56:36 | But in this case if it's like this then you can just change this over and then the caliper can be mounted the other way up, in this case with the bleed nipples at the top, so it just allows them for a little bit more flexibility and it's one of the ways that they take cost out of a product as well. |
| 56:53 | In this case for the AP Racing one here, it has internal passages, it doesn't matter so much because this has staggered pistons , which means it will be directional anyway and it can only be fitted to one side of the vehicle. |
| 57:09 | But they still in this case have the two bleed nipples depending on if it'll be mounted in front of the front axle or behind the axle, you can still have those two there. |
| 57:21 | So, I would say there's no real main performance advantage to it, I think it would be beneficial to not have it in a lot of cases, especially for a rally or something like that where you get gravel sucked up inside the wheel and you could damage the bridge here, it would be beneficial not to have it but I think that probably comes down to some of the cost involved in moving to a caliper like this too. |
| 57:50 | But I mean if you look at our Endless Mono 4 here as well, that has the bridge here externally plumbed so I don't think there's probably too much issues with having that external Parsi manufacturability and things like that. |
| 58:13 | M. Dubois, "How does radial scoring affect performance?". |
| 58:20 | Radial scoring, I'm not sure, I can't comment on that one, sorry, I'm not 100% sure what you're talking about. |
| 58:32 | "Where do you find high temp pistons and or dust seals?". |
| 58:36 | So, basically just on the supplier's website they should kind of have features like that quoted on the specifications of the caliper and that'll generally depend what they've been designed for. |
| 58:51 | For example, on the Endless website they have a section for their road racing calipers, their street calipers and also their rally calipers and they'll have the different specifications for those as well. |
| 59:07 | So, that would be where you'd find them and in terms of suppliers that are selling those separately for other manufacturers' calipers, I'm not 100% sure, haven't actually seen that but yeah. |
| 59:26 | In terms of each supplier should be able to sell obviously rebuild kits for their own calipers and you'll be able to find any seals there for that specific caliper. |
| 59:59 | So, world's first, "Do you set the brake bias before or after you set your suspension stiffness?". |
| 01:00:06 | So, that's an interesting one because it's kind of commonly, if you think about it, the suspension stiffness and the amount of anti dive and things like that, or anti squat, no anti dive in the case of brakes, you'd think that that has a significant impact on the brake bias. |
| 01:00:26 | The brake bias is more of a function on the, how do you put this, steady state weight transfer. |
| 01:00:37 | So, yes you're right, the suspension stiffness and things like anti dive affect the brake bias as you're transitioning onto the brakes, but once you're on the brakes and the car is stopping at that kind of constant G force, that is more where you set the brake bias. |
| 01:00:55 | Past that, so you can set that up based on kind of calculations and things as a starting point, but then past that it's just a matter of adjusting your brake bias from testing on the track. |
| 01:01:10 | So, that might just be using a spotter to check for brake lock ups or using wheel speed sensors and data and things like that and in that case you're going to be doing that after the suspension stiffness as well. |
| 01:01:24 | So, and then the actual transient brake bias is, like I said before, think about how the coefficient of friction of the pad front to rear changes and therefore the brake torque changes throughout the stop. |
| 01:01:38 | That more comes down to things like suspension stiffness during that weight transfer and things like anti dive as well. |
| 01:01:45 | So, in response to your question then I think you'd set the brake bias, you set the main brake bias kind of before and that's based on the steady state, but then you can tailor that a little bit to how you want the car to react as you apply the brakes as well and that'll kind of be set after the suspension stiffness. |
| 01:02:06 | But yeah, there's a lot more that goes into it there with adjusting the compression and rebound damping as well, the rebound on the rear axle and the compression on the front as you apply the brakes. |
| 01:02:22 | So, Prathamesh, "Does the location of the caliper change the centre of gravity of the vehicle?". |
| 01:02:29 | This is something I've looked into a little bit recently about the position of the caliper and generally, we don't have an upright here, oh we do actually. |
| 01:02:38 | So, this is a suspension upright of an S14 and you'll see generally speaking that the caliper mounting tabs here are just going to be on the opposite side to the steering knuckle, basically just for serviceability to keep those two out of the way of each other. |
| 01:03:00 | Generally though, what we're going to want to do is have the brake caliper sitting in a somewhat vertical position here and usually the manufacturers specify anything from kind of between plus or minus 15 degrees or so and that's just for bleedability, so to make sure when you bleed the calipers you can remove any air bubbles out of the top bleed nipple there. |
| 01:03:28 | In terms of having that mounted lower, then yes there is unsprung weight lateral load transfer as well that goes on. |
| 01:03:40 | It would be beneficial to have it further closer to the bottom but it's getting pretty kind of diminishing returns I'd say at that point. |
| 01:03:51 | I would consider first mounting it where it makes sense to make the most, I guess tidy bracket that is going to also give you the most stiffness before I'd consider lowering the centre of gravity so there's other things to consider there as well. |
| 01:04:11 | But if you do have the choice, all other things being equal, then having it lower would be better but then you also need to consider, depending on the application, that having it lowered down and depending on the position of it and the offset of your wheels and things like that is going to have an influence on things like the exposure to debris and things like that as well. |
| 01:04:39 | So, a lot of things to consider there. |
| 01:04:48 | Andre, "Is there an ideal bias to ideally dial in with front wheel drive, mid engine or rear wheel drive?". |
| 01:04:57 | Again, it just depends on your vehicle, typically, and it depends on what type of tyres you're using and the amount of load you're transferring, but a lot of it comes down to, with the amount of load you're transferring, so the deceleration that your vehicle can manage and that depends on the tyres and the kind of static weight distribution of the vehicle. |
| 01:05:25 | So, if you're for example at 50-50 static weight distribution and as you transfer a certain amount of load you end up at 60%, then you're gonna want to roughly target about 60% bias, but generally speaking for something like a front wheel drive vehicle like a Honda, you're gonna be at about 60-65% static weight distribution and then as you shift that forward you're gonna be closer to 70-75-80% weight distribution and then that's roughly what you'll be targeting in terms of the brake bias, because that'll give you a kind of more ballpark for the brake torques that you'll end up with and it all comes down to the tyre forces and things like that, which we discuss everything to do with in the brake course. |
| 01:06:18 | Generally areas, rough ranges that I'd say the brake bias on a front wheel drive front engine car is gonna be something like I just said between around 75% maybe all the way down to 65 or something like that for a front wheel drive car, something rear wheel drive front engine might be closer to 60% but it really depends on how far forward you're shifting that way, it's probably closer to 70% still for rear wheel drive cars and something mid engine or rear engine you could be shifting back but, even if you look at something like a GT3 Porsche like I said before with a lot of weight over the rear and rear aero and things like that, they still have a larger front braking package than the rear but it gets closer and closer as you shift that weight further back. |
| 01:07:16 | But it could be all the way up to something like 80% even for a front wheel drive car. |
| 01:07:26 | Just got one more question here. |
| 01:07:30 | So, Frank "Hi, just a question on your turbo manifold, although you go through the effort to build a bespoke manifold, why did you not try to balance the port lamps?". I assume the runner lamps, I understand this is a turbo application. |
| 01:07:45 | So, yeah absolutely, ideal world you'd balance so it was all equal length. |
| 01:07:51 | In this case there's just not room for that, which is basically what prompted it to be a bespoke manifold in that case. |
| 01:07:58 | And you could, where is it, you could increase the length of all the runners in that case but I think the gains that you'd get out of that were kind of outweighed in this case by the packaging because you'd basically have to have it all coming forward to the front of the engine. |
| 01:08:18 | But yeah, if you had the ability to balance them, it would be better, I completely agree. |
| 01:08:25 | The other thing that you'd have to consider by changing that whole shape of it would be things like wastegate priority and just the, if you're changing the length of the runners and their orientation then how that actually flows into the flange might not be best for wastegate priority and things like boost control. |
| 01:08:47 | In this case all of those things were definitely considered, but it's always just a way off. |
| 01:08:52 | And at the end of the day when you're talking about a Volvo, that'll be, you know, it could possibly make good power, but generally speaking it's just a street car in this case. |
| 01:09:03 | And a very old dated engine, it's just not really a motorsport application. |
| 01:09:08 | Then doing that to increase the efficiency by a couple of percent at the expense of a lot more material. |
| 01:09:17 | That's probably the other thing I didn't talk about with this. |
| 01:09:20 | This is gonna be kind of designed with it being cast in mind. |
| 01:09:25 | So, the increase in size would result in an increase in tool cost and material cost, but he's also thinking about possibly getting it 3D printed from stainless steel runners as well, because the cost of that's actually coming down to the point where if he got it cast and paying for a tool, you'd have to sell so many of them and then that's a trade off for kind of the manufacturing to pull back the money from that but rather than that, spend a little bit more, get it 3D printed and then you don't have to worry so much about that payoff, it just depends on how many you're making and things like that. |
| 01:10:01 | If you made it a lot bigger to try to get those runners to equal length then, in terms of if you're gonna 3D print the manifold, then that's a massive increase in price, you'd probably double the price of it. |
| 01:10:15 | Because that's all based on the weight of 3D printing metals, the more material you have increases the price of it significantly. |
| 01:10:24 | So, a few things to consider there, I know that's probably not the best answer in a perfect world, yes you'd have them equal length but there's a lot of other factors that kind of come into it there. |
| 01:10:41 | Alright, that looks like the end of those questions so I'll just wrap that up there. |
| 01:10:45 | Again, if you're interested in learning more about brake calipers, braking systems in general, I'd recommend checking out our brake course , which I think Jordi would have dropped the link to in the chat. |
| 01:10:57 | So, go check that out and we've got a lot in there on doing the calculations and the actual calculator to help you with that. |
| 01:11:04 | More things like practical skills, even just bleeding the braking system and taking measurements on temperature and being able to analyse the system and really understand what's going on. |
| 01:11:17 | So, I'll wrap that up there and we'll be back next week with another webinar. |
| 01:11:21 | Thanks for watching. |
0:00 - Introduction
2:46 - What makes good braking performance?
5:23 - Major brake factors: heat
8:29 - Caliper stiffness & unsprung weight
10:49 - Brake pads characteristics
13:46 - Brake piston characteristics
19:33 - Types of brake calipers
33:54 - Extra features like anti-knockback springs
36:31 - How to upgrade your calipers
49:23 - Q&A


