This offseason we’ve been steadily working on upgrading our SR86 endurance car* for the upcoming season (*an SR20VET-swapped Toyota GT86). One of these upgrades includes a change to Hitachi ignition coils from a VR38DETT, but this hasn’t come without its own set of hurdles to overcome - the focus of this article being the need for a new wiring junction box on the bulkhead behind the hot side.
When it comes to harsh engine bay environments, nothing is quite as brutal as a forced induction endurance car and we’ve seen our fair share of melted components. Luckily for us, carbon fibre can withstand extremely high temperatures while also being lightweight and strong. That is why we opted to design and construct our own carbon fibre part to mount the autosport connectors and house some of the wiring.

Designing and producing your own carbon fibre parts can seem like a luxury afforded only to professional motorsport teams but we’re here to show you this simply isn’t true. They are skills you can learn and put to use in your own garage. Here’s how we did it, and how you can too.
Designing Your Custom Part
Any custom component project starts with design. Well actually it starts with a problem that needs to be solved, and then a concept and hypothesis of how to solve it. After that, you can get down to design.
In this instance we began by designing the part in CAD first - specifically Autodesk Fusion 360.
This allowed us to do three crucial things:
- See how the autosport connectors would fit
- Get an idea of what the part would look like
- Conceptualise how it would work
Test Your Concept
Prototyping is an often overlooked but crucial stage of the production process. In order to physically see our custom part in the car and be sure it would fit in the location we wanted we first produced a 3D printed prototype using PLA filament with our Creality CR10S Pro Printer.
Of course, not everyone is going to have access to the same tools but that doesn’t make the process less valuable. Producing a prototype of your design early on that you can test can, and probably will, save you hours of trouble later in your project.
After testing, a few necessary adjustments were made and we could move on to production.
3D Printing Your Custom Part
Once we were happy with the design, the CAD model could be reversed to make a mould for constructing the part from carbon fibre, which was also 3D printed. What’s important here is that the mould has no overhangs, and ideally, a positive draft on the surfaces so the part can be removed without difficulty.

Because the printer builds up layers upon layers of material to make the 3D part, we get a lined surface texture, which isn’t something we want to carry over to the final part.
To fix this, body filler was applied to the mould surface and then sanded flat for a nice smooth finish. Next, a release agent was applied to the surface so the part could easily break free of the mould when cured.
Carbon fibre reinforcement fabric was next laid into the mould and wetted out with high-temperature epoxy resin before being vacuum-bagged for the curing process.
Once cured, the part was released from the mould, excess material was trimmed off, and the edges were finished with perma-grit tools.
Implement Your Solution
After that, it was simply a matter of drilling holes for the connectors and of course, completing the wiring work.
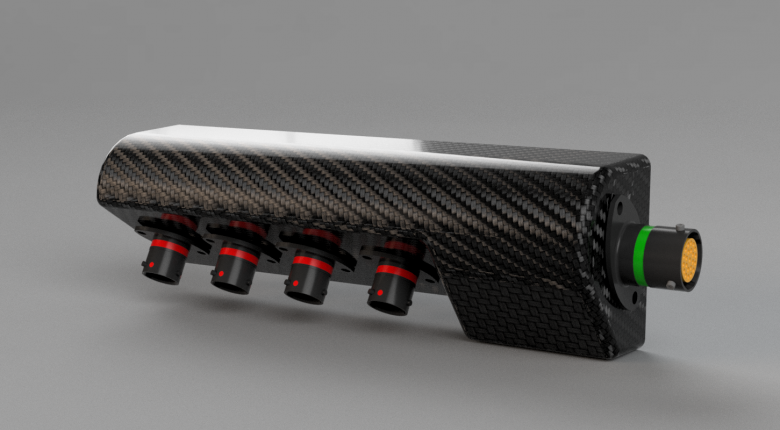
With the part fitted in the car, the result is a tidy lightweight junction box that should withstand the abuse of extended periods of continuous racing without ending up in a steaming puddle on the pit garage floor.

How You Can Learn These Skills
This wiring junction box is just one example of the countless ways you could use CAD combined with 3D printing to produce custom parts for your project. As with most technical skills, 3D modelling and CAD can be broken down into an easy-to-follow, step-by-step process, and that’s exactly how it works in the 3D Modelling and CAD for Motorsport course.
If you’re looking to learn how to use these tools to make progress on your garage project this course will help and save you hours of precious time down YouTube rabbit holes. It comes with a 60-day money-back guarantee and can even be broken down into 8 weekly payments while still getting instant access to the course material. If you’re ready to start learning click here and enroll today.


