Whether you’re rebuilding a factory engine with a stock bore size or you are going to an oversize bore and fitting factory oversize pistons and rings, in most cases, the rings come pre-gapped, meaning they’re already set for the bore diameter. This means that once installed, they’re good to go. When fitting an aftermarket forged piston, however, you will most likely be working with ‘file-fit’ piston rings. In this article, we’re going to explore how to select, measure, and adjust your ring end gaps to help achieve a reliable ring seal in your engine building project.
Let’s start with the obvious question — why don’t aftermarket manufacturers simply supply piston rings that fit, as you’d expect with a factory piston? This is to allow you, the engine builder, to select ring end gaps that suit your application. The idea with file-fit rings is that you adjust the gap when the rings are at room temperature (20ºC) so that when the rings heat up and expand under operating conditions, the gap will be minimal but won’t risk the ends butting together. A minimal gap also means a minimal path for combustion gases to escape through into the crankcase which can result in a small but measurable increase in power, and also decrease oil consumption.
In this article: How To Choose The Right Ring End Gap | How To Measure Piston Ring End Gap | Adjusting Ring End Gaps | Optimising Your Ring Gaps | Running In | Conclusion
How To Choose The Right Ring End Gap
When choosing your ring end gap at room temperature, you need to consider the amount of heat the ring will be exposed to and also the material it’s made of or, in other words, the coefficient of thermal expansion. The amount of heat the rings will be exposed to will depend on your engine and how you’ll use it. A high-boost turbocharged engine, for example, will produce more combustion heat than a naturally aspirated engine, while the combustion of pump gasoline will create more heat than an alcohol-based fuel such as E85 or methanol. Of course, the amount of time you spend at wide-open throttle will also be a factor here.

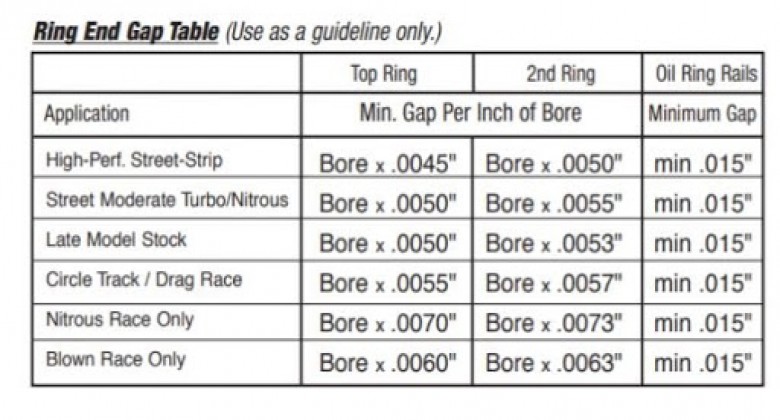
Luckily you won’t be flying completely solo when it comes to choosing your ring end gaps — the ring manufacturer will provide you with some recommendations like those shown above from JE for our Subaru FA20 piston rings. As you can see, for a high performance street/strip application, a minimum end gap of 4.5 thou per inch of bore is recommended, so that means if we have a 3.386 inch bore, we multiply that by 0.0045 to arrive at our recommended end gap of 15.2 thou. With a figure like this, we’d be safe to round the result to 15 thou, as it’s very difficult to work to more accuracy than 1/1000th of an inch. You might be thinking, shouldn’t I be rounding up, not down? Typically recommendations from manufacturers are quite conservative to avoid rings butting in use and damaging their customer’s engines. As a general rule, if the calculated result is 0.5 or larger then we should round up, however with a result of 0.4 or less we can round down.
As you can see, the recommended end gap for the second ring is half a thou per inch of bore larger than the top ring, which doesn’t initially seem to make much sense as the top ring is being exposed to more combustion heat and will, therefore, expand more than the second ring. It used to be that the accepted technique was to gap the second ring tighter than the top ring for this very reason. The reasoning behind this is that even with your top ring end gap set perfectly, you will still end up with some combustion pressure escaping past the top ring. If the second ring gap is optimal then the theory is that pressure can build up between the two rings which can destabilise the top ring, negatively affecting its seal. By having the second ring end gap a little larger, it allows this pressure to continue on its path into the crankcase.
To summarise, you want to select the tightest ring end gap possible in order to minimise blow by, reduce oil consumption, and increase horsepower. If you take this too far, however, the rings can butt together, possibly resulting in the rings seizing in the bore, which can damage the cylinder wall, rip the crown off the piston, and in severe circumstances, the conrod will push the wrist pin out the bottom of the piston and then exit through the side of the block.
How to Measure Piston Ring End Gap
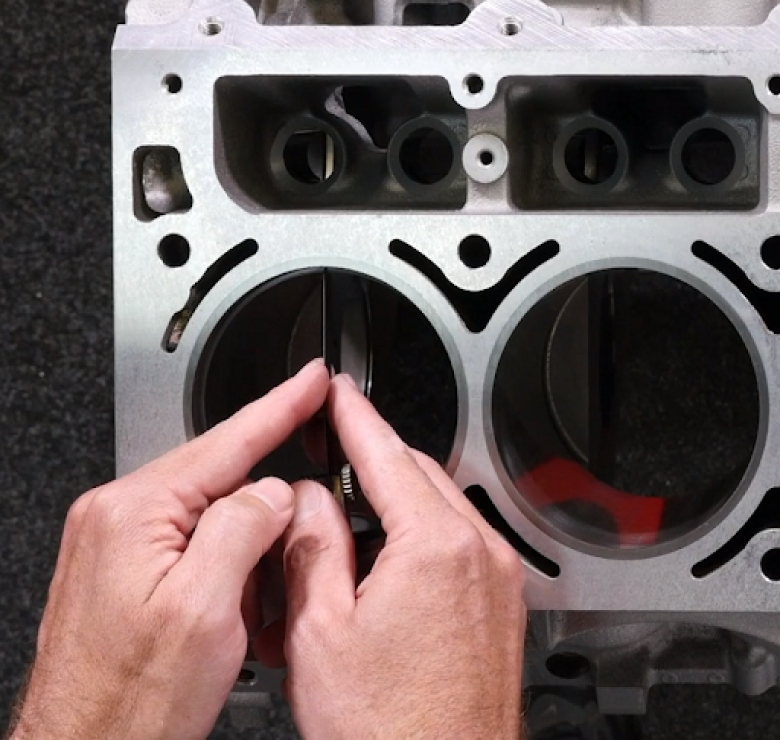
In order to measure your ring end gap, once the ring is located in the bore, you need to make sure that it’s an equal distance down from the top on all sides — or in other words, it’s square. This can be done with a piston ring squaring tool, which has little pockets that locate on the top of the bore and makes sure the ring is located squarely, the right distance down the bore. As well as measuring the ring end gap, you also need to take note of whether the ends are parallel to each other. If not, this will need to be taken into account when you adjust the ring end gap.

Once you have determined whether or not the gap is parallel, you can begin measuring it using a set of feeler blades and going up in size until you feel a moderate amount of tension. In our case, this occurred with the 14 thou blade. As we discussed, our ring end gaps need to be 15 thou so we will need to remove a small amount of material.
Adjusting Ring End Gaps
Adjusting your ring end gaps is done with a piston ring file and there are two options when it comes to this — manual or electric. If you’re only going to build one or two engines, it’s hard to justify the USD$300-400 expense of an electric ring file, as a USD$40-80 manual ring file can still do a perfectly-good job if used carefully. If, on the other hand, you’re planning to build multiple engines and perhaps you’re even setting up your own shop, the cost of an electric file will rapidly pay for itself as it will provide faster, more accurate, and more consistent results.

An electric ring file has a dial indicator which, when zeroed before use, means you can be very accurate with how much material you’re removing. It also has an adjustable stop that allows you to set the bore diameter that you’ll be using, and this helps make sure you keep your ring end gaps parallel. This makes it easier to keep good consistency across all of your rings as you will need to gap multiple rings for one engine. To begin removing material, you need to locate the ring in the file with the end protruding just past the table (often the ring grinder will have a stop that the ring is located against) and then bring the ring down until it just contacts the grinding wheel. You then zero the dial gauge and start filing. It’s always a good idea to go slowly when you’re grinding your rings, removing small amounts of material and checking your work frequently. It’s easy enough to put the ring back in the file and remove more material if your gap is still too tight, but if you go too far then it's a costly error as the only solution is a new set of rings.

If you opt for the cheaper manual ring file, you can achieve great results — but there are a few things to keep an eye out for. Firstly, the handle that turns the grinding wheel can be turned in either direction, just make sure you’re grinding from the outside of the wheel to the inside. A lot of piston rings have an inlay on the outer surface, so if you grind from the inside to the outside, the grinding wheel can tear that inlay out of the ring. Another common mistake a lot of people make is to squeeze the ring together against the grinding wheel and grind both sides of the ring at the same time. Not only is this unnecessary, but you’ll also guarantee that your ring gaps won’t be parallel unless you want the gap to be the same width as the grinding disc which is very unlikely.
Regardless of which option you choose, the process of removing material is likely to leave you with a small burr on the ring where you’ve ground it, which needs to be removed before you install the rings onto the piston. This can be done by gently running a needle file against the edge of the ring, being careful not to create a chamfer. It should only take a couple of light passes with the file to remove the burr.
Optimising Your Ring Gaps
As we mentioned earlier, the ring end gap recommendations provided by the manufacturer are always going to be on the conservative side. There is nothing wrong with sticking to these but if you want to extract every last horsepower out of your engine, there can be an advantage that comes with adjusting and optimising your rings, something that is particularly important if you’re running in a controlled race class where you are otherwise limited with what you can do to your engine.

This can be difficult to do unless you see the same engine repeatedly as it comes back to be stripped down after being run hard. If you have this luxury, you then have the opportunity to see what the ring end gaps look like and whether there is any potential to tighten them. Before the engine gets to the point of having the ends butt severely, causing a lot of damage, you should be able to see some more tell-tale signs of this starting to occur. If your ring ends look polished, this is a clear sign that you went too far and would want to increase the end gap by a couple of thousandths of an inch. If, however, there is no polished appearance and you are willing to experiment, you can rebuild the engine with a new ring set with slightly smaller end gaps. Throughout a few engine builds, you can decrease the end gaps by 1/1000th of an inch each time until you arrive at the optimal gap for that engine.
Running In
While not specifically related to your ring end gaps, the running in process is an important factor when it comes to achieving a good ring seal. With that said, there’s a lot of misinformation out there. Many people think that this process exists to bed-in the bearings against the crankshaft journals, which of course is not the case as any metal to metal contact will result in engine damage that no amount of gentle running in will fix. There should instead be a film of oil protecting these components. The main thing we’re trying to achieve during the running in process is to bed the rings against the cylinder walls, taking advantage of the fresh hone pattern to properly seat the rings to the cylinder walls. With modern honing techniques and rings, this is a process that’s hard to mess up but having said that, it’s still a good idea to work through the process methodically.
When it comes to running in your engine, you’ll want to use a mineral based oil or a specific running in oil, as some of the full synthetic oils on the market are so slippery that they can stop the rings from bedding in correctly. There are specific running-in oils but in general, these are very thin and when running in a high performance engine, it is best to have the protection that a thicker, good quality mineral-based oil provides. If you are determined to use a running in oil, select one that’s designed specifically for performance or race engines.
When running in your engine, it’s important not to baby it as you need to apply a moderate amount of load to force the rings out against the cylinder wall to ensure they bed against the hone pattern. You will, however, need to intermittently allow the rings time to cool down as the friction between them and the fresh hone pattern generates a lot of heat, cycling between moderate load and backing off the throttle works well. It’s also important to vary the rpm, starting out between 2-3000 rpm, and gradually increasing the rpm range as you progress through the process. You have quite a limited amount of time in which to bed your rings before the hone pattern is smoothed out — about 85% of your ring bedding is completed in the first 100 kilometres and by the time you’ve got to 200 kilometres, the running-in process is about as complete as it’s ever going to get. After this, gently running in your engine will have no added benefit, you may as well get out and enjoy your car!
Conclusion
As you can see, selecting, measuring and adjusting your ring end gaps is a relatively simple process, particularly if you’re sticking with the manufacturer’s recommendations. With a bit of care and precision, you can achieve accurately-gapped rings that will give you the peace of mind to go out and enjoy your car without the ring ends butting together.
If you want to learn how to gap a piston ring in real time, sign up for the next free live Introduction to Engine Building lesson.


